Gross Beat is the go-to plugin for many trap producers. However, you can use it in practically any genre.
So what makes Gross Beat special? And why do so many producers praise it?
In a nutshell, Gross Beat allows you to manipulate audio in unprecedented ways.
You can stretch, stutter, reverse or scratch your audio. And a lot more, in just a few clicks! However, it can be a bit tricky to wrap your head around it. So in this guide, we’ll cover every detail you need to know:
- The Gross Beat Interface
- What makes it so special
- Who to draw volume and time envelopes
- My 5 Secret Gross Beat Tricks 👀
Ready? Let’s dive in 👇
So… What is Gross Beat? 🤔
So, what is Gross Beat? And why do you see it in so many YouTube tutorials?
Gross Beat is a real-time audio manipulation effect. It can warp the pitch, timing, volume, and more of any sound source.
Gross Beat is a native FL Studio plugin available in the Signature and All Plugins bundles. It can also be purchased separately if you have a lower version, and works in any DAW:
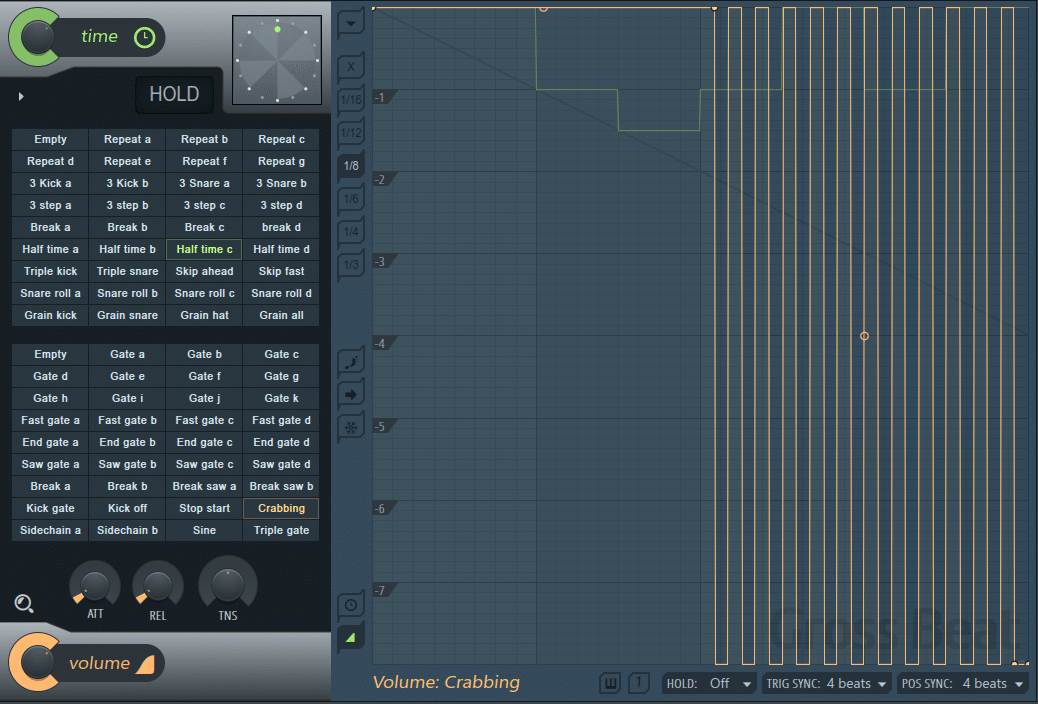
The plugin features 72 preset slots: 36 for time manipulation, and 36 for volume manipulation.
Each slot has its own editing window. This means you can create up to 72 different mapping envelopes.
You can then easily switch between them with your MIDI keyboard (but more on that later). If you’re a bit confused, don’t worry. Here’s a quick example:
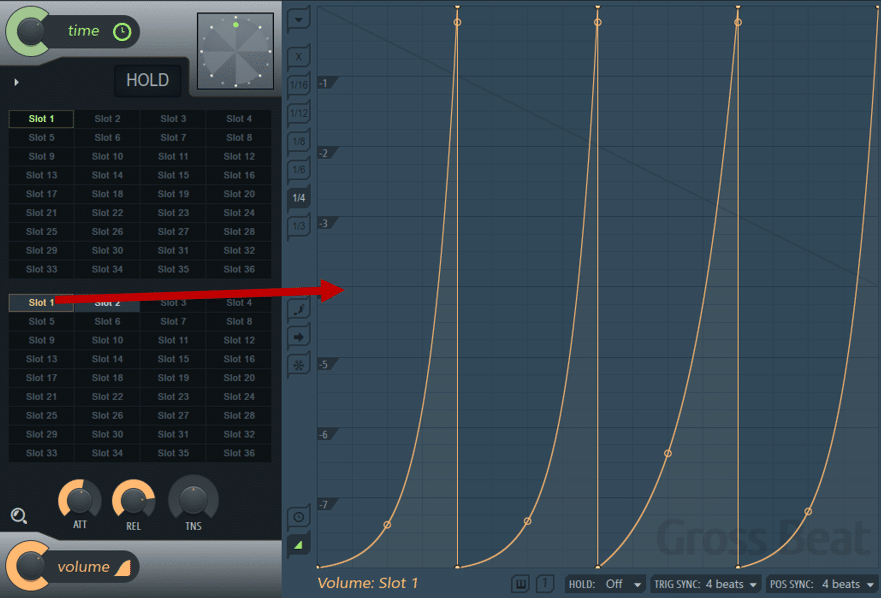
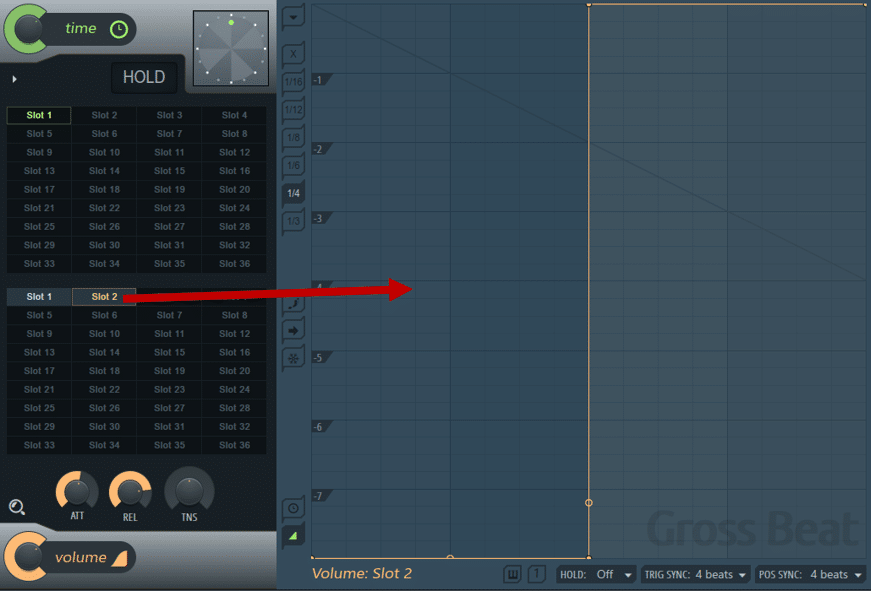
Here are some audio examples so you get the idea:
With Gross Beat, you can easily create:
- stutter effects
- vinyl effects
- repeat looping effects
- reverse effects
… and a lot more! Let’s dive in and see how this bad boy works. 👇
Overview of the Gross Beat Interface 📺
When you open up Gross Beat for the first time, you’ll be greeted with this window:
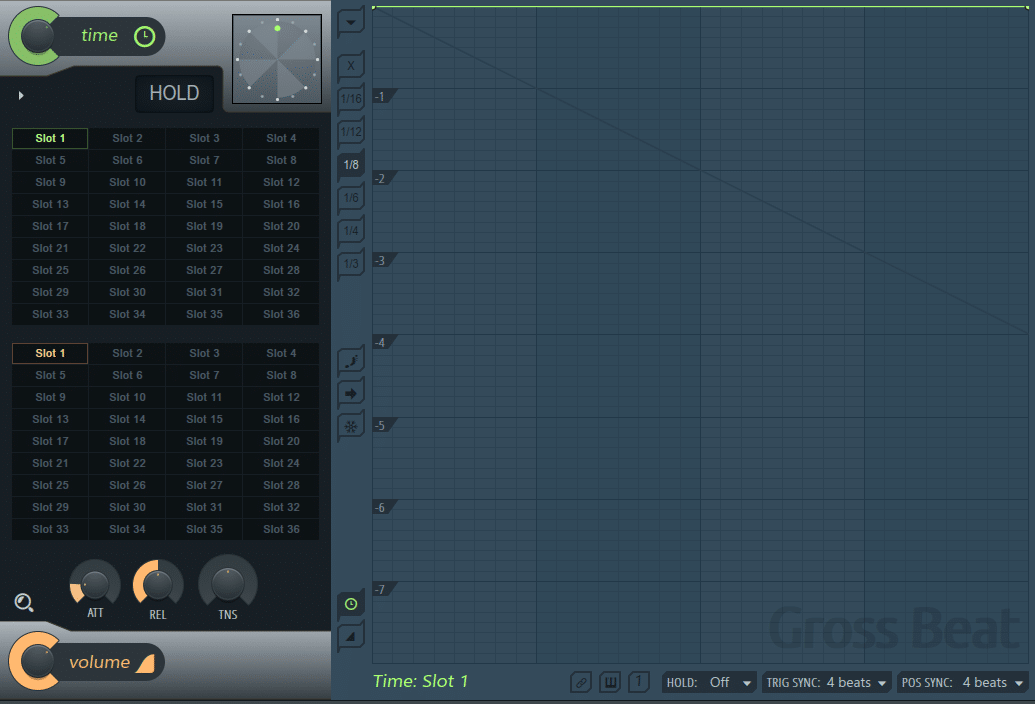
This is the default preset for Gross Beat. You can see each of the 72 slots (36 for Time and 36 for Volume) is empty.
If you want to get instant results, you can load one of the presets:
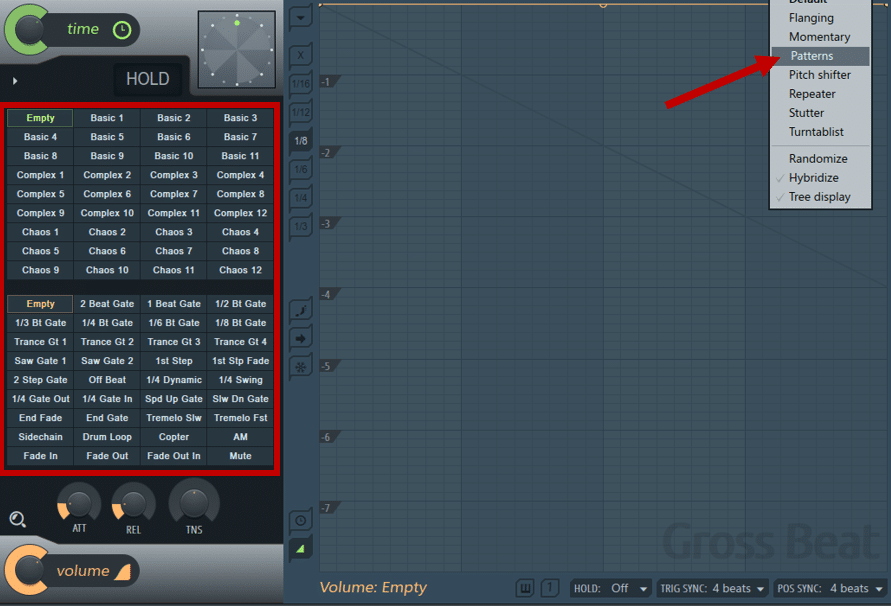
For now, let’s stick to the default preset. Gross Beat is divided into 3 main sections:
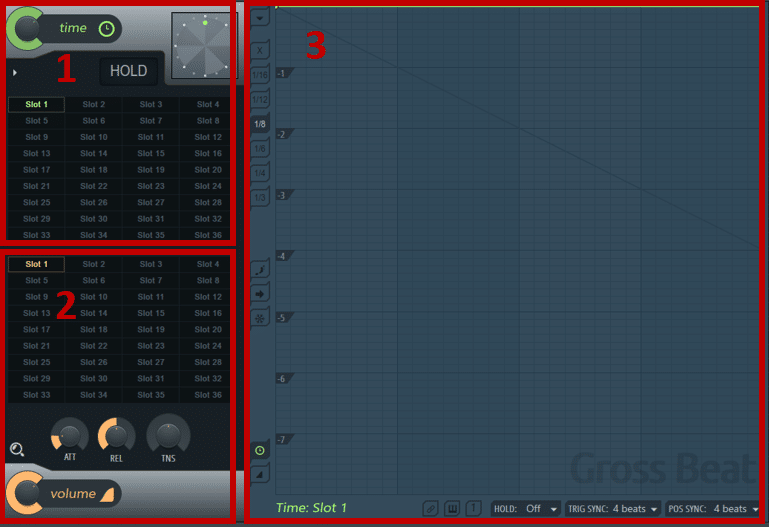
In order, we have:
- Time/Pitch settings and slots. The main Time knob controls the dry/wet amount. You then have 32 slots where your store your time manipulations. At the top right, the scratching clock allows you to manually scratch.
- Volume settings and slots. At the bottom, the main Volume knob controls the dry/wet amount. You also have 32 different slots to store your volume manipulations. At the bottom, you also have 3 separate knobs. These help you achieve a smoother sound when clicks become apparent:
- Attack: smooths the attack volume
- Release: smooths the release volume
- TNS: tension (slope) adjustment for both the attack and release times
- Mapping envelope editing window. This is where you create your automations. As you edit an envelope, changes are automatically associated with the selected slot.
Gross Beat Editing Window: Main Controls 🎛️
Now that we understand the general layout of Gross Beat, let’s dive a bit further.
Editing an envelope is pretty intuitive if you’ve already used FL Studio. Many of the controls and options are similar to general automations in the playlist:
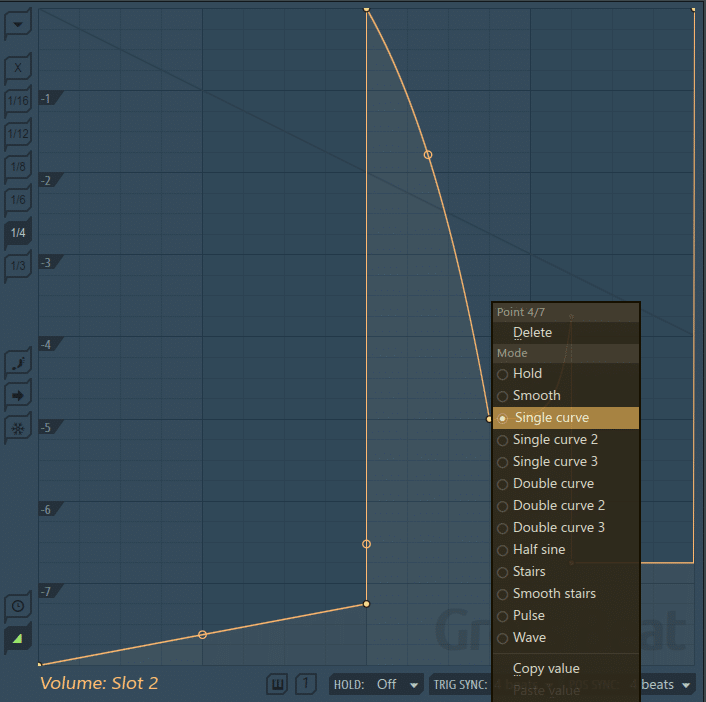
New points are added by right-clicking. To change a point mode, right-click to open the drop-down menu.
On the left-hand side are the “snapping” options. These let you decide where the points snap to the grid.
You can also choose to deactivate snapping altogether by pressing the “X” icon.
Next are 3 more editing options:
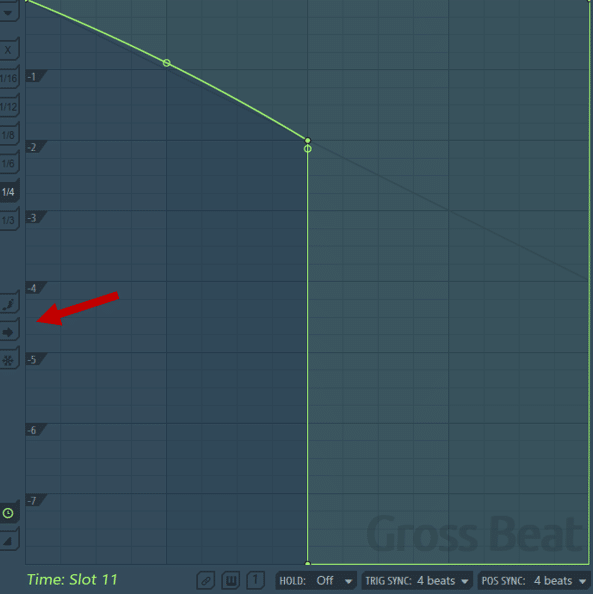
- Step Editing: this will add new control points at each snapping interval
- Slide Remaining Points: all points to the right of the selected point will move as a group
- Freeze Editing: freeze the envelope so no changes can be made
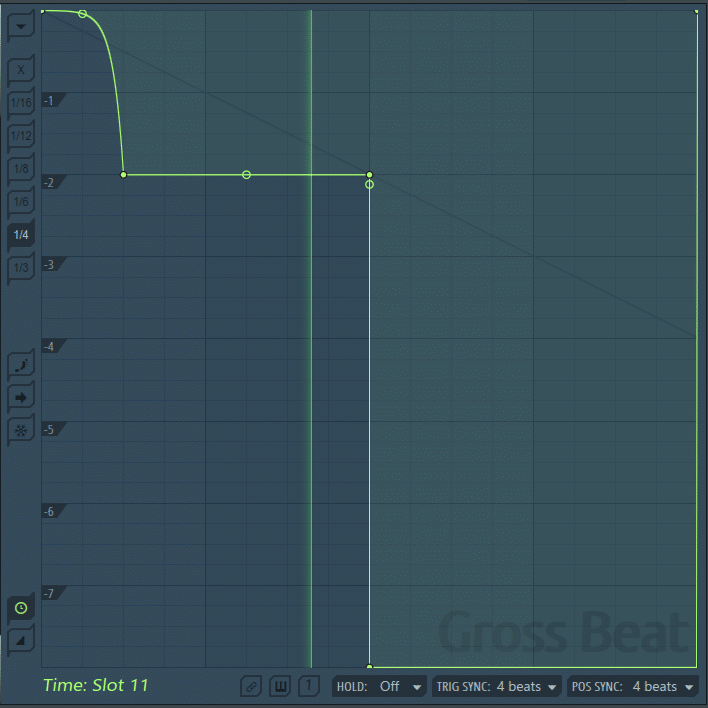
The length of the window is always 1 bar (i.e. 4 beats). During playback, the position of the beat is indicated by a green line:
As mentioned, there are two types of envelopes: time and volume.
With a volume envelope, the top of the window represents 100% volume. The bottom of the window represents 0% volume:
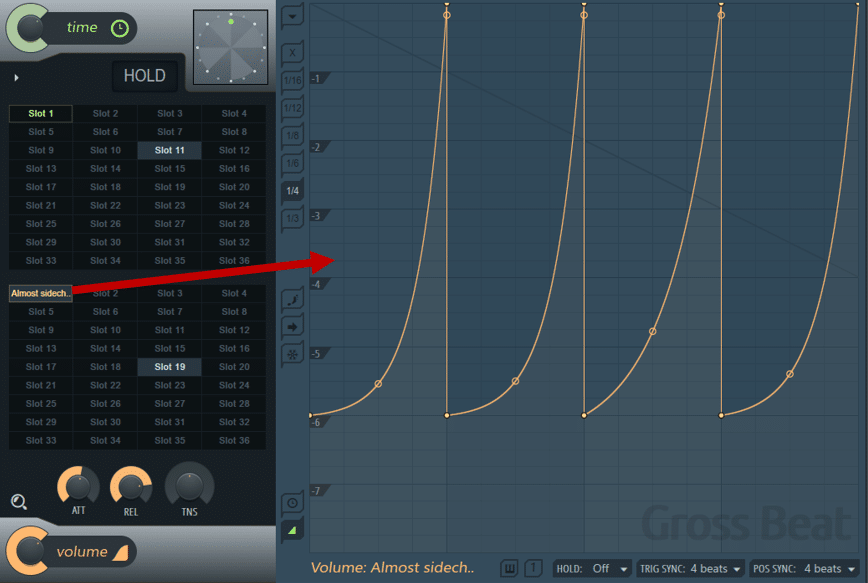
This is what it sounds like:
However, things get a bit trickier when playing with the time envelopes. Let’s explore 👇
Understanding Gross Beat’s Time Envelopes ⏰
So what happens when we draw a time envelope?
Things are going to get messy, so fasten your seatbelt 😅
Remember that I said that the length of the editing window was 4 beats? Well, the height of the window is 8 beats:
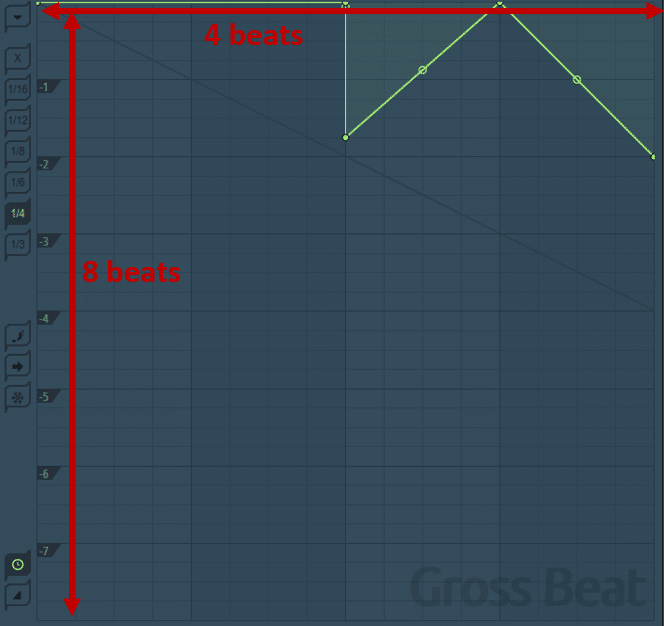
The envelopes you draw will impact three things:
- Playback speed: how fast your sample is played back
- Playback direction: if your sample is played normally (“forward”) or “backward”
- Playback position: what part of the sample is played back
Practically, you can draw 3 types of envelopes. Either your envelope is flat, rising, or falling:
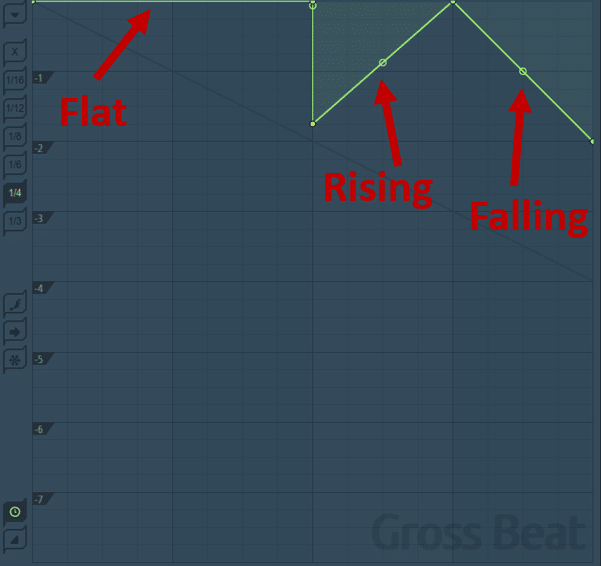
Let’s examine all 3 cases 👇
Drawing Flat Envelopes ➡️
Let’s start with flat envelopes.
A flat envelope will play your audio “forward“, and at “normal speed“. The height of your envelope will determine which section of the sample is played back.
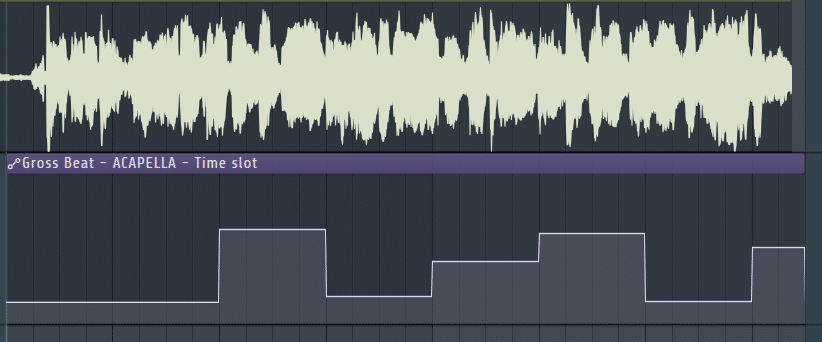
Here’s a quick example of an acapella you’ve all heard before.
If you draw a flat envelope at the top of the window, you’ll just hear the original sample:
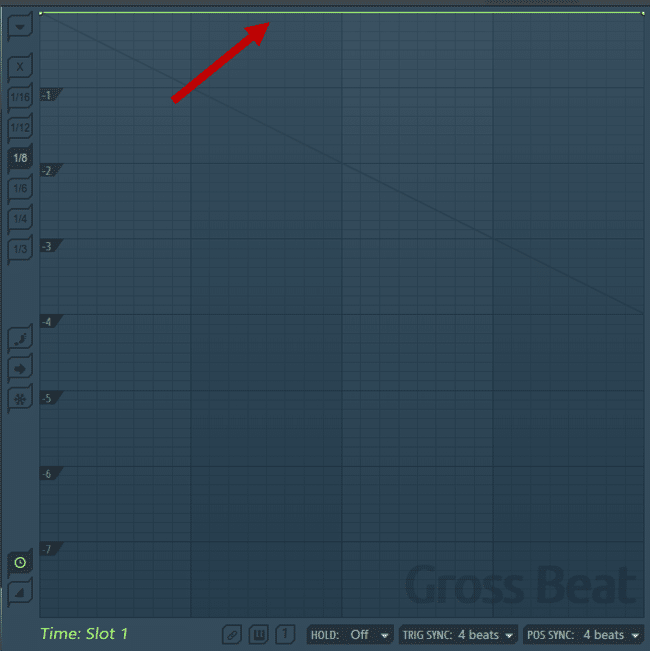
So, what happens if I draw another flat envelope, but a bit lower?
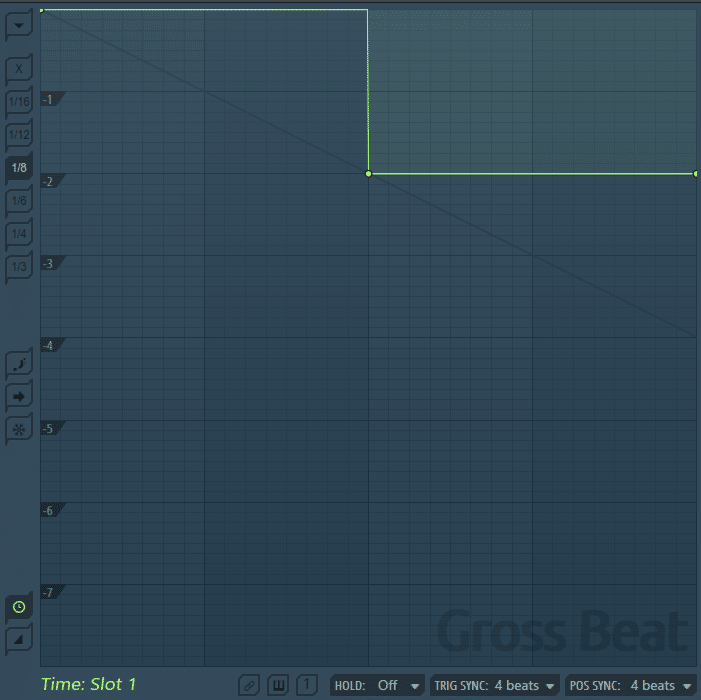
This is what it sounds like:
You can hear that after 2 beats, the audio jumps back. It then plays those same 2 beats again.
That’s because on our envelope, we’ve gone down 2 beats:
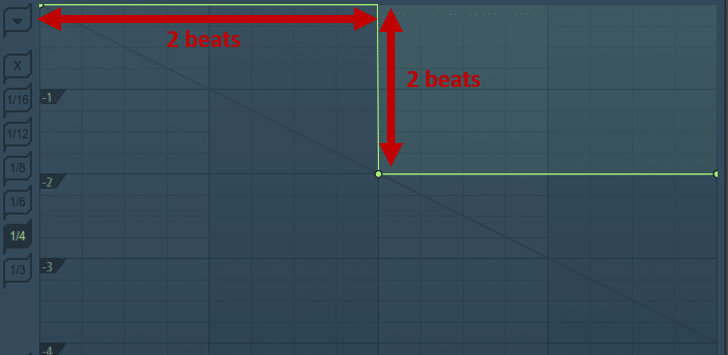
However, the audio is still playing forward, and at normal speed. That’s because we’re still only drawing flat lines.
Looking for more cool ways to manipulate your audio? Check out this video from Aden:
Drawing Falling Envelopes ↘️
Let’s now look at falling envelopes.
As you start bringing the envelope down, your audio will slow down.
Here are 3 examples and how they sound:
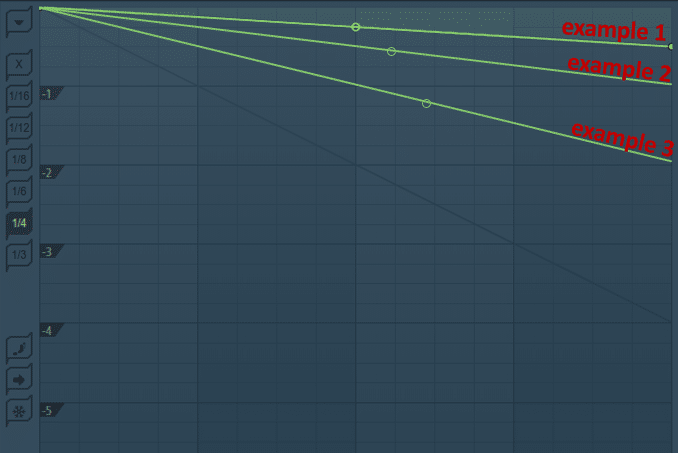
As the audio slows down, the pitch also drops.
If you keep drawing a steeper slope, the audio will eventually start playing backward.
Here’s a quick example:
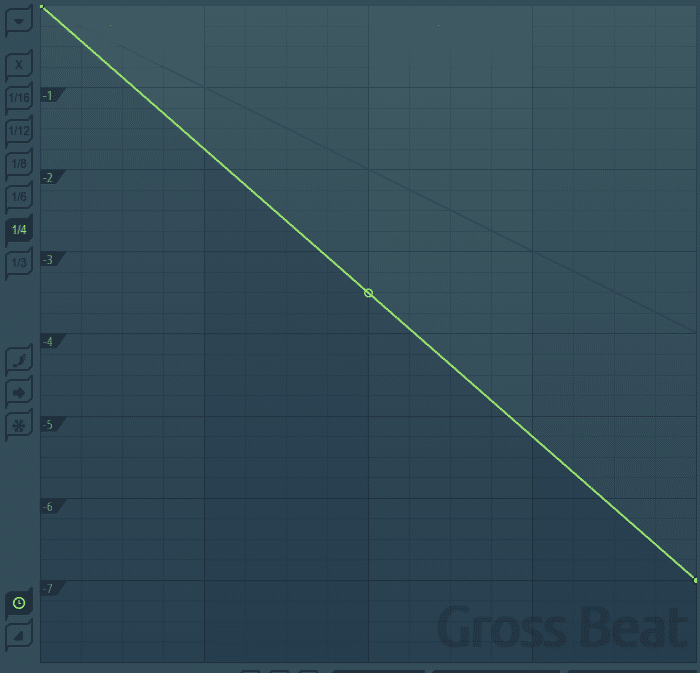
This happens when your slope is steeper than -1. Confused? Let me explain.
Here are some examples of envelopes and their slopes:

So if you’re slope falls below -1, your audio starts playing backward. As you lower the slope even more, the audio will gradually speed up. When you reach a slope of -2, the audio will play backward, but at normal speed.
Note that with a slope of exactly -1, the audio simply pauses.
No sound will be outputted. This is because the audio is stuck between “forward” and “backward” playing.
Drawing Rising Envelopes ↗️
We’ve covered falling envelopes. So now let’s look at rising envelopes.
As you would expect, this will cause the audio to play faster.
As a consequence, the audio will also be pitched up:
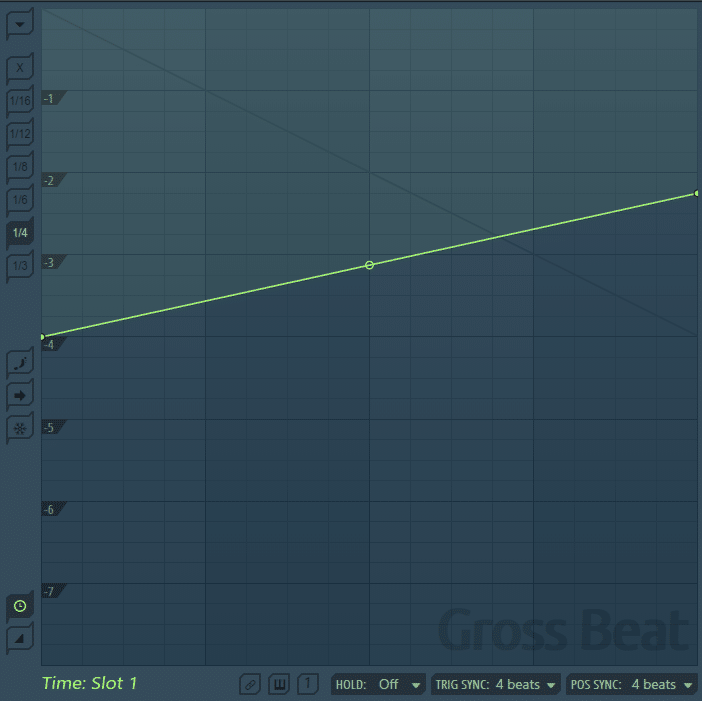
Here is what it sounds like:
As the slope becomes steeper, the playback speed increase. When your slope becomes vertical, the audio will simply jump forward in time.
About the Buffer Size and the Safety Line in Gross Beat
Sometimes, you will get moments of silence. This means no audio is outputted.
Why does this happen? Because Gross Beat doesn’t have anything to play back.
Gross Beat works by storing audio in a buffer and then playing it back. However, if not enough audio has been stored, Gross Beat can’t play it back!
Here’s an example. Say you want to play your audio backward and from the start. You would need to draw a line that is steeper than -1:
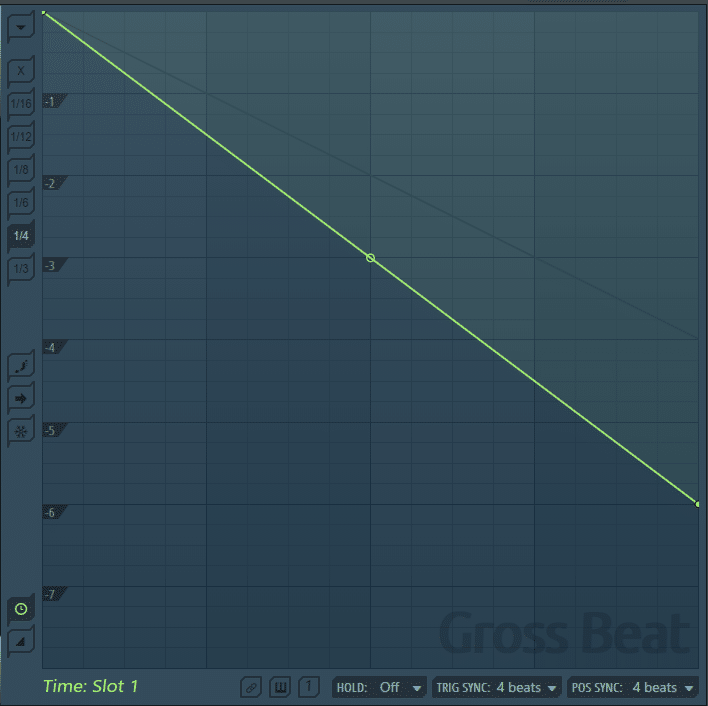
Here is what it sounds like:
During the first 4 beats, nothing is played. This is because Gross Beat has nothing stored in its buffer yet. So it’s impossible to play something backward.
It’s only when you get to the second bar (the next 4 beats) that you hear the audio. Gross Beat is now playing what is stored in the previous 4 bars, backwards.
Practically, this is represented by the grey “Safety Line”:
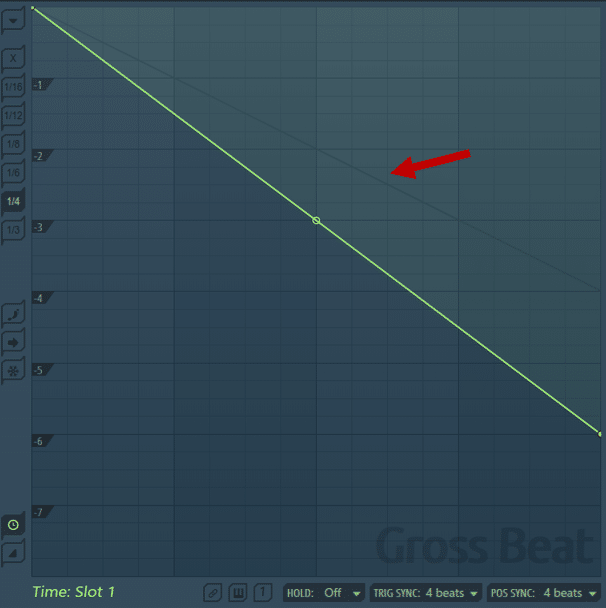
The grey safety line shows you if audio will be played during the first 4 beats:
- Above the safety line. Gross Beat has audio in its buffer and will play back something
- Below the safety line. Gross Beat doesn’t yet have audio in its buffer, so no sound will be outputted
Note that this is only valid for the first 4 beats. Afterward, Gross Beat will always have something in its buffer to play.
Great… But What About Curved Envelopes?
So far, we’ve only covered “straight” envelopes. By that, I mean envelopes that are always straight lines (either flat, rising, or falling).
So what happens to our sound if we curve an envelope?
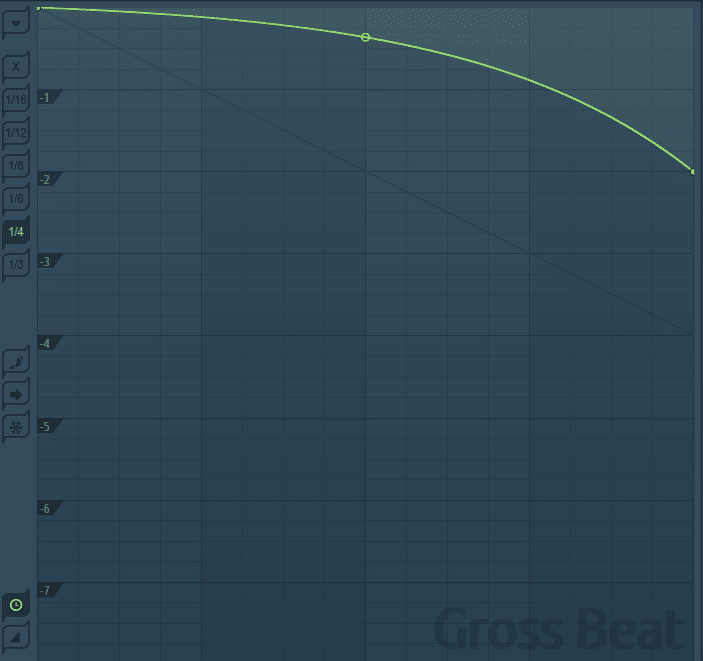
Curved envelopes will create a rising or falling pitch. This is reminiscent of slowing down a track on vinyl.
The best here is to experiment with different curves and see what you like. Depending on the steepness, the audio might slow down, then accelerate again for example.
Gross Beat Advanced Controls 💪
We now have a full understanding of how to draw envelopes in Gross Beat 🙏
Let’s take a look next at some handy controls.
Firstly, here are 2 useful shortcuts to move points:
- Hold Control if you just want to move a point up or down
- Hold Shift if you only want to move a point left or right
To reset an envelope, go to Options –> Reset:
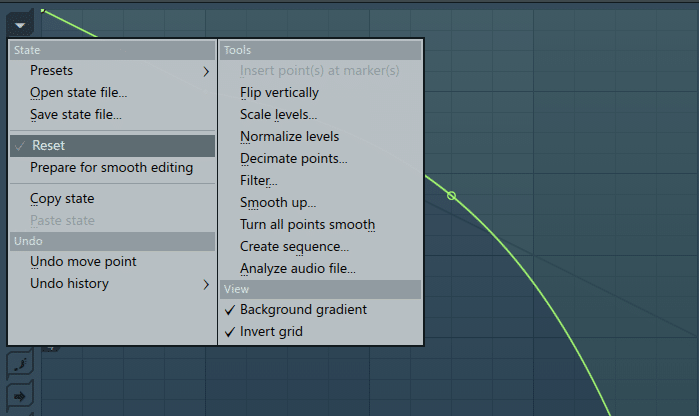
If you want to reset a curve to a straight line, simply right-click on the tension point.
Another handy tool is the “semitone pitch” option. This lets you pitch the audio by semitone increments:
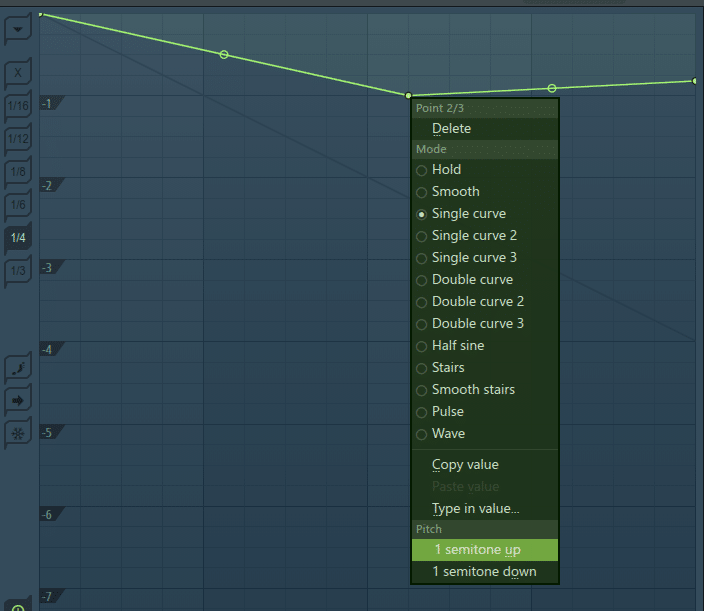
Finally, a really cool feature of Gross Beat is slot automation.
Under any time or volume slot, right-click and select Create Automation Clip. Each slot has an assigned value that can be copied to the automation clip.
Simply right-click a slot and select “Copy Value”. Then paste it into your automation clip. This enables you to easily switch between patterns:
So, When Do I Use Gross Beat? 🧐
By now, you’ve understood the limitless possibilities of Gross Beat. But here are my 5 favorite techniques I like to use.
Create Sick Turnarounds
Creating interesting turnarounds can be tricky.
A turnaround (or transition) is simply a passage at the end of a section that leads to the next section.
Let’s look at an example. I have this loop, and I want to create a transition before the saxophone comes in:
What I would do here is place Gross Beat on the Master. Then, I create an automation clip like such:
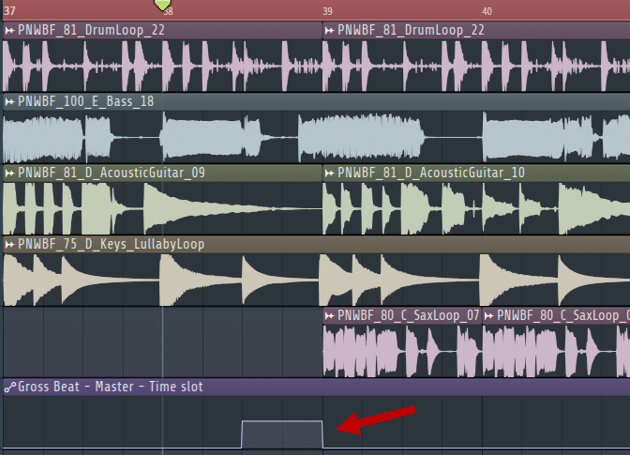
In this case, the automation is activating slot 20. Now I am going to experiment with different envelopes until I find something I like!
Here, I ended up with this:
Which corresponds to this envelope:
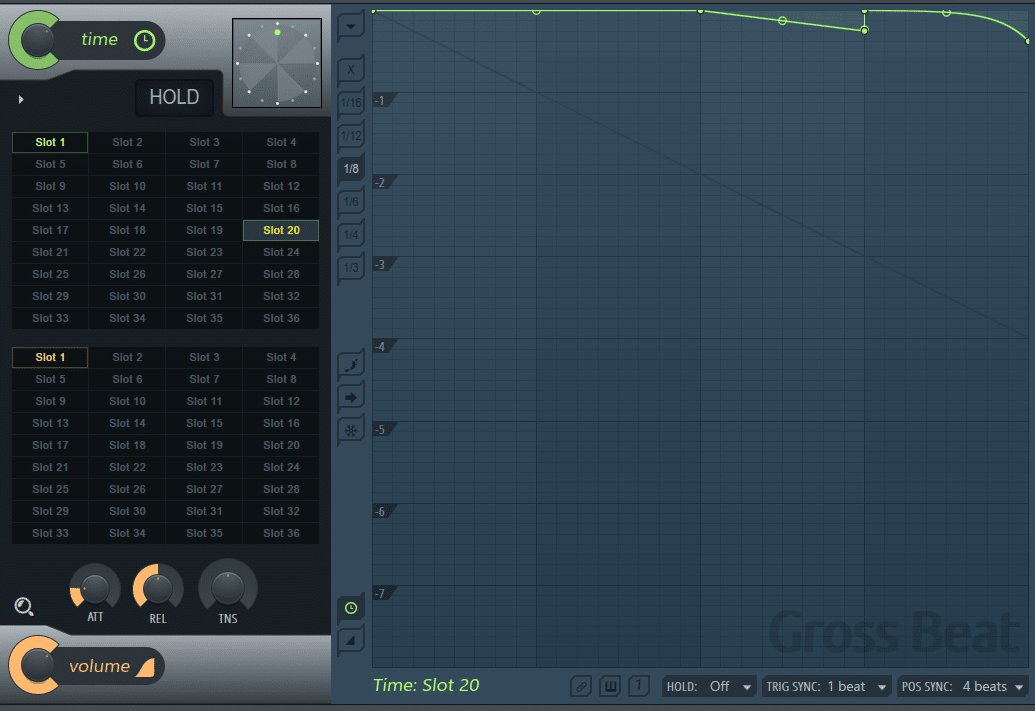
Of course, you can also scroll through available presets! Note that you might need to play with the “Trig sync” and “Pos sync” options at the bottom. This will make your transition activate at the right time.
Create New Track Ideas
Let’s say you find a really cool sample. You want to start a track with it, but you’re not sure how.
Messing around with Gross Beat is a great way to spark new ideas.
Here I have the following loop which I really like:
I then played with different time and volume envelopes. A good idea here is to start with presets and tweak them.
I finally settled on the following shapes:
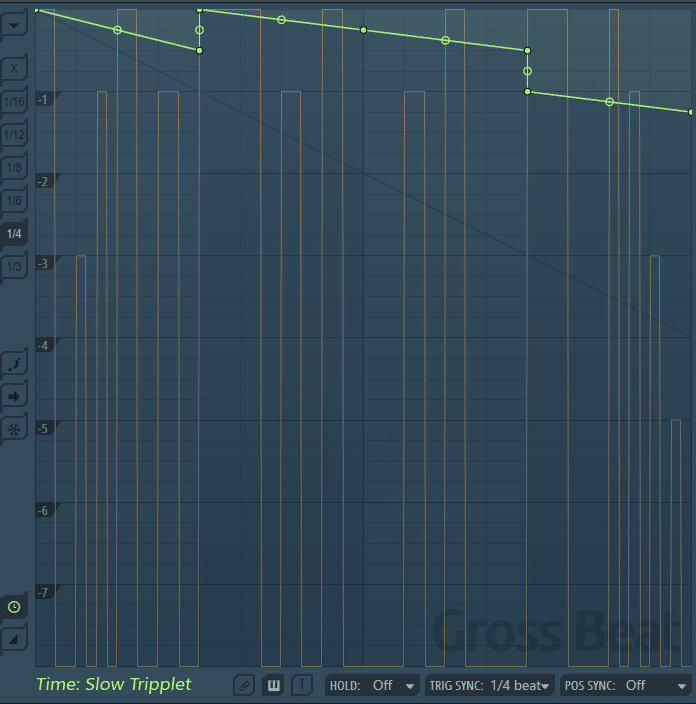
Which sounds like this:
A good tip is to play with the Dry / Wet knobs. This allows you to dial in the effect subtly into your loop.
Next, I render everything to audio. This lets me chop and re-arrange the sections I like:
Nice 😍
Chopping Up Drum Breaks
Playing with Gross Beat is a great way to create new drum patterns.
For this, I especially like the “Stutter” presets.
Try automating the slot selection in the playlist to chop up your beat:

This is what it sounds like:
The easiest and fastest way to chop up drum breaks!
Create Unique Delays
Another cool way I like to use Gross Beat is with the Dry/Wet knob turned to almost zero:

This allows me to dial in some extreme effects. One example is this stutter pattern. By setting a small amount, I can create a delay-like effect:
Create Reverse Vocal Atmospheres
Finally, another trick I like to do is the reverse a vocal. Here I’ve got a vocal loop:
I am going to use Gross Beat to reverse the loop. Here, I’ve used the WishWash 2 preset:
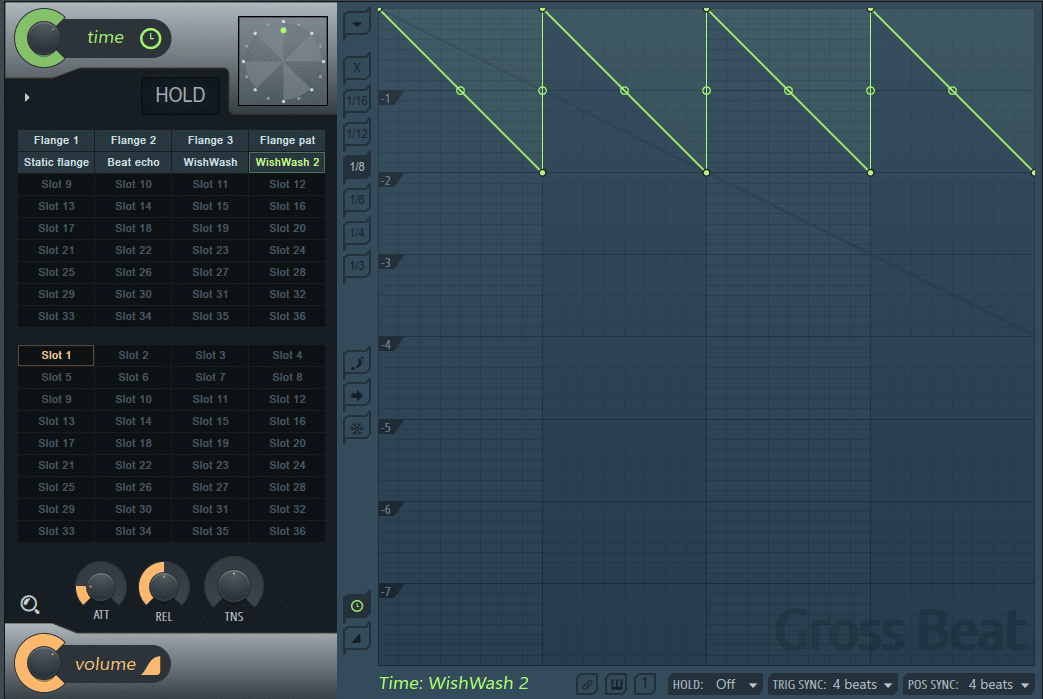
This is what it sounds like:
Render everything, then select and blend in with the original!
That’s It For This Guide! 🙏
That’s it for this guide on Gross Beat!
I hope you learned some new tricks that you can now apply to your music. Gross Beat can be quite a tricky plugin to fully understand. But hopefully, this guide will have inspired you to try it out!
Got any questions? Drop me a line over at [email protected]


