Ever come across the term ADSR, but weren’t sure what it meant?
ADSR stands for Attack-Decay-Sustain-Release. And it forms the basis of all synthesis and sound design techniques.
Although it can seem daunting at first, the concepts are really simple to grasp. If you are just starting your sound design journey, you have come to the right place!
In this article we’ll cover:
- what an ADSR envelope is
- where to find it in the most popular synths
- how to design your first sounds with the ADSR parameters
Let’s take a look! 👇
What Is an ADSR Envelope? 🤔
As mentioned, ADSR stands for Attack – Decay – Sustain – Release.
Also called the ADSR envelope, it describes the evolution of the amplitude (or loudness) of a sound over time.
Typically, the variation in the volume of the sound is described through these 4 different stages. Let’s explore each of them.
Note: although ADSR generally refers to the volume of a sound, an ADSR envelope can technically be applied to any parameter within a synth such as pitch or filter cutoff.
Attack
Attack is the first stage of a sound when the note is played.
The amount of attack determines how long the sound takes to reach maximum volume.
Most natural instruments (guitar, piano, drums…) have a very short attack, meaning they reach maximum volume immediately after a key is played.
However, with synths, we can tailor this attack time to our liking. Let’s hear some examples:
Decay
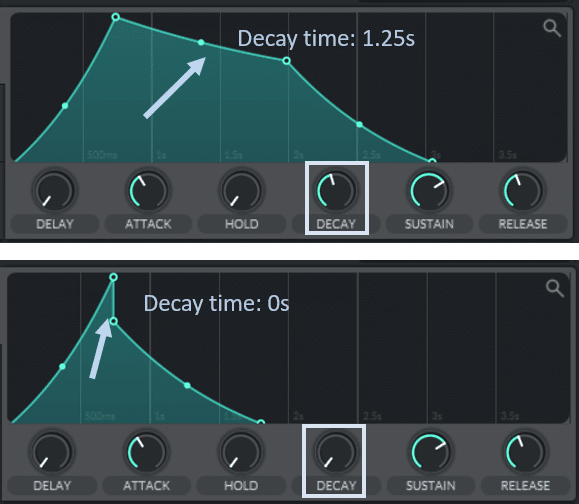
Decay is the time it takes the sound to reach its sustain level. Set a decay time of 0 seconds and the sound immediately drops to its sustain level:
Sustain
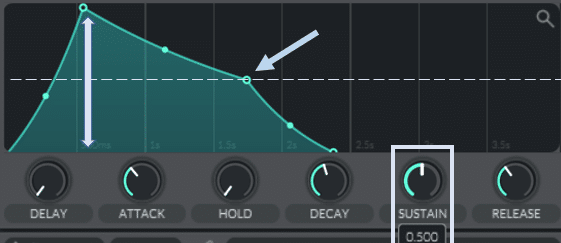
Sustain is the volume at which the sound is maintained while the key remains pressed. It can be the same as the peak volume at the end of the attack phase, or anything lower.
Sustain is therefore a “volume amount” rather than a length of time.
It is therefore often set as a percentage of the peak volume (from 0 to 100):
Release
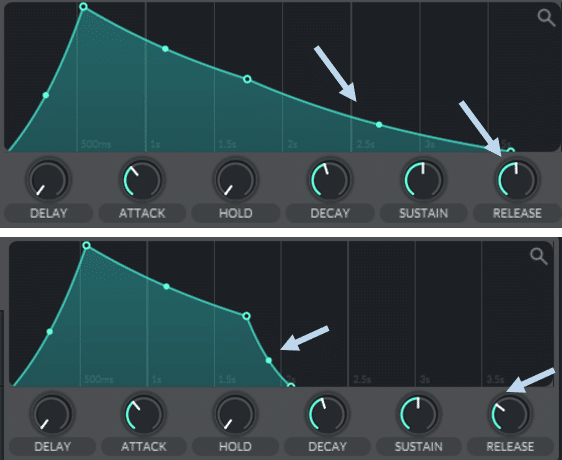
Finally, the release time dictates how long the sound takes to fade away when the key is released:
The release is also called the tail of your sound. In general, avoid releases times that are too long unless you’re going for a specific effect. When playing consecutive notes, tails can add up and muddy your mix.
Bonus: the Hold function
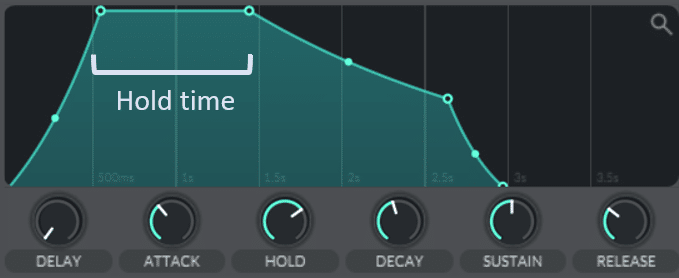
Some synths will also have a Hold parameter. ADSR is then referred to as ADSHR.
The hold time adds another level of control over the sound. Usually, it controls the time the sound will remain at peak level before entering the decay phase:
However, in some other synths, ‘hold’ is the length of time the sound remains at its sustain level.
Where to Find the ADSR Envelope? 🧐
The ADSR envelope is usually visible as a dedicated module on any digital or hardware synth.
Whether it’s a subtractive, wavetable or FM synth – all of them usually contain envelopes.
But let’s go over some popular synths and where their ADSR envelope is located.
Most synths have several envelopes to customize. Usually, one of them is already assigned to the synth’s volume, making it the default ADSR envelope.
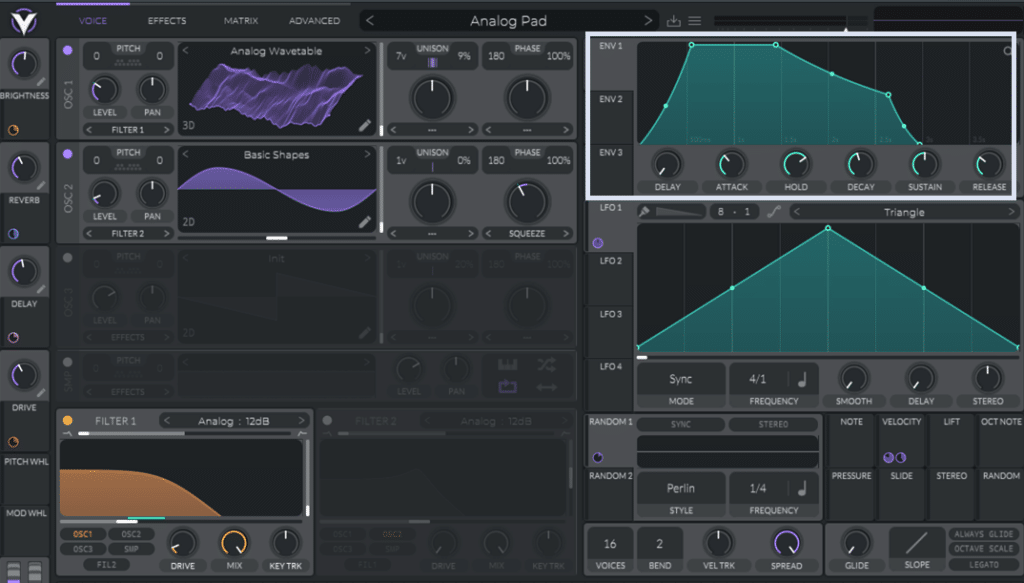
In Vital, the ADSR envelope is located at the top-right:
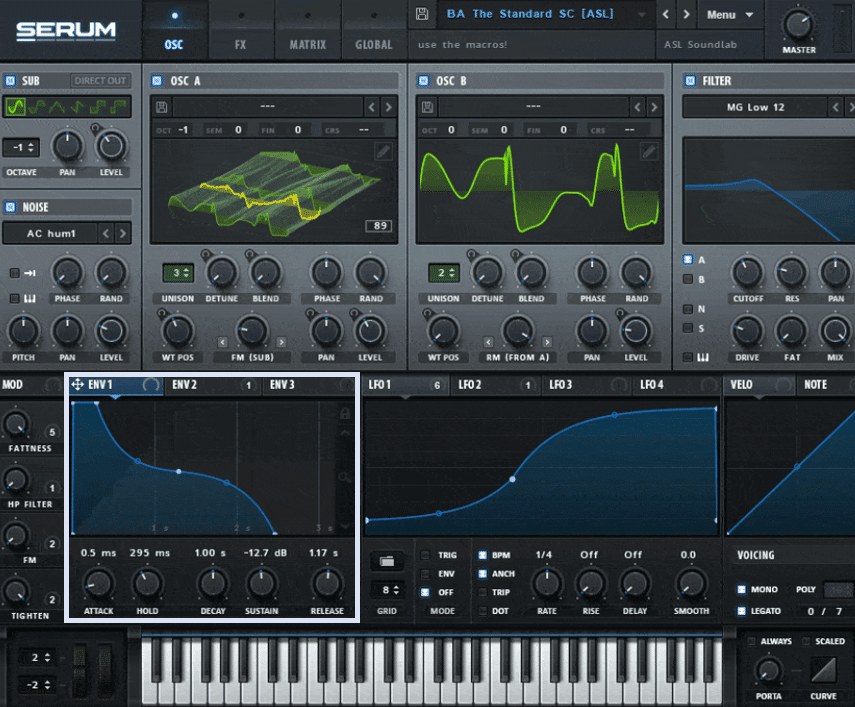
In Serum, the ADSR envelope is located at the bottom-left:
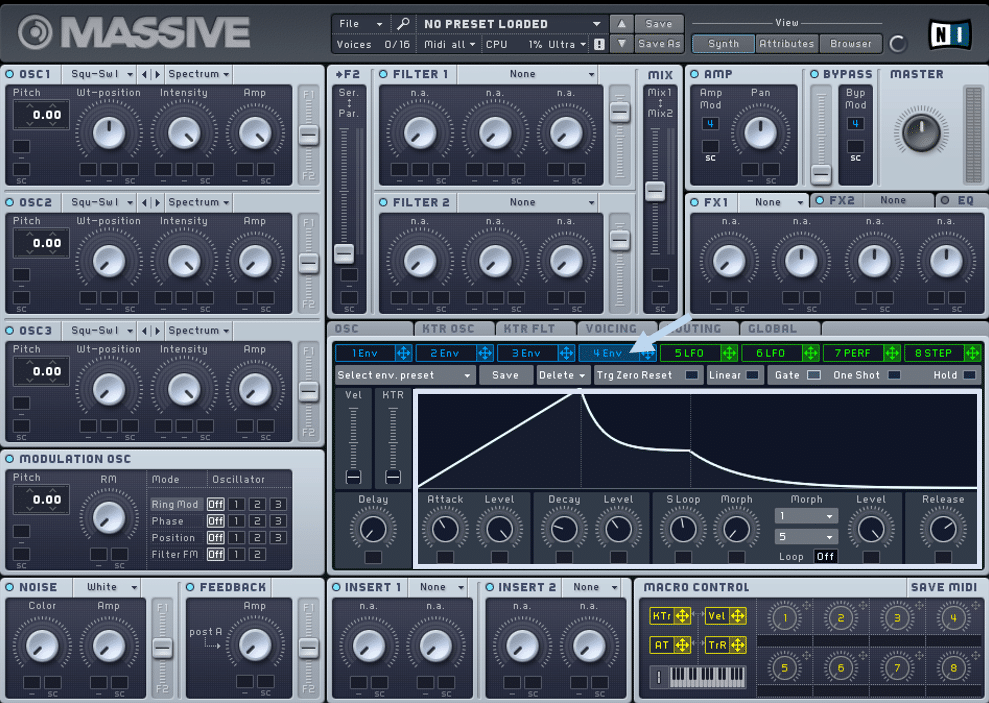
In Massive, the ADSR envelope is located in the middle of the screen under “4 Env”:
Now let’s see how we can create some sounds using ADSR!
Recommended: 100 Next-Level Sound Design Tips
Create Any Sound with ADSR Envelopes! 🎛
It’s crazy to think, but it’s quite possible to create pretty much any sound by tweaking these four knobs.
Obviously, the waveform you initially choose has a huge impact. Post-processing is also responsible for a lot.
But ADSR lets you control the entire dynamic range of the sound. Let’s go over some classic examples.
Pads
Pads and atmospheres are a great starting point to learn about ADSR. This is because their envelope is easily recognizable. Pads usually have a slow attack, long decay, and a slow release:
Here I have used the following settings:
- Attack: 2.4s
- Decay: 7.6s
- Sustain 65%
- Release: 4.6s
With such a long release time, be careful when playing chord progressions to avoid notes blending into each other.
Drum Hits
Believe it or not, ADSR is all you need to design your first kicks and snares too!
Let’s have a look at designing some hits with just ADSR.
First, we’ll make a basic kick. I will be working in Vital (which is a free synth you should definitely download), but you can follow in any synth of your choice.
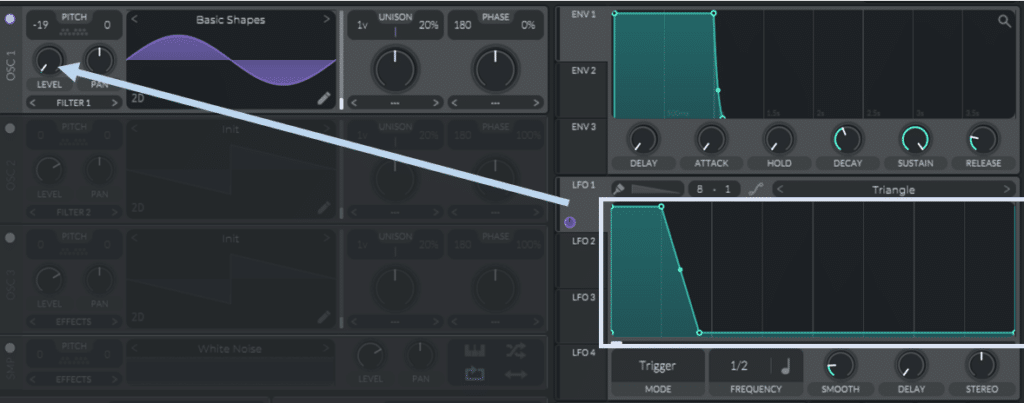
First off, select a basic sine wave and set the phase randomization to zero. This is to ensure we get the exact same hit every time. Then I am going to use LFO 1 as an ADSR envelope to control the volume of Osc 1:
I’ve also pitched down Osc 1 by -19 semitones to get in the range of a classic kick. This is what you should have:
Not too far from an actual kick right?
There’s a lot more processing to be done here to actually get a proper kick. But this is just to give you a flavor of what’s possible.
Next, let’s try to design some hats. For this, I am going to use a white noise waveform.
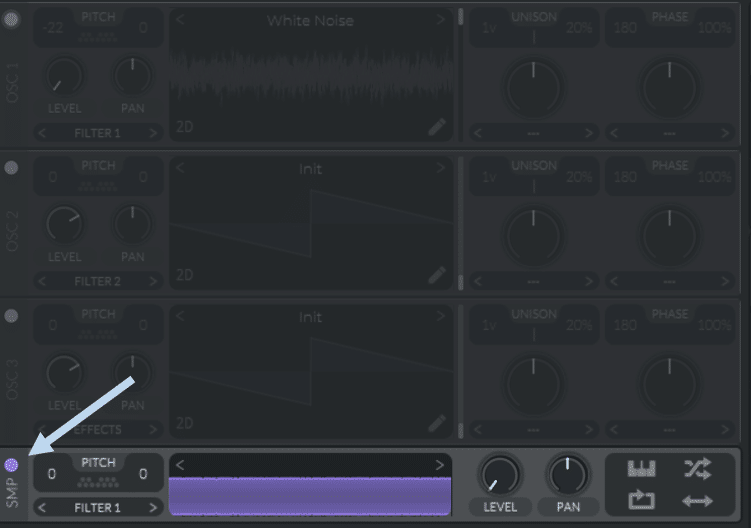
In Vital, you can do this by disabling all oscillators, enabling the sampler, and selecting “White Noise” from the presets:
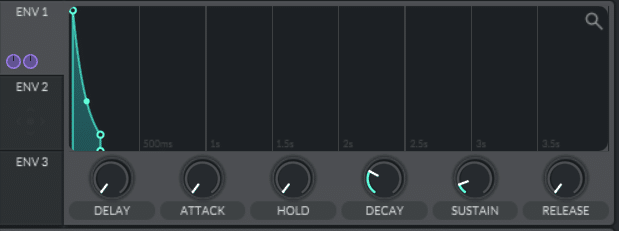
Next, I’m going to draw a very short ADSR envelope with the following settings:
- Attack: 0s
- Decay: 0.2s
- Sustain: 11%
- Release: 0s
The envelope should look something like this:
I’m going to assign this ADSR envelope to the volume of the Sampler. Here is the result:
I’ve applied a bit of a high-pass filter to clean up the low-end. Without any post-processing, you can see how much can be achieved with just ADSR and some filtering!
Plucks
Plucks are another very common sound in electronic music. They usually refer to short synth sounds played in arpeggios or short melodic sequences.
Let’s design a basic pluck. We’ll start with a sine wave, and draw a relatively short envelope:
I am using the following settings for my ADSR envelope:
- Attack: 0s
- Decay: 0.24s
- Sustain: 28%
- Release: 0.09s
In this case, it’s OK to leave some phase randomization to add variation to our sequence.
Add a bit of reverb and delay, and you’ve got yourself a pluck!
Leads and Basses
For leads and bass sounds, you generally want a short attack time and a sound that sustains at the same level. To achieve this, set your attack to 0s, and your sustain to 100%.
This will ensure the sound remains at peak level while the note is played. Your release time will also need to be quite short.
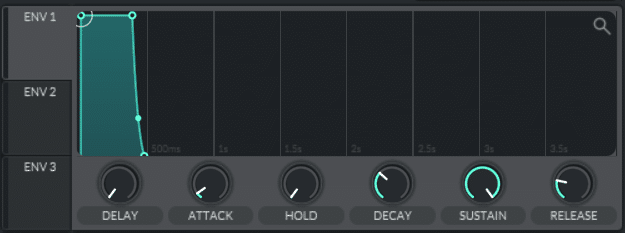
This is what my ADSR looks like for this sound:
FX
Finally, your can use ADSR envelopes to create cool transitions. Risers are a very popular effect that creates tension between two sections of a song.
For risers, set a very slow attack so that the volume gradually fades in.
Here’s an example:
To achieve this, I drew an ADSR envelope with the following settings:
- Attack: 15.2s
- Decay: 1s
- Sustain: 100%
- Release: 0.08s
To get the “rising” effect, I applied the ADSR to both the volume and the pitch of the oscillators. That way, the slow attack also acts as a way to pitch up the sound slowly over time.
Next, let’s get out of the synth and start using ADSR to manipulate audio samples.
Using ADSR Tweaking to Sculpt Samples 🔊
So far, we’ve covered ADSR in the context of sound design. You start from scratch in your synth and tweak the ADSR parameters to your liking.
However, you can apply to same concepts to existing sounds!
This is often called “transient shaping”. Transient shaping is done through dedicated plugins such as Neutron 3 Transient Shaper or Waves Smart Attack.
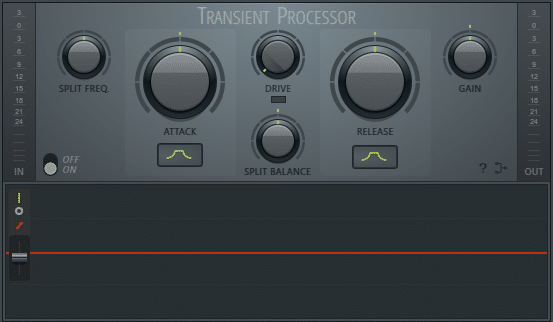
Let’s explore! For these examples, I will be using FL Studio’s Transient Processor.
Removing Room Sound
Transient shaping plugins usually come with at least 2 settings: Attack and Release.
One common issue when working with drum breaks (especially the old funky ones) is the presence of room noise.
Room noise is due to mics picking up reflections in poorly acoustically-treated rooms. The result is a lot of natural reverb, which can muddy up your mixes. Let’s check an example:
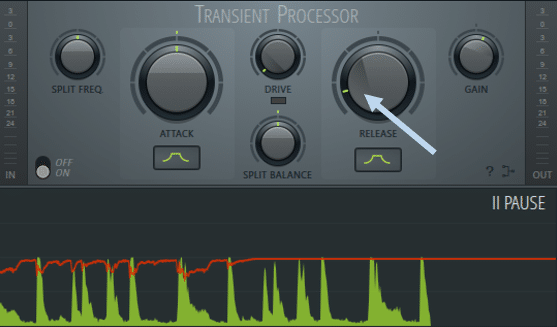
Let’s see how we can tighten up that break. I’m going to apply the Transient Processor, and reduce the release time:
Let’s compare the result:
The room noise hasn’t completely disappeared. But this gives us a much cleaner break to work with, especially if we want to start layering.
Adding Punch
We can also play with the Attack time to add some punch to our loops. Doing this works well on drum breaks/loops that lack some character. But the same principle can also be applied to melodic loops.
In this example, I have a drum break that I like. However, I feel the hats lack a bit of punch:
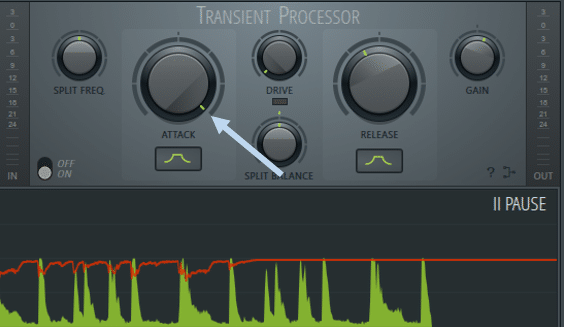
Let’s apply some transient shaping and boost the attack:
Let’s listen to the result:
You can hear how the hats are cutting through a lot more now.
You can apply the same concepts to melodic loops such as piano too:
The Release Stage Of This Guide 😉
Jokes aside, hopefully, you will now have a better understanding of ADSR! With these basic concepts, you should be able to start designing your first sounds.
And with that, I hope you enjoyed this post!
Did I miss out on anything? Any tips you have used to overcome writer’s block? Feel free to get in touch with me at [email protected].

