Recording vocals in a vocal booth will allow you to capture dry vocal recordings, free of undesirable reverb. Commercial vocal booths cost thousands of dollars, but it’s possible to create your own vocal booth for a fraction of the cost. In this guide, I’m going to show you how to build a DIY vocal booth for under $85.
Some spaces, like opera halls, produce a very pleasant reverb, but bedrooms do not. When you record vocals in an empty bedroom, the flat reflective walls will make your vocalist sound like they’re singing inside a tin can.
You should do what you can to reduce reverb when recording at home. It’s easier to apply reverb to dry vocals using reverb plugins than it is to tame reverb using a de-reverb plugin. The control that a reverb plugin provides will allow you to make your vocals sound professional once you start mixing them.
From a difficulty perspective, building this vocal booth is quite simple. When you’re not using the vocal booth, you’ll be able to quickly disassemble it and store it within a drawer or closet.
I’ve included the materials you’ll need for this project below, along with step-by-step instructions on how to build the vocal booth.
Required Materials
You’ll need 3 moving blankets, a grommet kit, 8 command hooks, 4 drywall anchors, 4 screw eye hooks, and 4 carabiners.
You can significantly reduce the cost of this project if you have a few friends who want to build vocal booths as well. By purchasing a 12 pack of moving blankets and splitting the rest of the supplies, you’re looking at a total project cost of around $40 per person.
The tools you’ll need for this project include a measuring tape, hammer, drill, drill bits, level, and step stool.
Where to Build Your Vocal Booth
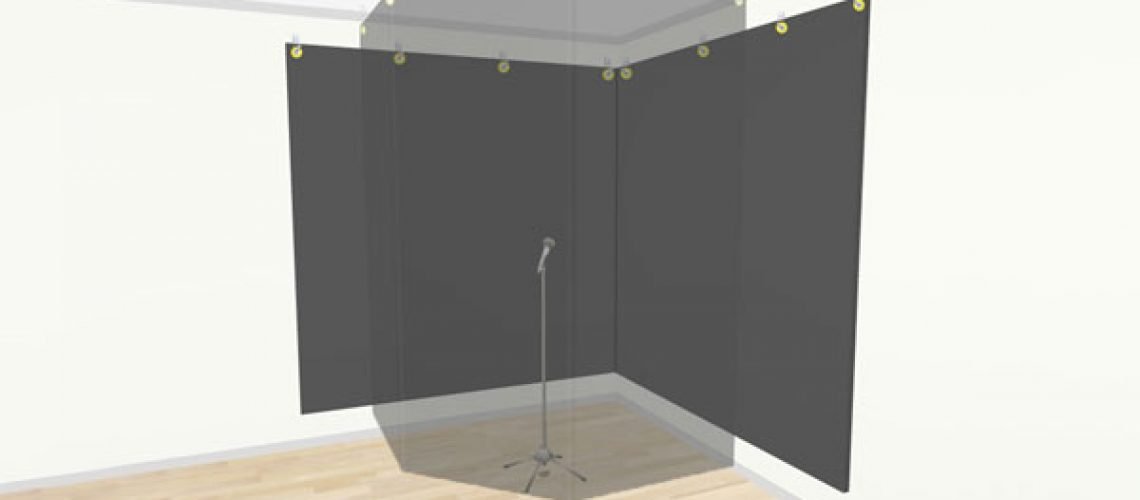
This vocal booth is meant to be installed in the corner of your room. Your vocalist will face the center of the room, with their back toward the corner, and sing into a floating moving blanket suspended from the ceiling. There will be a moving blanket hanging on each wall behind your vocalist to absorb sound as well.
The moving blanket floating in front of your vocalist will absorb first reflections and prevent the vocalist’s voice from resonating throughout the room. Late reflections will get absorbed by the moving blankets behind your vocalist. The angle of all the moving blankets in relation to one another will also prevent flutter echo.


Moving blankets aren’t thick enough to absorb bass frequencies, but a vocalist isn’t capable of producing low-end frequencies with enough energy to resonate prominently through your room anyways. For mixing and mastering purposes, sound treating a studio with moving blankets is less than ideal, but they’re perfect for building a vocal recording booth.
Step-by-Step Instructions
Once you have all the materials that you need, it shouldn’t take more than 45 minutes to build your vocal booth. With the help of a friend, you should be able to complete this project even faster.
1. Install Grommets into Your Moving Blankets
You’ll be installing grommets into your moving blankets so that you’re able to hang hang them. Along one of the short edges of each of your moving blankets, cut a small hole every 2 feet and install a grommet using your grommet kit.


2. Stick Command Hooks to the Walls
Starting at the corner of the room where you’ll be recording, stick a command hook near the top of the right side wall every 2 feet. Repeat this process for the left side wall. Make sure that the Command hooks are placed high enough that the moving blankets won’t touch the ground when you hang them.

3. Hang the Wall-Mounted Moving Blankets
The grommets installed in the moving blankets should align perfectly with the Command hooks on your walls. Command hooks are removable, so you can reposition them if necessary.


4. Install Drywall Anchors into Your Ceiling
Starting in the corner that you’ll be recording vocals in, measure 5 feet toward the center of your room, along the ceiling, and mark this point with a pencil.
Now you need to mark the corners of a semi-hexagon, using the previous mark you made as the semi-hexagon’s center point. The distance between each corner of the semi-hexagon should be 2 feet.

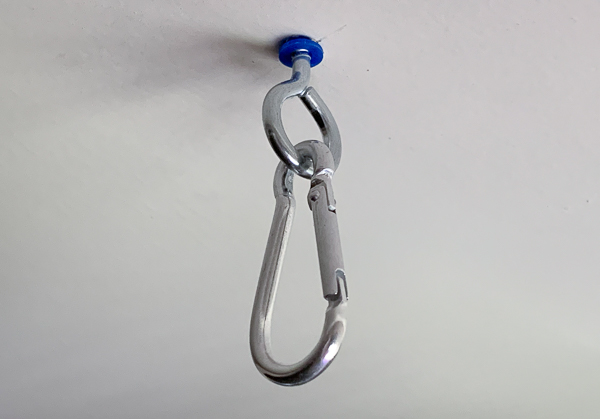
Drill pilot holes into your ceiling at the marked locations and install the drywall anchors. Twist a screw eye hook into each of the ceiling mounted drywall anchors, and then clip a carabiner to each hook. Your completed ceiling assemblies should match the following image.

5. Hang the Floating Moving Blanket
Hang the floating moving blanket by latching each grommet into one of the available carabiners.


Deconstructing Your Vocal Booth
Moving blankets are a bit of an eyesore and not everyone wants to permanently hang moving blankets in their room. One of the best parts about this vocal booth is that you can quickly disassemble it—take down the moving blankets, fold them up, and put them away. The ceiling assemblies and Command hooks aren’t meant to be removed, but they draw very little attention to themselves, so you’ll barely notice them.
As far as budget vocal booths go, this is one of the most budget-friendly and comprehensive options available. This vocal booth doesn’t look as fancy as a vocal booth worth thousands of dollars, but you need to pick and choose your battles when working with an $85 budget.
Looking for another fun DIY project? Learn how to build your own acoustic panels.
Make sure to follow Black Ghost Audio on Facebook, Twitter, Instagram, and YouTube to stay up to date on the latest music production tips and tricks. There’s new content every week.


