So, looking for a guide on how to make Indie Electronic? Well, you’ve come to the right place!
Indie Electronic is a fascinating style of music that isn’t strictly a “genre”. It’s more of a combination of electronic music, indie rock, and other styles melded into one.
In this guide, you will create your first Indie Electronic from scratch! We’ll go over:
- creating a groovy drum beat;
- creating a warm chord progression;
- using vocal chops to create a hook;
… and a lot more! Let’s get started.
So… What is Indie Electronic?
Indie Electronic (also known as indietronica) is a genre that emerged in the 1990s and 2000s. It combines elements of indie rock, with electronic music production techniques.
Things that set it apart from other genres of electronic music such as Tech House or Hard Techno include:
- Pop-inspired melodies;
- Vocals and other live instrument recordings alongside electronic production;
Indie Electronic artists often blend indie rock’s introspective songwriting with electronic music production techniques. This fusion creates a unique sound that is both catchy and innovative.
Step #1: Laying Down an Indie Electronic Beat
Firstly, I’m going to set our project to about 84 BPM – something a little on the slower side. That way we can get this almost hip-hop-inspired feel. We might speed it up later but let’s start there for now. Next up, let’s find ourselves some nice vintage drums.
In Indie Electronic, you can use a combination of synthesized hits as well as sampled hits from real drum kits.
And that’s exactly what we’re going to do here. Starting with the kick, I’m going to use one from our free EDM Starter Kit. Here’s what it sounds like:
I’m hearing a bit of noise I don’t like in this kick, so let’s grab an EQ. I’m using Pro Q3 from FabFilter and just rolling off the “iron” noise sounds.

Next, let’s bring in a clap sample. I’m actually going to layer two different clap samples which both have a similar vibe:
Oftentimes, you’ll find that using just one clap sounds a bit thin. If that’s the case, try layering in a second clap with a slightly different tonality.
Pro-tip: when layering claps, use the “track delay” function for a more organic feel:

Now, let’s beef up our beat a little bit. I’m going to create a new MIDI track and I’m going to load up just a simple 808 type kit. A lot of Indie Electronic kits use vintage drum sounds from vintage drum kits. I’m feeling a bit of a LoFi vibe here so let’s load up some samples:

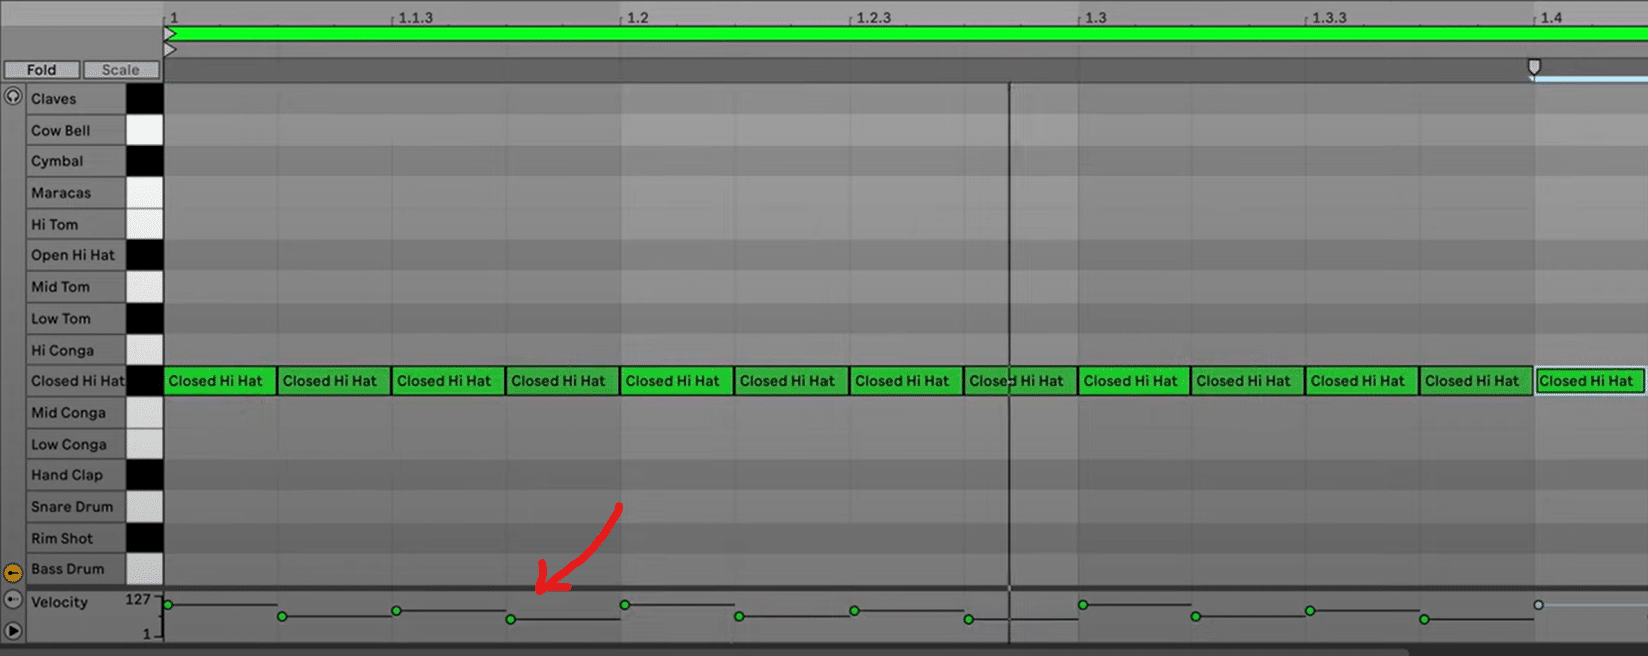
I will program 1/16 hats to get the vibe of the track going. We may play around with the velocity as well to give it a human feel:

Let’s also add an open hi-hat at the end of the section:

Here’s what it sounds like with some high-pass filtering applied:
Now that we’ve got a basic beat laid down, let’s flesh out our drums a bit more.
Fleshing out our drum arrangement
Let’s duplicate our beat to two bars and start making a few changes.
On every second clap, for example, we’ll mute the higher clap layer. This will give some natural, subtle variation.

To bring these hats to life, I’m also going to add:
I’m also feeling like some shakers and chimes would be great to fill out the spectrum. Here are some organic-sounding shakers I found:

Note that I brought the Width down a bit because they sounded a bit too wide to my liking.
I also found a chimes loop, which I chopped up in Ableton’s Sampler and then played back some notes:
Lastly, I’m going to bring in another drum rack. The idea here is to give our beat a bit of extra percussive feel. At the moment it’s pretty “high-end heavy” so let’s add some punchy samples.
By the way, you can also check out this whole tutorial on our YouTube channel:
This part is entirely up to taste, and you don’t need to add precisely the same percussion as me.
Here are some elements I added:
- a tambourine;
- a low bell.
Here’s what our beat sounds like now over an 8-bar loop, with some added variation on some kicks and claps:
The last thing we need to do is group all our drum hits together. This will enable us to do some group processing:

This allows us to add compression, saturation, and any other effects we want to the drums.
Pro-tip: add a bit of sidechain compression to your percussion (shakers, chimes, even hats). This will give your beat more groove.
Step #2: The “Phat” Indie Electronic Bassline
With Indie Electronic, the bass tends to either be a recorded bass guitar with an amp, or a synth bass emulating a real bass.
As I imagine most of you don’t have a bass guitar lying around, I’m gonna do a synth bass.
Let’s go with some of Ableton’s stock plugins here and find a nice bass sound. After scrolling through a few presets in different instruments, I settled on the “Jupiter Plus Bass” preset in the Wavetable instrument:

Note that you don’t have to use exactly the same patch. We’re just going for something nice and mellow, not an aggressive screechy Dubstep bass 😅
After jamming on my keyboard, here’s the melody I settled on:
Let’s chuck some effects on it to bring it to life.
First I’m going to add some chorus and saturation:

These 2 effects in combination are perfect to get that warm, analog feeling.
Finally, don’t forget to add some sidechain compression to make that bass pump!
Step #3: Building a Warm Chord Progression
For our chord progression, I’m going to use the same basic movement of the bass notes.
Let’s load up Drift (which comes with Ableton Live) – and find some cool sounds.
I found the preset “Gentle Sixty” which I really like, and simply programmed in some MIDI chords to follow the bass:

This is what it sounds like:
I’m gonna add some keys too, but I want to leave some space for a vocal effect.
A lot of songs in Indie Electronic tend to either use a vocal or a very catchy synth hook.
We’re going to demonstrate both here, and we can choose which one fits best in your track.
Here’s the melody I settled on. I’ll break down right after what went into it:
For this sound, I started out with Ableton Drift set to the “Retro Bell Keys” preset. I didn’t even play with the settings, which goes to show that you don’t have to design every sound from scratch 🙃
However, I did add some Auto Filter with the Envelope turned up to around. This adds some natural movement to the sound:

I also turned up the LFO amount on the Auto Filter to give the sound that wobbly effect. Finally, I’ve added Decapitator (which is my favorite saturation plugin) to add some grit, but you can also just use Ableton’s Saturator.
Adding a vocal chop
Now that we have a nice melody, let’s complement it with some vocal chops.
At this point, it’s crucial to spend enough time finding the right vocal sample. If the sample doesn’t fit the vibe, no amount of processing will work.
Here’s a sample I had in my library which could fit:
And here’s the section I chopped:
To choose a chop, I loaded Ableton’s Sampler and dragged the starting and end points:

I then used multiple effects to bring the vocal to the front:
Next, let’s duplicate this track, and choose a different vocal chop in the sampler to alternate:

Here’s what they sound like:
Sounding nice 😍 Now that we have most of our elements there, let’s start fleshing out the arrangement.
Step #4: The Arrangement
The first thing to do is to look at the context of where each section will be. For example, the section with both the melody and the vocal chops will be our chorus. We know this is going to be the biggest part of the track.
So what we can do is add eight bars before that, so we can start to tease the main elements.
Let’s add our pad, as well as our kick and clap:
We’ll come back to that, but this is just to get something in there for the intro.
Next up, we want something leading into our drop. I’m feeling a sort of toms fill, so let’s see what samples we can find.
I found a sample I like and drew in 3 notes leading into the drop. This is a classic triplet pattern you often hear in genres like Indie Electronic and Future Bass:
From there on, 90% of arranging a track is either:
- making slight variations (removing a clap, doubling a kick…);
- removing certain elements at the end of sections.

We could for example duplicate our main drop, but remove the melody, shakers, and hats. That will give a nice variation from the first 8 bars of the drop:
We can also bring some variation to our vocal chops. Pitching down your vocals by one octave is a classic, low-effort high-reward trick 😅
Step #5: Getting a Clean Mixdown
Now that we have our track laid down, let’s go over some essential steps to get a clean mixdown. Firstly, let’s look at our drums.
Adding a bit of reverb to your whole drum bus doesn’t work for every genre, but it will definitely work for Indie Electronic.
Next, I’m going to add:
- saturation;
- glue compression;
- multiband compression;
- limiter to catch some speaks.
For our bass, we want to check for mono compatibility. If there is too much stereo information, the bass might sound weak on mono speakers.
For this, I like to use the Utility plugin, turn it to “Side” and check what I hear:

If I feel like the Side information is too present, I can turn the knob slightly to the left (toward Mid) to make it more mono.
For our melodic elements, the usual suspects will always come in handy:
- EQ to remove any resonances;
- multiband compression to even out the frequency spectrum;
And to be honest this track doesn’t much more processing than this! Let’s listen to the final result:
That’s a Wrap on How to Make Indie Electronic!
That’s it for this guide on how to make Indie Electronic music! Hopefully, you found it useful and will be able to put some of these techniques to use.
Indie Electronic music is a genre that is quite vast and often branches out into multiple other genres at the same time. So don’t feel like you should restrict yourself to the types of sounds from this tutorial. Indie Electronic is the perfect time to experiment!
And don’t forget to grab the whole project file for Ableton Live, as well as the full sample pack which you can use in any DAW.


