So, you’re looking to master a song yourself in 2023? Well, you’ve come to the right place.
However, this will not be your typical guide on how to master a song.
Most guides and YouTube tutorials give you a list of plugins to use. But they don’t give you context. And they don’t tell you why you should use them.
So in this guide, we are going to do things differently. We are not going to give you a magic recipe that (supposedly) works for every song. Instead, we are going to cover everything you need to think about when mastering a song.
More specifically, we are going to look at:
- the right mindset before you master a song
- how to set up the right environment to master
- the tools you can use to master a song
- the state of the loudness wars in 2023
Let’s get started 👇
How to Master a Song – Let’s Clear Some Misconceptions…❌
Before we dive in, let’s clear a few myths and misconceptions about mastering.
If you haven’t mastered a track yourself before, these might be some harsh truths.
However, learning these lessons early will spare you a lot of pain in the long run 😉

Mastering Can Fix Your Bad Mix
This is the first lesson you’ll learn when mastering your own songs.
Mastering will never, ever fix a bad mix.
The mastering job is to take a mix and present it as a product for the listener. The quality of that product ultimately relies on the quality of its mixdown. Got issues getting your master loud enough, or fixing problematic frequencies? Then you might need to go back to the mix.
You Can Only Master a Song With Expensive Plugins
Flashy plug-ins and expensive gear might be great assets to one’s mastering arsenal. However, they will not make mastering decisions for you. Your ears and the decisions you make with them are what matters most in mastering.
Case in point, you can get a great-sounding master with just stock and free plugins.
Don’t believe me? Keep on reading 👀

Mastering is Only About Getting a Track as Loud as Possible
Mastering is about creating a presentable product. For commercial genres like pop and hip-hop, there is definitely a push for loudness. But this is not always the case.
Although mastering includes getting a track as loud as possible, there are many other objectives at play:
- Making sure your track sounds good on all devices
- Adding that extra 1% to make your track shine (with subtle saturation and EQ’ing)
- Correcting minor issues in terms of frequencies and dynamics
Before You Master a Song: The Checklist 📋
Before you get ready to master a song, two things need to be true:
- Your track is ready for mastering
- You need to be ready for mastering 😅
What do I mean by this?

On the one hand, your mix needs to meet a number of criteria. Only then is it ready to be mastered.
Generally, this is called a pre-master. A pre-master needs to check the following boxes:
- mix bus level does not exceed 6dB (including peaks)
- enough dynamics
- the overall mix needs to sound good, i.e. no major needs to be fixed
- no audible pops or cracks due to volume cutting out from samples
The right mindset
Secondly, you need to set yourself up for a good mastering session.
If this is the first time you master a song, it might seem like a tedious process. However, mastering can be a very creative a fulfilling process. It all depends on the attitude you show up with.
Here are a few tips you can follow to put yourself in the right space of mind:
- Approach your mastering session as a creative process. Keep all the habits you have when you do a writing or sound design session (cup of coffee, regular breaks, etc.)
- Don’t expect your mastering session to be a 1h affair. You will probably need to go back to your mix to fix issues, export multiple versions, listen to various devices, etc. Get ready 😉
- Listen to music for 10 to 15 minutes before your mastering session. Ideally tracks you love that put you in a good mood 😊. As a bonus, these songs can be in the same genre as the one you’re about to master. That way, your ears will naturally be tuned to “what sounds good”.
- Listen to your pre-master a few times and take notes. What needs to be achieved here? Do you just need to boost the overall volume? Add some stereo width? Tweak some specific frequencies?
Why Your Environment Matters When You Master a Song 🏠
Mastering a song is all about making it sound good on multiple devices.

This is why your listening environment matters so much. Ideally, you are working in an acoustically-treated room or studio that you know well.
However, most people don’t have the luxury of working in a studio.
If this is your case, I suggest doing your master exclusively on your headphones. This might be a controversial opinion, but this is how you’ll get the best results. If your room is not properly treated for resonances, your ears will be tricked into adjusting frequencies that don’t need fixing.
Use headphones in combination with a spectrum analyzer (more on that later). Then, listen to your master on different devices. These should be devices that you listen to music on a regular basis. Examples include:
- your smartphone speaker
- a small mono Bluetooth speaker
- you car speaker
How does your master compare to pro tracks? Does it sound quieter, thinner, and less dynamic? Use this learning to adjust your master further.
An alternative to headphones-only mastering is to use Sonarworks. Software like Sonarworks can help combat the drawbacks of mixing in an untreated room by tuning your speakers to accommodate the sound of the room.
Right, let’s dive into the part you’ve all been waiting for 😇.
In this section, we are going to cover some of the most important tools used in a mastering chain. Important note: you don’t need to use all of them on each master you do! Use a plugin with a specific goal in mind, and not just “because someone told you” 😉.
Referencing
Referencing is the most important aspect when you master a song.
If you don’t reference, you are essentially working blind. You have no comparison points to tell you if you’ve done a good job or not.
Practically, referencing consists of taking a professionally mixed and mastered track. This will be your north star, and help you guide your decisions in terms of:
- frequency spectrum (does your track have too much sub, or too little highs?)
- dynamics (have you applied too much compression and lost all sense of dynamics in your track)
- stereo placement (does your track sound too “narrow” compared to a professional one?)
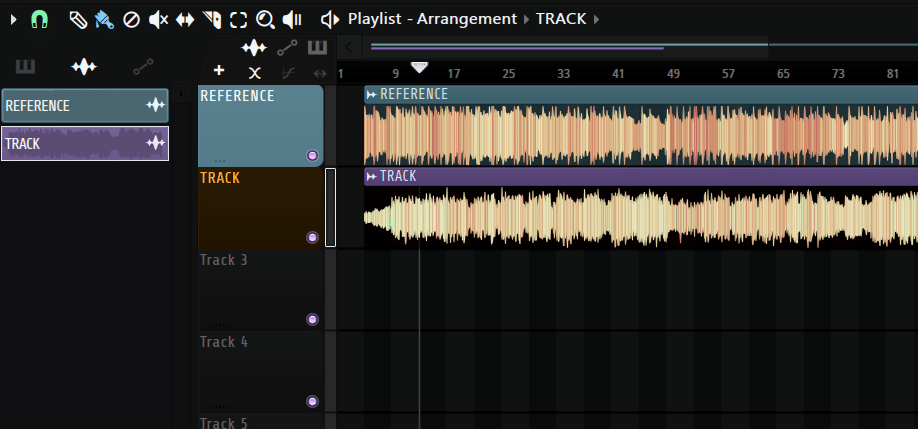
Pro-tip: you can use several reference tracks for different purposes! For example, you might like the bass frequencies in one track and the highs of another. Or you might like the stereo image of a third track. Combine difference reference tracks to create your own sonic identity.
You can also use specific plugins for referencing such as Reference2 or MCompare.
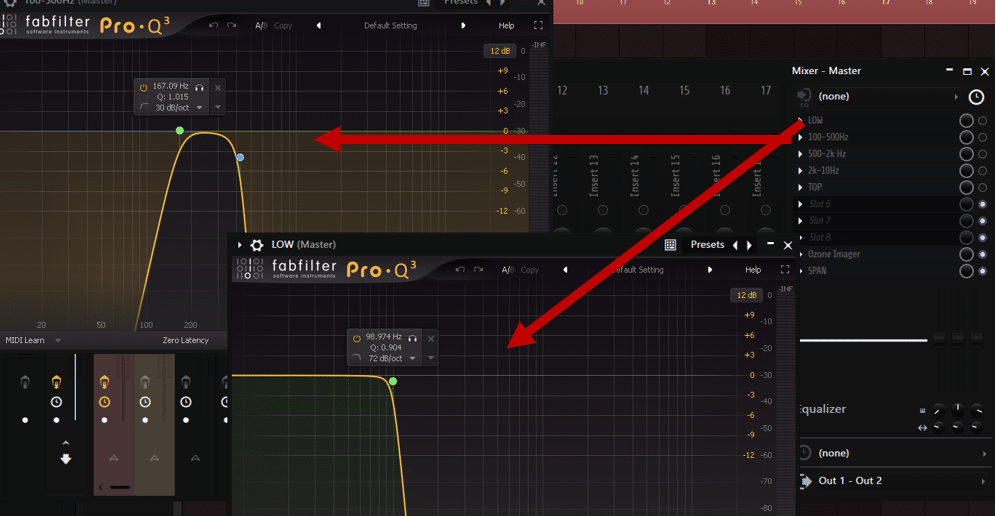
Another option is to use several reference tracks, with specific filters applied on them:
EQ
Corrective EQ will be one of the first steps you take when mastering a song.
Practically, there are 3 types of EQ’ing you can do at this stage:
- Mid/Side and Left/Right EQ’ing
- Automatic (or dynamic) EQ’ing
Let’s dig into when you might use each type when mastering a song.
Standard EQ
A standard EQ (or static EQ) is an EQ that cuts certain frequencies permanently. This is probably the EQ you’re most familiar with:
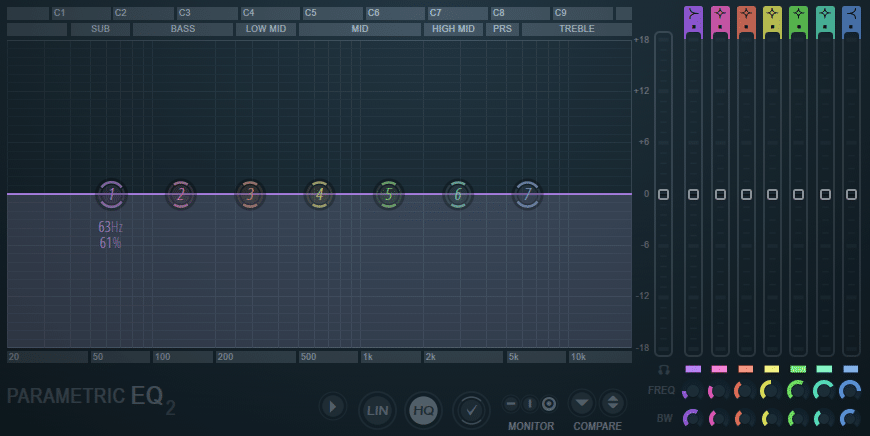
When mastering, a static EQ should be limited to minor corrections.
If you find yourself boosting or cutting more than 1 or 2dB, then there’s an issue with the mix.
One area where this isn’t strictly true is for low-cutting and high-cutting the track. The human ear can only perceive sound between 20 Hz and 20,000 Hz (roughly). This means that anything below and above this threshold can be safely removed.
Here, you should experiment with different EQ slopes, as this will highly affect how your low-end sounds:
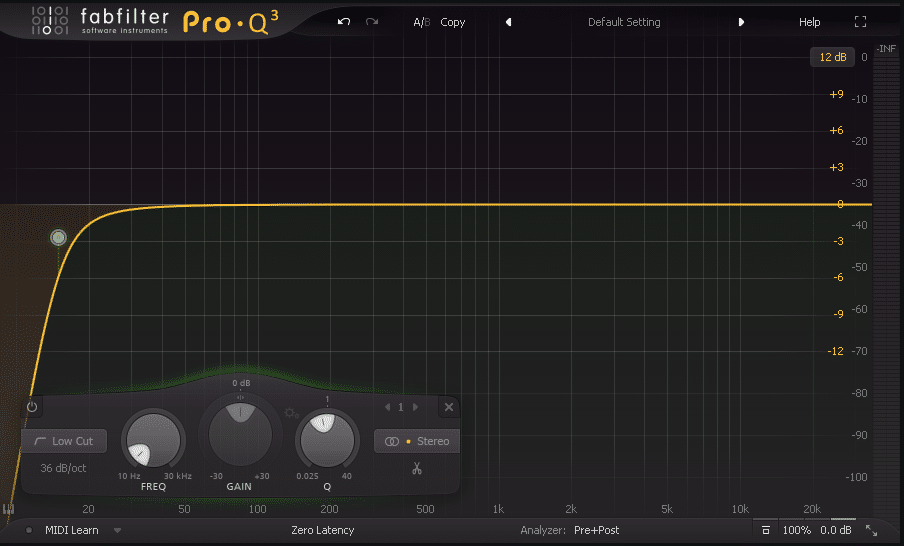
A static EQ might also be good to:
- add a bit of clarity in the high-end (above 10kHz)
- boost the fundamental frequency of your snare (between 100Hz and 250Hz)
- remove some overall muddiness in your mix (between 200Hz and 500Hz usually)
Mid/Side EQ
Mid and Side (M/S) processing is a topic we’ve covered in depth in our Mono vs. Stereo guide.
But here’s the TL;DR:
- “Mid” refers to the information of a stereo signal that is identical in both speakers.
- “Side” refers to the information that is different in both speakers.
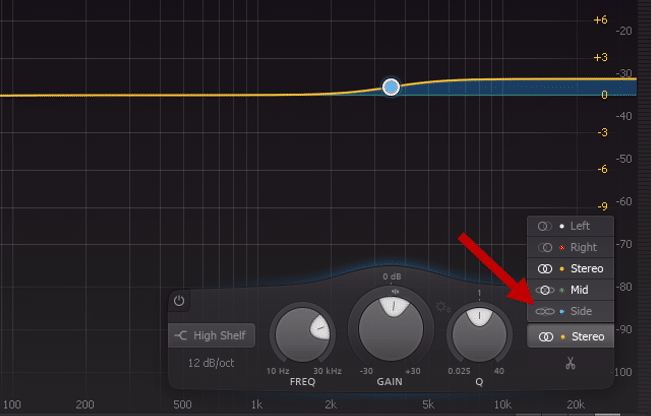
Note that not all EQ plugins offer M/S processing.
When you master a song, here are some examples of when M/S EQ’ing might come in handy:
- Remove side information in your sub bass. You usually want your sub to be mostly mono information.
- Boost some side information in the high end. This might help bring out some backing vocals or atmospheres.
Dynamic EQ
Finally, dynamic EQ’ing is also a super handy tool to help correct issues in your track. We’ve done an extensive guide on it in our soothe2 review, so feel free to check that one out 😊
De-Esser
De-essers are a type of dynamic EQ that target specific, harsh frequencies.
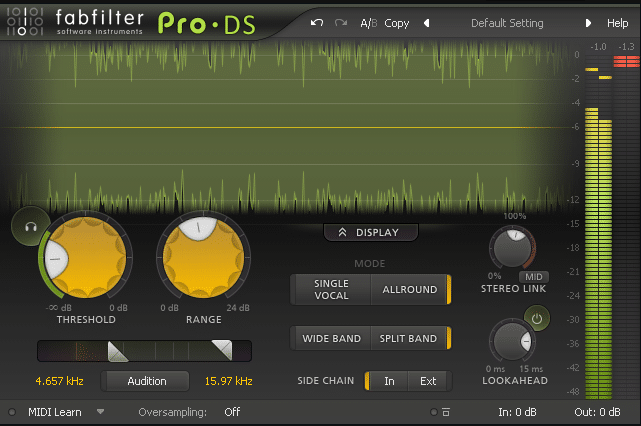
Much like a compressor, a de-esser is a dynamic processor that targets and removes high frequencies when they cross the threshold.
This allows you to preserve the clarity of the high-end throughout the track and only reduces it when the sound becomes harsh, ensuring your mix never sounds dull. They can be especially great for taming string noise and suppressing harsh cymbals.
Start with the de-esser in split-band mode and listen carefully to the “input monitor,” “delta” or “audition” signal, which allows you to zero in on the specific frequencies the plug-in is removing.
Adjust the target frequency until you find the sound you want to eliminate, then adjust the threshold until the harshness is gone.
If you’re interested, check out our full guide on de-essers here.
Compression
Compression is a tool that needs caution when mastering. Overdo it, and your entire mix loses all energy and dynamics.
However, gentle compression can glue your mix together and make it sound more cohesive.
For this, use subtle settings on the ratio (around 1.5, and not higher than 2). Use a slow attack to let the transients of your drums through (around 100ms), and a slow release to allow time for the compressor to recover.
The goal here is to add add a bit more energy to your mix, and tame some of the peaks.
Limiting
Applying a limiter is usually the last step in a mastering chain.
The aim of limiting is to bring our track to its maximum loudness while preventing digital clipping.
The most popular choices for limiting are Ozone Maximizer and FabFilter Pro-L2. However, there are also free alternatives like Frontier and TDR Kotelnikov:
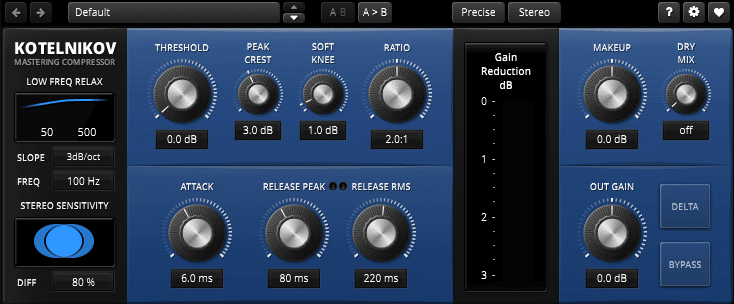
When applying your limiter, make sure to use the loudest part of your track to demo.
If you want to learn more about limiters, check out our full guide over here.
However, what sort of loudness should you actually aim for? That’s where metering comes in 👇
Metering
Metering allows you to monitor the exact loudness of your master. A go-to plugin for this is Youlean Loudness meter, which is free and recommended by the best engineers around the world:
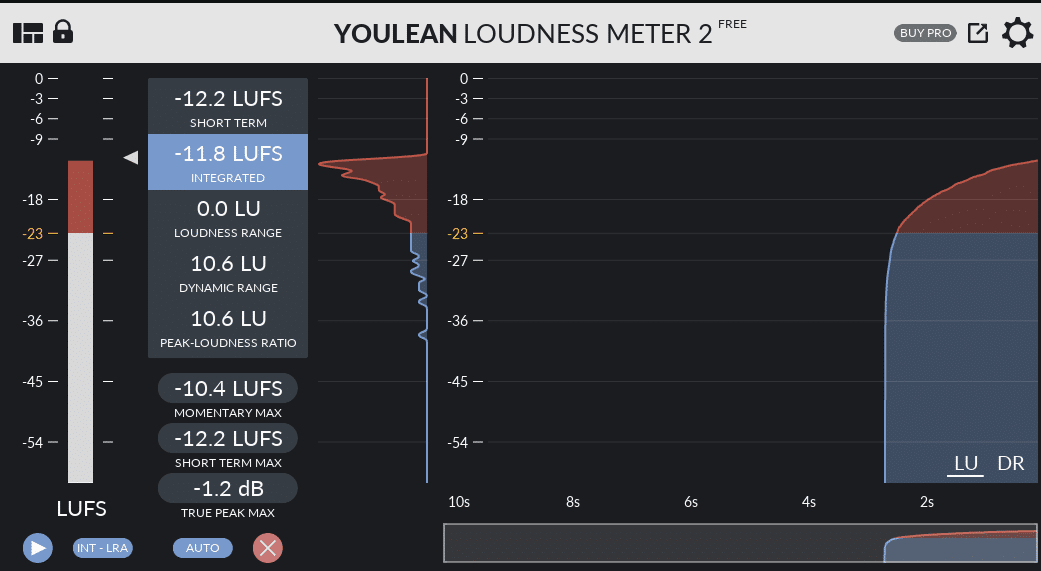
How loud you want your master will largely depend your genre and taste. Some commercial songs and genre will need to be extremely compressed (think pop, EDM, hip hop) while others can be a lot quieter and dynamic (jazz, ambient, etc.).
Generally, Spotify recommends an integrated LUFS of -14dB, and a true peak that does not exceed -1dB.
However, most chart-topping songs nowadays actually push to loudness way beyond -14dB. So if you stick to the recommended loudness, your track might sound too quiet when played on streaming platforms. My best advice here is to look at your reference track and try to match their loudness.
To achieve loudness, make sure to use several compressors and limiters in combination. If you need several dBs of increased loudness, you run the risk of completely overloading a single plugin.
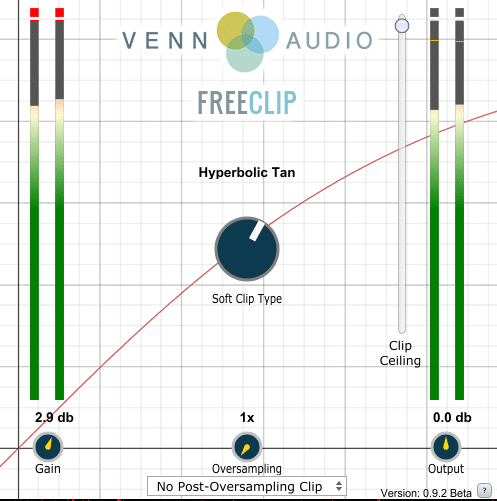
Soft clipping is also a great tool to add extra headroom. A plugin such as Freeclip is great for this:
That’s It for this Guide on How to Master a Song! 🙏
That’s a wrap for this guide. Hopefully we were able to give you some helpful tips and tricks on how to master your next tracks.
Was anything unclear? Something we missed? Let us know over at [email protected]
