Learn how to produce professional quality mixes using Ableton’s stock audio effects.
Mixing is a process that creates a space for the elements of your track to live in, and also creates cohesion between those elements. There are countless mixing tools available on the market in the form of plugins, but Ableton offers 5 exceptional tools that are capable of producing professional quality mixes all on their own. These tools include Ableton’s EQ Eight, Compressor, Saturator, Filter Delay, and Reverb, all of which are available in the Standard version of Ableton.
People always speak of attaining professional quality mixes using stock plugins, but is this really possible? Of course, it is… if you know what you’re doing. I’ll be running you through Ableton’s 5 most useful mixing tools in detail, and by the end of this guide, you’ll have all the knowledge that you need to operate each device. Many mixing techniques use these 5 mixing tools, so the first step is to learn how they work. I’m a firm believer that mixing is a simple art form, and I’m about to demonstrate why.
There’s a lot of confusion over what constitutes “mixing.” People often mix as they produce, so there’s not always that distinction between the production and mixing process. I think it’s actually beneficial to mix as you produce, and as a producer, you have the massive advantage of having full control over your sound selection and arrangement; this will allow you to achieve a quality mix regardless of your mixing ability.
Working as an audio engineer requires a set of skills, and tools, that are well beyond the scope of many music producers and musicians. If you’ve ever tried to mix someone else’s song before, you’ve likely realized that issues that could easily be fixed by choosing a different sound or modifying the arrangement, are no longer easy fixes because the client may not want to change anything. You sometimes end up having to reach deep down into your bag of tricks to find a solution to an unrelenting client’s mix issue; this is where your mixing tools come into play.
A poorly recorded song is going to be a nightmare to try and mix, and a big reason why you may doubt your mixing ability is because you’re unknowingly working with unusable content. This doesn’t necessarily mean that you aren’t good at mixing, it just means that there are recording issues that need to be addressed at a recording level and not a mix level. It’s not unheard of to tell a client that they need to re-record something. As the old saying goes, “Shit goes in, shit comes out.” Sometimes it doesn’t matter how skilled you are as an engineer if the material you’ve been handed is mangled beyond repair.
For the most part, if you’ve recorded exceptional quality audio, you won’t be forced to do much devil magic when it comes to mixing. You can take an adequately recorded, arranged, and balanced song from 80% complete to 95% complete with the following mixing tools. In certain situations, the mix may call for a completely unique processing device, but for the most part, these 5 tools will get you from point A to point B without a hitch.
1. EQ Eight
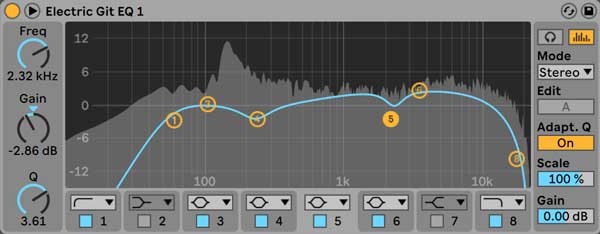
An EQ is one of the most potent mixing tools at your disposal, and it’s one of the most frequently used tools in my mixing arsenal. It allows you to control the gain level of different frequency ranges, known as bands.
EQs can be used to fit different elements of your song together like puzzle pieces. If there are too many elements in your song that all live prominently within the same frequency range, you can end up with a “muddy” mix. By cutting certain frequencies from one element, you provide more room for another element. Alternatively, you can boost frequencies from one element to rise above the frequencies of other elements. Contrary to popular belief, there’s nothing wrong with boosting EQ bands.
The EQ Eight in Ableton gives you control over the frequency, gain, and Q (bandwidth) for each of its eight bands. With the ability to switch EQ Eight into left/right mode or mid/side mode, Ableton’s stock EQ is more than capable of handling most mixing situations.
Another one of EQ Eight’s cool features is its adaptive scaling function that scales the amount of active gain change to all active filters; the result of this is either an exaggeration of the gain changes you’ve applied or an inverse exaggeration of the gain changes you’ve applied.
EQ Eight’s audition mode allows you to solo bands and sweep through the frequency spectrum to pinpoint troublesome frequencies; this is called frequency fishing. By attenuating the level of these unnecessary and unpleasant frequencies, you’re able to provide clarity to the elements within your mix.
If the concept of EQ is new to you, this interactive chart provides the typical “sweet spot” of different instruments, as well as information regarding where you should boost/cut to add/remove certain characteristics from your sound. For example, if you wanted to add more “warmth” to a vocal, you would boost around 200Hz, or if you wanted to add more “air” to a guitar, you would boost at around 16k+.
2. Compressor
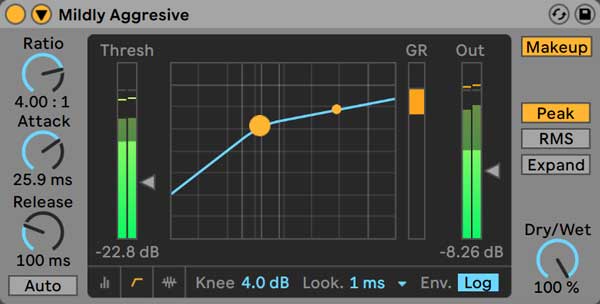
A compressor allows you to reduce the dynamic range of an audio signal. Compressors belong to the family of mixing devices known as dynamics processing tools.
Typically, a compressor is used to attenuate the volume of a signal when it passes above a certain level. One of the most common types of compression is peak compression, which is used to tame unruly transients in material such as drums, vocals, and all sorts of other instruments.
The 4 basic controls on a compressor include threshold, ratio, attack, and release. Some compressors determine the value of these parameters automatically, but Ableton’s Compressor allows you to dive right in and control them yourself.
On top of acting as a compressor, Ableton’s Compressor works as an expander. This means that Ableton’s Compressor can perform all of the following functions: downwards compression, upwards compression, downwards expansion, as well as upwards expansion.
Although the standard Compressor in Ableton provides a lot regarding functionality, I actually prefer the character that the Glue Compressor delivers. Ableton’s Glue Compressor was designed by a company called Cytomic, and it stacks up exceptionally well against 3rd party VSTs.
Compression is one of the audio engineering concepts that people have the most trouble understanding. I run into music producers all the time who for 5+ years haven’t fully comprehended how a compressor works. This isn’t because the concept of compression itself is that difficult to grasp, but because to effectively use a compressor, you need to understand how all of its parameters function. Basically, if you kind of get it, you don’t get it.
One of the most popular guides I’ve written to date is called The Ultimate Guide to Compression, and within it, I explain everything you’ll ever need to know about compressors and how to use them. It’s provided clarity to hundreds of producers struggling with compression.
3. Saturator
A saturator is a device that applies compression and distortion. Back when recording to tape was the norm, engineers had to make sure the signal they were recording to tape wasn’t too low. If it were, the engineer would end up with a recording full of noise caused by the surface of the tape. If the signal were too strong, the tape would reach a point in which it was no longer capable of holding any more information–it would become completely saturated. The byproduct of saturation was non-linear distortion and compression. When you’ve undoubtedly heard people talk about tape saturation, this is what they’re referring too.
Ableton’s Saturator is used to emulate the characteristics that driving an audio signal into a tape machine would yield. A saturator is an excellent tool to reach for if you’re trying to “thicken” your audio. The “thickness” is a result of the distortion generating additional frequency content, and the compression keeps the affected frequency range under control.
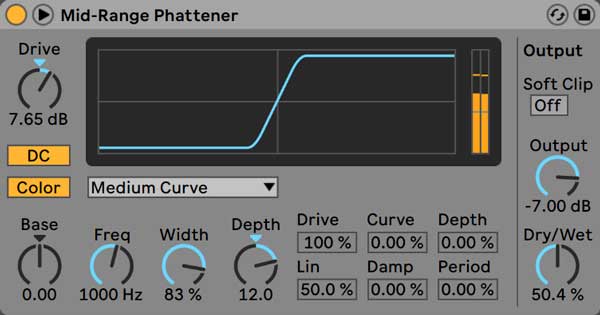
The Drive function on Ableton’s Saturator is what will apply the saturation, and the Dry/Wet knob will allow you to control the mix between the direct signal running into Saturator and the processed signal. Beyond this, selecting different curve types from the drop-down menu will modify how the value of the input’s signal is remapped by Saturator to create the devices output signal.
Color toggles two coloration filters on and off. The first filter is controlled by the Base knob, which determines how much the Saturator effect will be reduced or increased for very low frequencies, while the second filter is controlled by the Freq, Width, and Depth Knobs.
The Freq knob sets the center frequency of the second filter. The Width knob controls the bandwidth of the second filter, and the Depth knob determines how much the second filter will contribute to Saturator’s sound.
To accurately listen to how Saturator is affecting your input signal, make sure to use the Output knob to level match the output signal level with the input signal level. As an additional note, engaging Soft Clip applies a separate instance of the Analog Clip curve to Saturator’s output.
It’s not very often that you run across audio that requires a DC offset filter applied, especially if you’re producing mostly in-the-box. If the average value of a waveform over one period is not zero, it has a DC offset. Saturator has a Pre-DC Filter that allows you to filter DC offsets at its input stage. While it’s not one of Saturator’s primary functions, knowing that it exists could save you from dropping cash on unnecessary plugins if you ever run into a DC offset pickle.
An exciting feature of Saturator that many people don’t know about is that when you select “Waveshaper” from the dropdown list of curve types, 6 additional functions become available to you when you expand the disclosure triangle in the top left corner of Saturator. These parameters include Drive, Curve, Depth, Lin, Damp, and Period.
Drive determines how much the input signal will be influenced by the other 5 Waveshaper parameters. Curve adds third order harmonics to the input signal. Depth superimposes a sine wave curve onto the Waveshaper curve and sets its amplitude. Lin works together with the Curve and Depth parameters to alter the linear portion of the Waveshaper curve. Damp flattens signals near the grid’s origin, behaving like an extremely fast noise gate, and Period determines the number of ripples in the sine wave created by the Depth parameter.
Waveshaper happens to sound really cool on bass growls due to how it’s capable of mangling incoming audio signals. I would consider it more of a creative effect when used in this way, but it’s still worth mentioning here.
4. Filter Delay
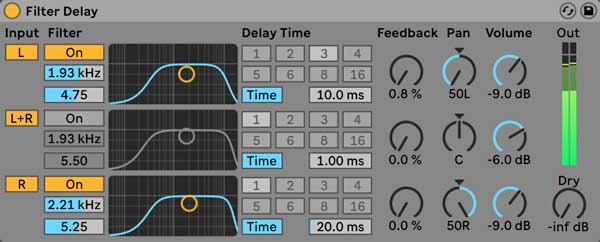
A delay is a device that creates a duplicate version of an incoming audio signal and runs it through a feedback loop at timed intervals. Many delays have the additional option of applying a filter to the feedback loop, which effectively creates separation between the feedback signal and the original input signal.
As with the rest of the mixing tools on this list, a delay is used to create a sense of space. A short delay with a low amount of feedback is capable of making an element in your mix sound dense, while a longer delay is capable of imparting an ethereal quality.
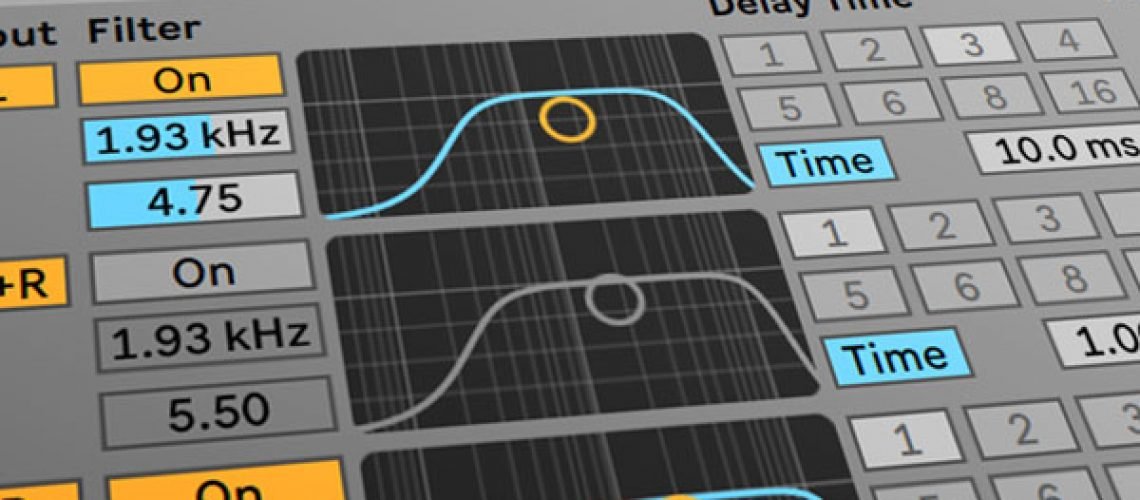
Ableton’s Filter Delay offers all of the basic functionality that I could ever ask of a delay. It gives you control over the delay lines (L, L+R, or R), bandpass filters, delay times, feedback amounts, pan positions, and volume level for each delayed signal.
Filter Delay allows you to toggle on/off 3 separate delay lines, and run each one through its own filter section that can be toggled on/off as well. There’s the ability to control the center frequency of each bandpass filter, as well as it’s bandwidth.
One of the biggest mistakes that you can make with your delay is losing control of the effect it applies. Certain atmospheric music calls for long, drawn-out delays with copious amounts of reverb, but for lots of Pop, Rock, Rap, and Country music, an out of control delay will merely muddy up your mix.
Selecting a delay time that’s in time with the tempo of your song is essential if you’re trying to achieve a delay that sounds intentional and under control. To calculate the quarter note value of a delay in milliseconds (ms), divide 60,000 by the BPM of your song. For example, 60,000 / 120 BPM = 500 ms. In this situation, 500 ms is equal to the value of a quarter note playing at 120 BPM. I don’t care much for doing math problems while I’m mixing, so I use an app called musicMath to calculate note values in ms for me. Luckily, Ableton’s Filter Delay allows you to toggle from Time mode to Sync mode which allows you to set delay times in note values as opposed to ms.
5. Reverb
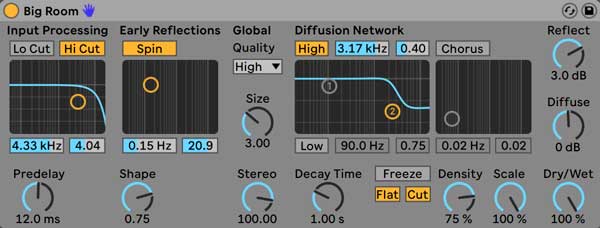
A reverb is a device that models the acoustic properties of a room and simulates what the reflections would sound like if you were to play your input signal within the room. Reverb is like wildfire in the sense that if you let it get out of hand, you’ll destroy your entire mix. Moderation is the name of the game when you apply reverb, and a little goes a long way.
Ableton’s Reverb has multiple controls that allow you to manipulate the properties of the room you’re placing your sound in. First, your signal passes through high- and low-cut filters; these can be toggled on/off in the Input Processing section, and the center frequency and bandwidth can either be adjusted using their dedicated controls or the bandpass display node.
The Early Reflections section allows you to control the modulation rate and amount applied to the early reflections. This section can be toggled on/off using the Spin button. The Shape knob below the modulation controls allows you to sculpt the prominence of early reflections, as well as their overlap with the diffused sound.
Under the Global section, you’ll find a drop-down menu labeled as Quality. This allows you to save CPU by using the lesser Eco mode, or forfeit CPU as you move up to High mode. Ableton’s Reverb doesn’t require a whole lot CPU power, so although the option is there, I would just leave Quality on High because you can hear a significant loss in quality when reducing the quality to Eco.
The Size knob controls the size of the room… who would have guessed? A high value will provide a diffused delay effect, while a small amount will give a bright metallic sound.
The Stereo knob allows you to control the stereo width of the processed signal. At 0, the output signal is in mono, and at 120, your left and right monitors will output reverberant channels that are independent of one another.
The Diffusion Network section creates the reverberant tail that follows the early reflections. You can apply high and low shelving filters to provide frequency-dependent reverberation decay. This section helps to say a lot about what material the room is made of. For example, a gym has a lot of hard surfaces and would likely reflect many of the high frequencies so it would make sense to allow these high frequencies to pass through the filter section. On the other hand, a large sound treated room like a concert hall would likely dampen those upper frequencies, even if it’s decay time is similar to that of the gym.
Decay Time is one of the knobs in Reverb that has the most noticeable effect. It adjusts the time required for the diffusion network’s tail to drop 1/1000th (-60 dB) of its initial amplitude. Most beginners quickly realize they should look for the decay knob on reverb units because it will have the most drastic effect on the output signal. Sounds with a shorter decay time are usually perceived as closer within the stereo field and in a smaller space, while sounds with a longer decay time are typically perceived as further away and in a larger space.
Reverb’s Freeze function allows you to sustain the diffuse response of the input sound almost indefinitely. Engaging the Flat button bypasses the Diffusion Network filters while Freeze is engaged, and toggling on the Cut button modifies Freeze by preventing the input signal from adding to the frozen reverberation. The Freeze function is especially useful for auditioning the sound that Ableton’s Reverb is producing.
Ableton’s Reverb has a Chorus section that can be toggled on/off, and it allows you to control it’s modulation rate, as well as it’s modulation amplitude. I’ve found that regardless of how I set this in conjunction with the other parameters it has a relatively minor effect on my processed signal.
Density affects the density of the Diffusion Network. Setting Density to a lower value produces thinner sounding echoes while setting it to a high value produces denser ones. Scale controls the coarseness of the diffusion, with higher values producing a darker sound.
Reflect allows you to control the output level of the Early Reflections, while Diffuse enables you to manage the output level of the Diffusion Network. You can only attenuate these outputs level down to -30 dB, so there’s no way to remove the Early Reflections or Diffusion Network completely.
To avoid drowning your sounds in reverb, you can use the Dry/Wet knob to achieve a balance between the unprocessed signal and processed signal, or apply Reverb in parallel using a return track.
For a more comprehensive guide on how to use reverb, check out The Ultimate Guide to Reverb!
I want to invite you to join me in the Black Ghost Audio group on Facebook; it’s full of producers currently working in the music industry who are more than happy to help you improve your productions. Leave a comment below if you have any questions regarding this article. Your feedback is always appreciated, and we’ll take it into account when we publish future articles.
