Phase Plant is (possibly) the most powerful synth out there. Modular by nature, its capabilities are limitless.
However, it also has a steep learning curve. And its complex workflow can discourage some.
Being a modular synth (more on that later), Phase Plant relies on YOU to do a lot of the work. Luckily, we’re here to help you on your journey!
In this guide, we are going to look at:
- What makes Phase Plant the most unique synth
- Understanding the general layout
- How to create your first sounds
- My 6 favorite tips to get the most out of Phase Plant
Ready? Let’s dive in! 👇
Phase Plant: A Quick Disclaimer 🚨
Before we dive head-in, I do need to give you a disclaimer.
Phase Plant is quite an advanced synth. And it demands some previous knowledge.
This is why I would not recommend starting with Phase Plant as your first synth. However, with some previous experience with Serum or Vital, Phase Plant might become your new best friend.
With that said, I would suggest the following readings before we continue. These are concepts crucial to how Phase Plant works. Which, for the sake of length, we won’t be expanding on in this guide:
If you’re familiar with all of these topics, then you’re ready to dive in 👇
By the way, if you don’t have Phase Plant yet, you can grab it here. Splice also offers a rent-to-own model.
What is Modular Synthesis? 🤔
As mentioned in the intro, Phase Plant is a modular synth. So, what does this mean?
Modular synthesis is a form of sound synthesis broken down into modules:
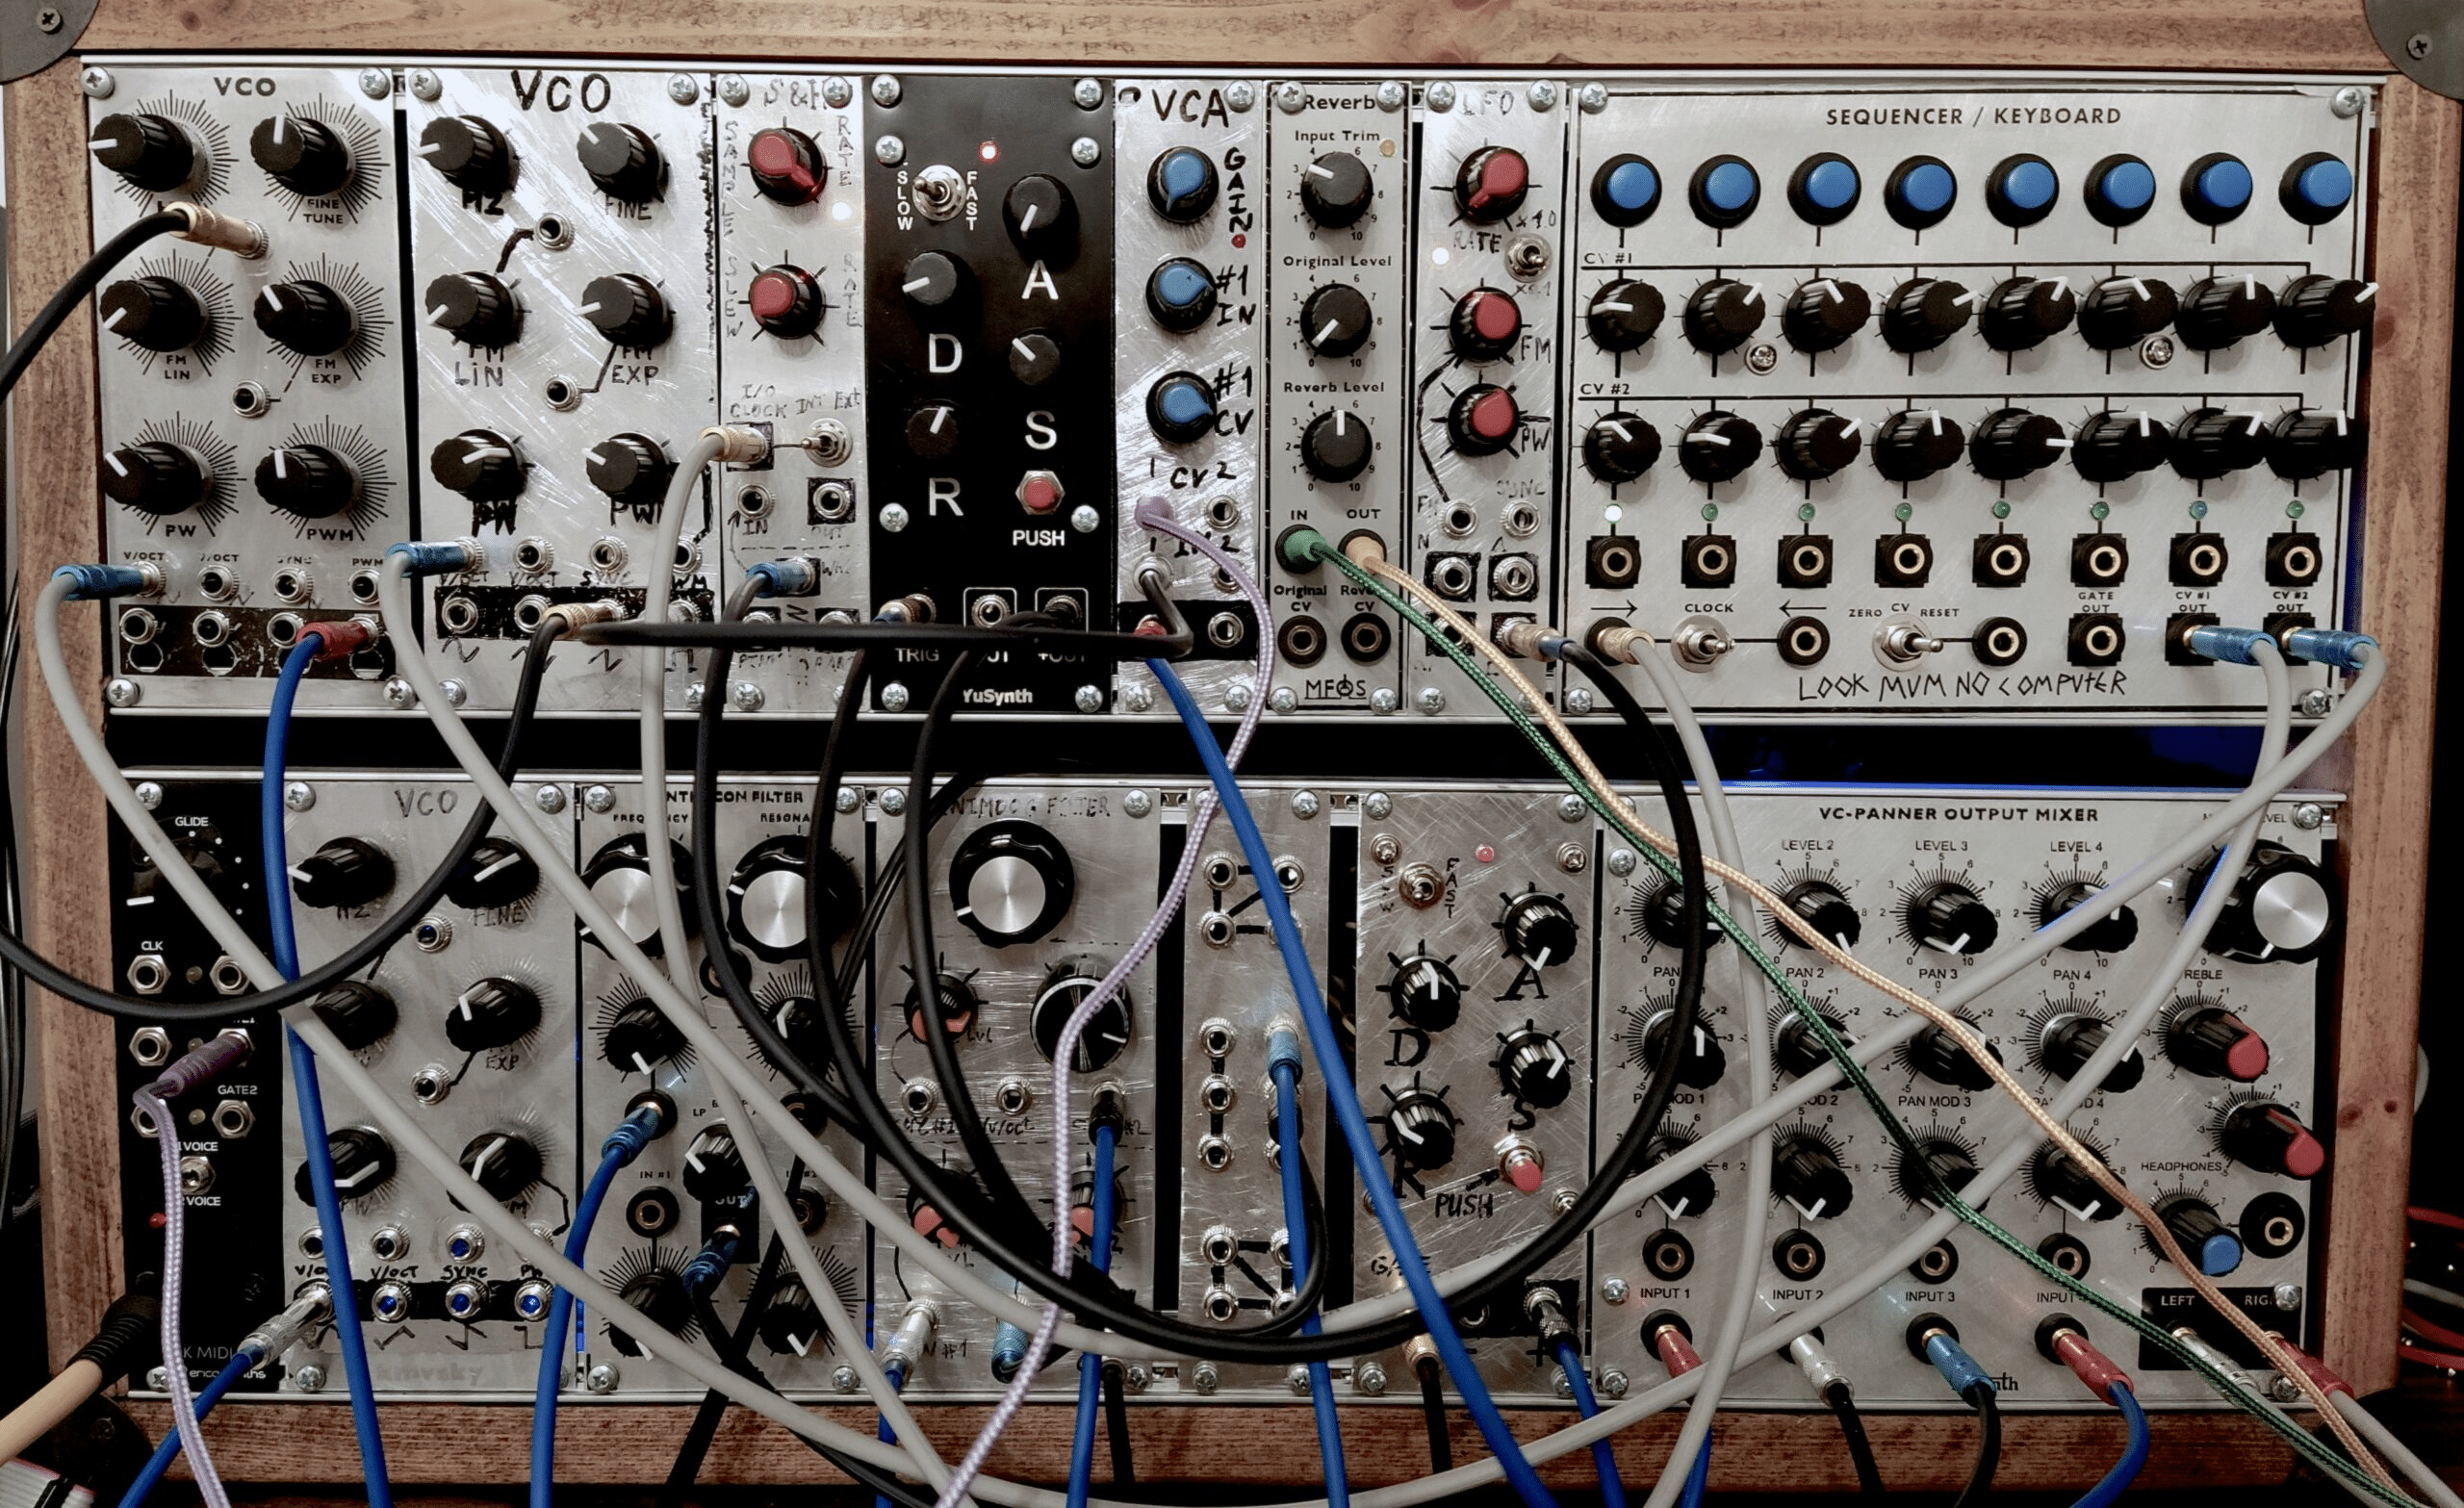
Each module works independently. This means you can route modules to create the sound of your dreams. Basically, there is no fixed structure. It’s up to you to build and connect modules.
Modular synthesis appeared in the early 60s. However, the actual first modular synth is still debated.
Eurorack is the most well-known modular standard today.
If you remember our article on the origins of MIDI, this is the same thing. Eurorack defines a set of standards so that modules from different manufacturers are compatible:
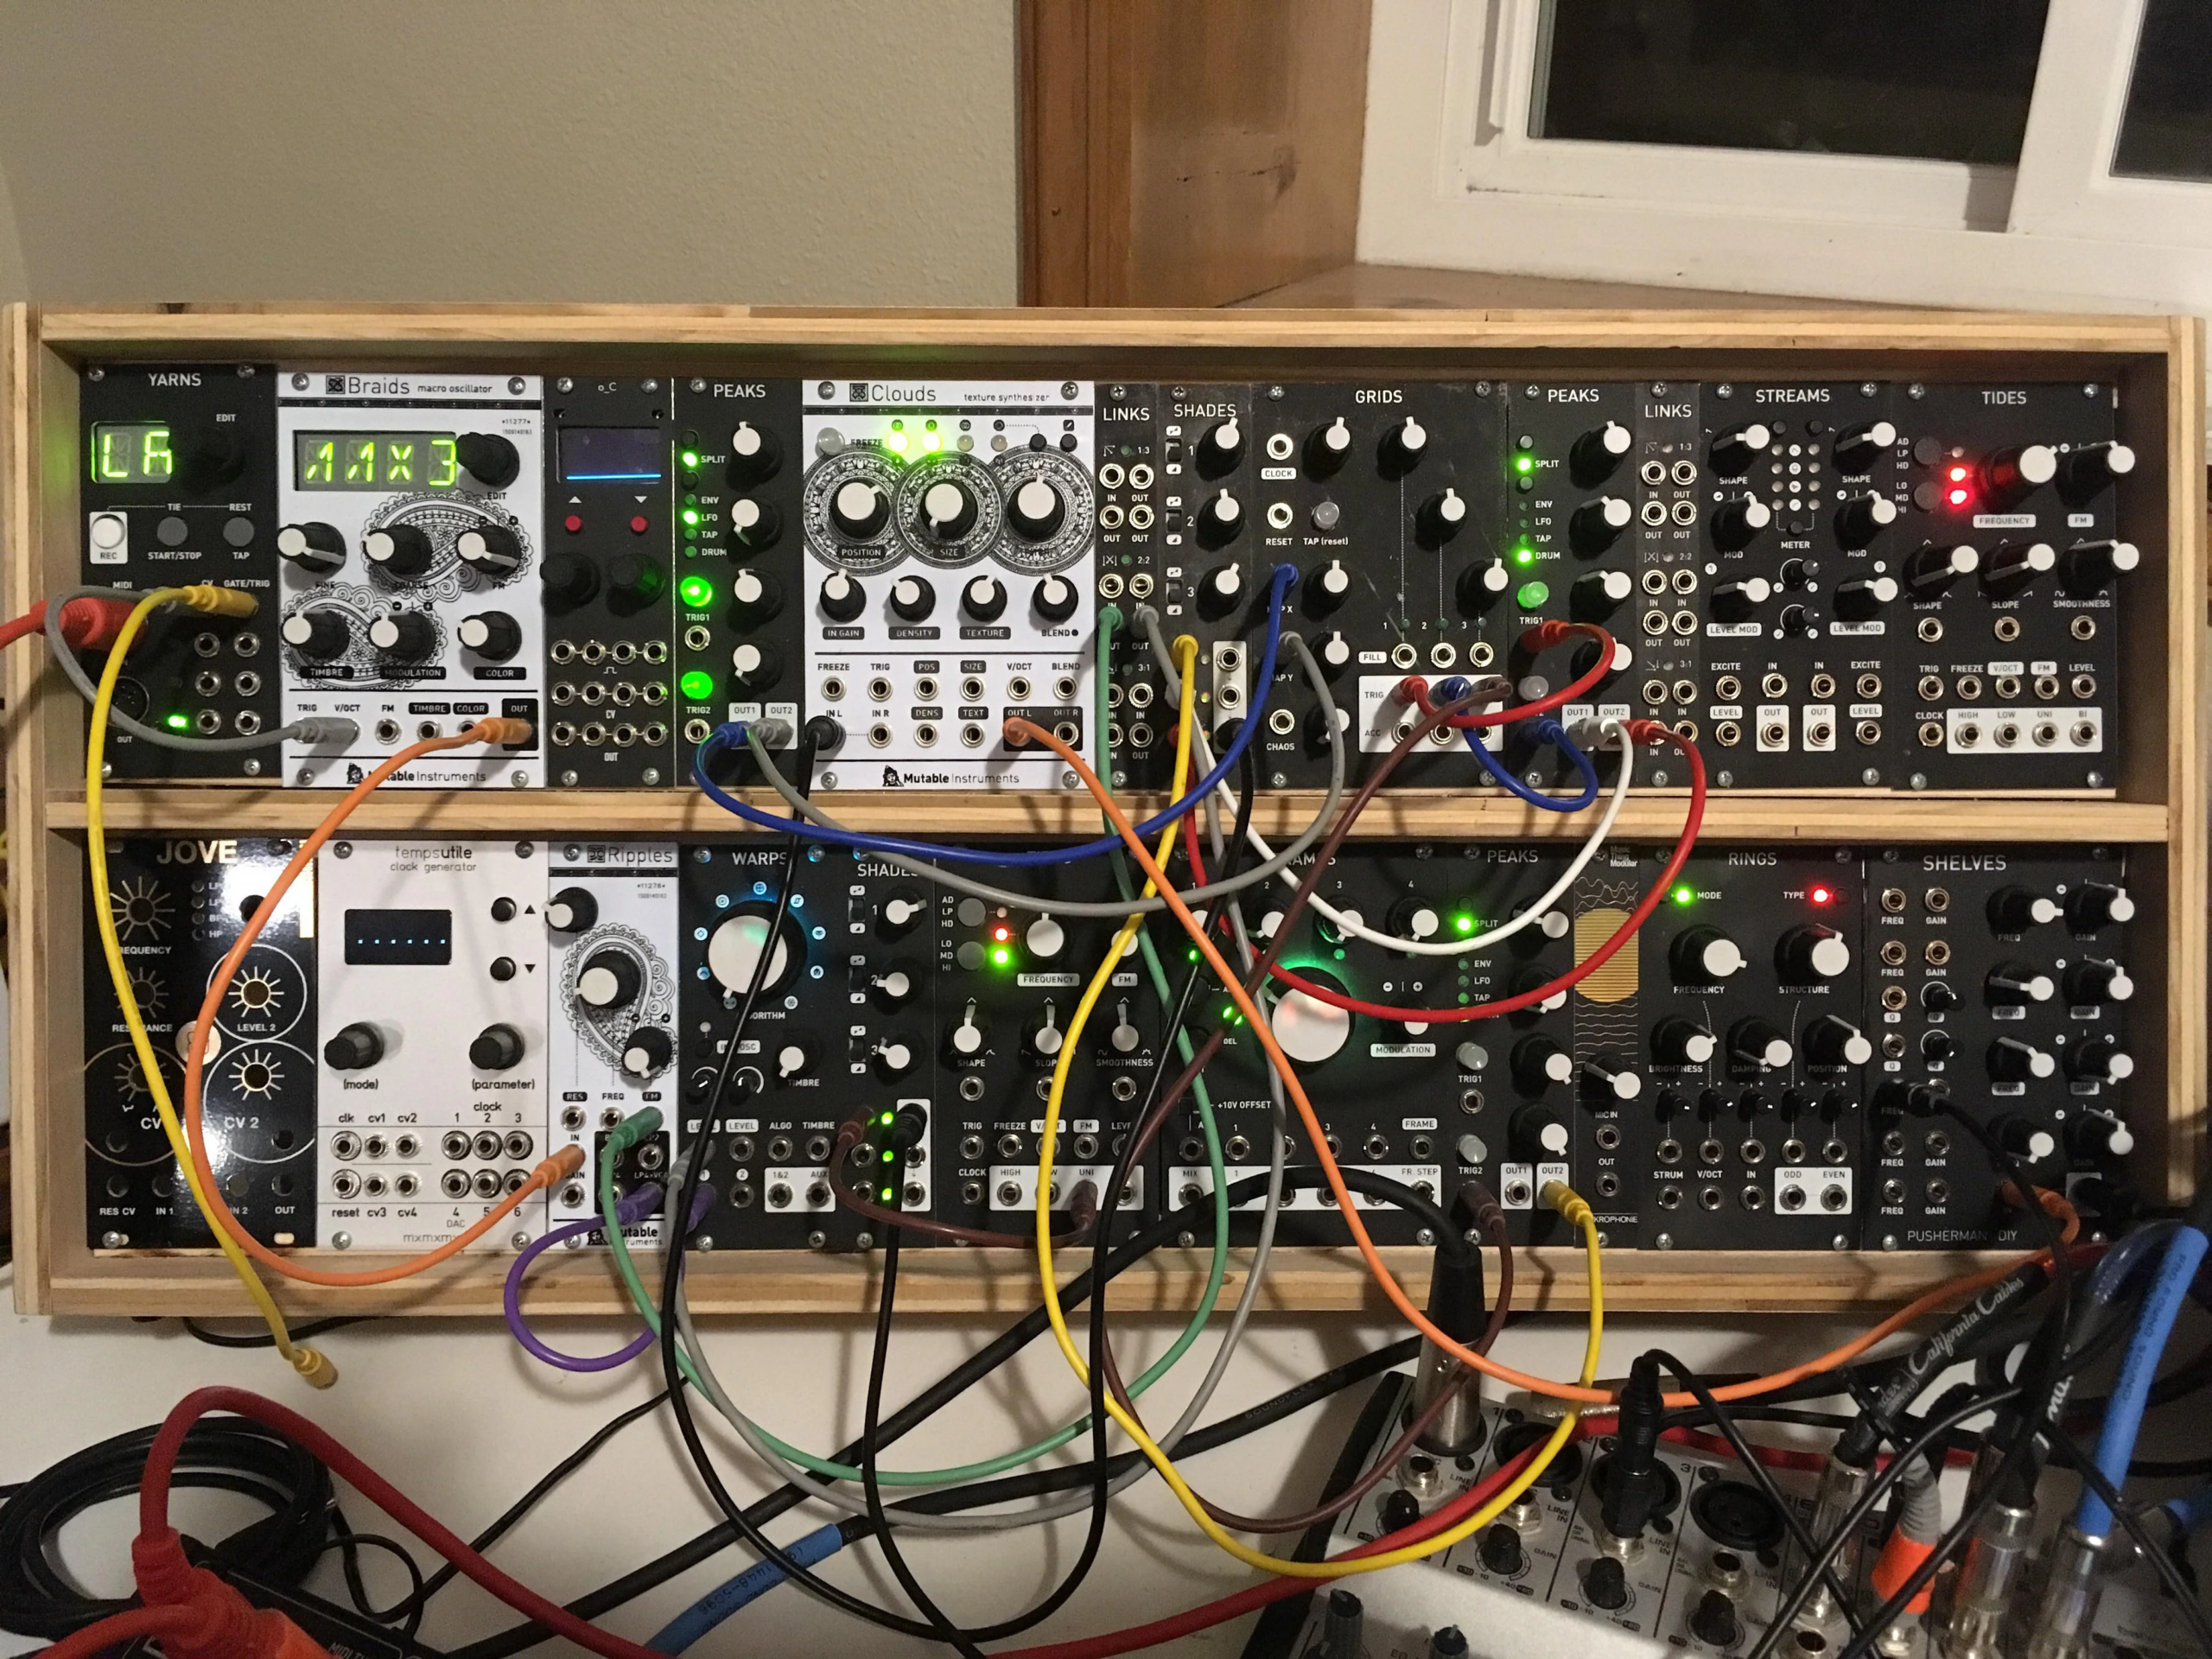
As you can imagine, modular synthesis is not for the faint of heart. This type of synthesis is for those who like to get their hands dirty. But if that’s the sort of thing you like, modular synthesis gives you unparalleled control.
Of course, this isn’t a guide on physical modular synthesis. But you can think of Phase Plant as a digital equivalent.
So What is Phase Plant? 🔍
Now that we have a basic understanding of modular synthesis, let’s dive into Phase Plant.
Phase Plant is a “modular synthesizer where you can combine different synthesis techniques”:
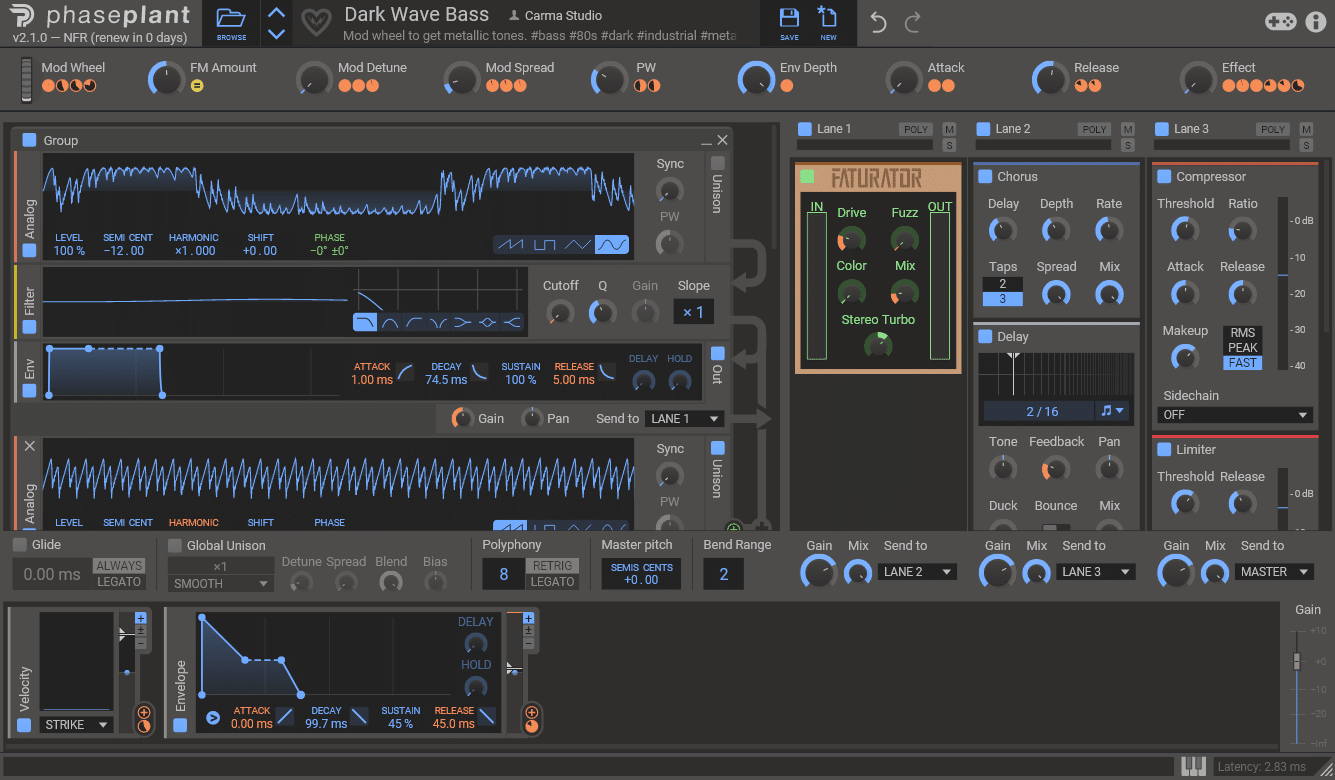
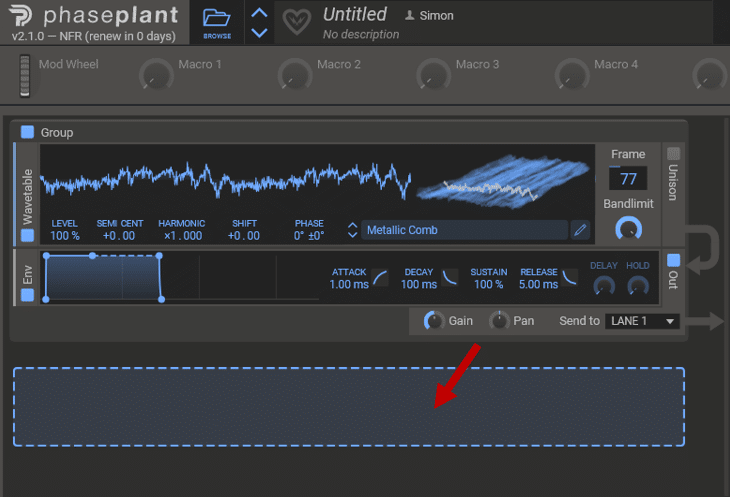
It features a choice of synthesis methods, effects, and modulations. You add each module manually, then route them. Here’s a quick example:
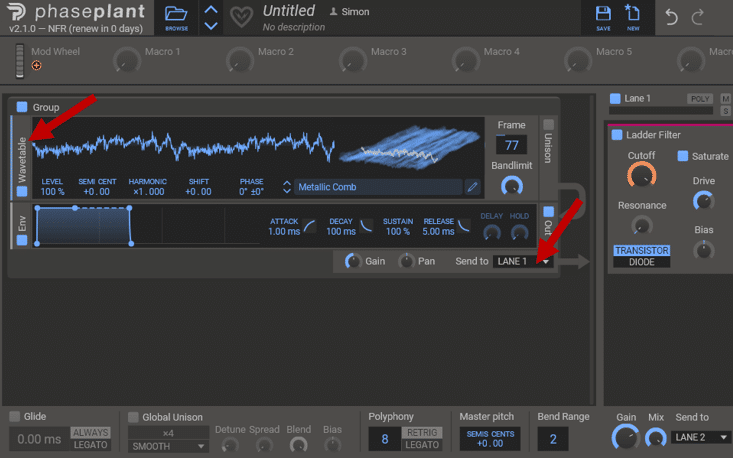
In this example, I’ve loaded up a Wavetable generator. I am then routing it to Lane 1, which is the first effects chain. There I’ve added a filter module.
Just like a physical modular synth, Phase Plant lets you add as many modules as you want.
You simply click on the blank space to do so:
Phase Plant Interface 🖥️
Phase Plant is the only synth that offers such a blank canvas when you open it. Play a note, and you won’t get any sound 😅
With Phase Plant, you must build your sound from the ground up.
So let’s run through the interface:
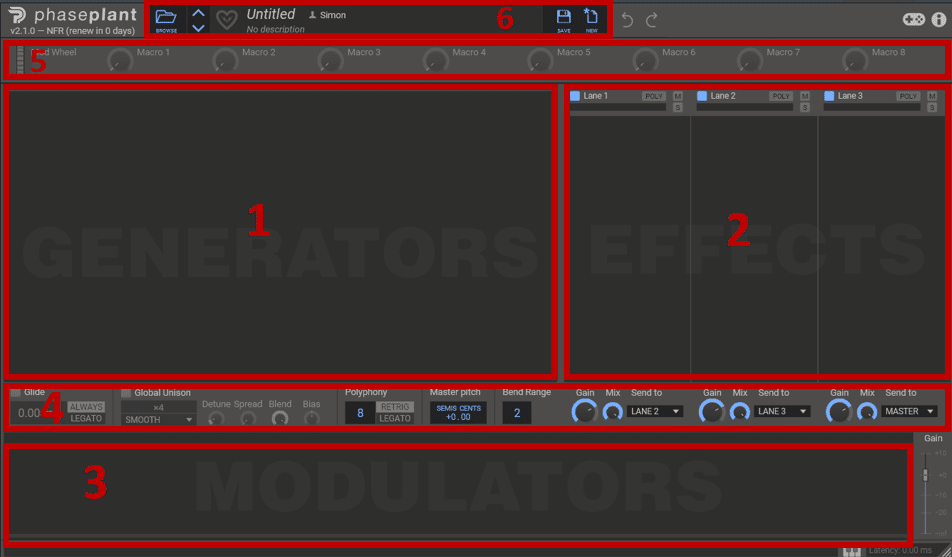
- The Generator area. This is where your sound is generated (duh). You get a choice of 5 main types of generators: analog, granular, noise, sampler, and wavetable. Confusingly you also have a few effects here such as distortion. But more on that later.
- The Effects area. This is where you add your effects. These include different types of EQ, distortion, filter, reverb, and more.
- The Modulation area. This is you create envelopes and LFOs to modulate any parameter you want.
- The Voice Settings. Here you can fine-tune global controls such as glide, unison, and polyphony.
- The Macros. You have 8 macro knobs to which you can assign any number of parameters. If you’re not sure what macros are, read on 😉
- The Preset bar. Save and load your patches here.
Now that we understand the layout of Phase Plant, let’s dive a bit deeper 👇
Phase Plant’s Generator Area 🔊
As mentioned, this is where you generate your sound. However, you’re not limited to a specific type of sound synthesis.
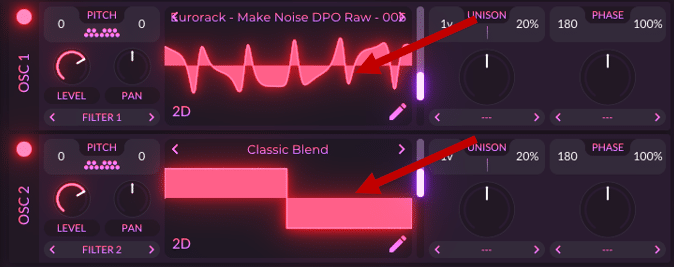
With Vital for example, you’re basically “stuck” with wavetable synthesis:
With Phase Plant, you have a choice of 5 types of generators:
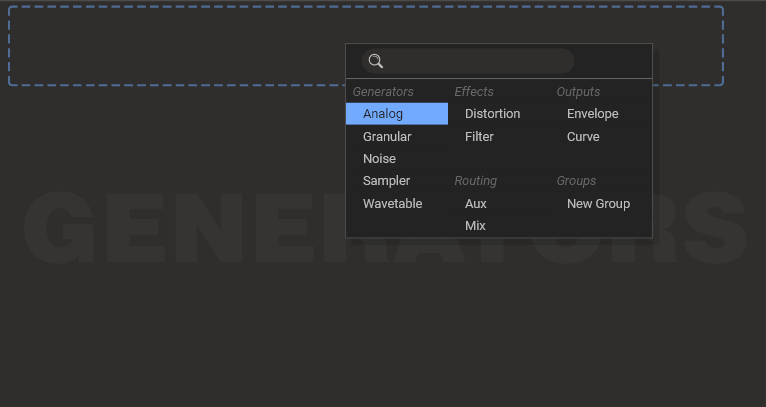
In order, we have:
- Analog. This aims to reproduce classic waveforms such as sine, square, and triangle. This makes it a perfect starting point for subtractive synthesis.
- Granular. As the name suggests, this is a granular synthesis module. Basically, you give it a sample, and it chops it into grains. It then plays them back more or less randomly:
- Noise. This is a noise generator module. You can use it to create inharmonic sounds such as drum hits. Or you can layer it with other sounds to add more texture.
- Sampler. This module allows you to play samples. You can set specific start and loop points, crossfading, and more.
- Wavetable. If you’ve used Serum or Vital, this section will look familiar. You can load up any wavetable of your choice, and browse between frames:

Each generator type comes with its own envelope section. This lets you control the ADSR of the generator:

About Grouping Generators
As you add new generators, you can choose between two options: grouped or separate. Practically, this means you can process several layers as one (with the same ADSR envelope for example):
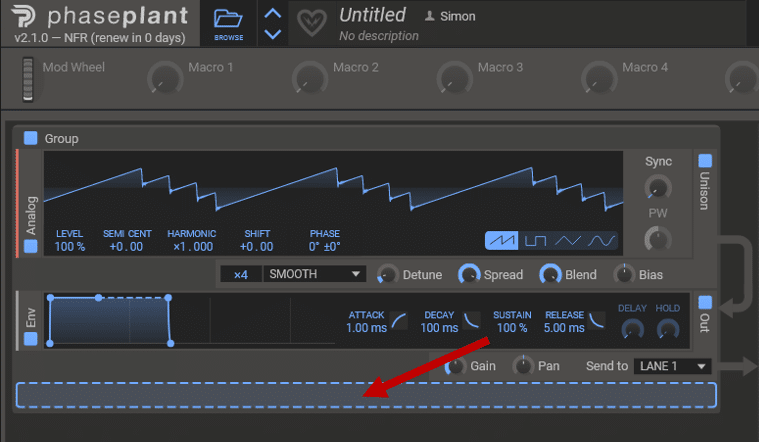
Each group can then be renamed for a clearer layout.
The arrows on the right-hand side indicate the signal flow:
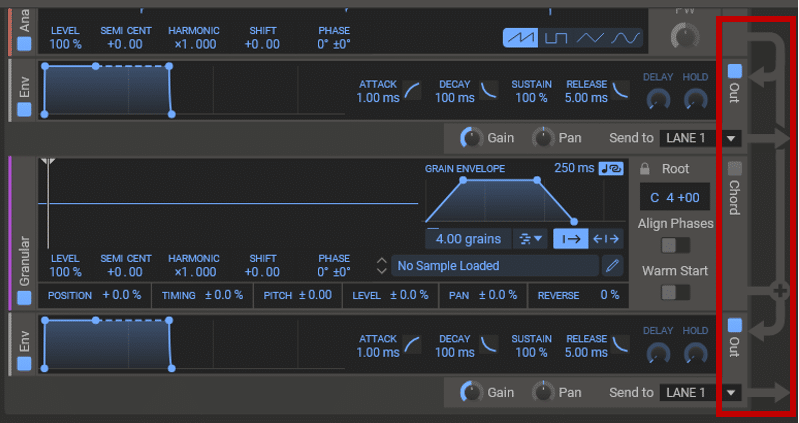
You can also easily re-arrange the order by drag-and-dropping modules. Simply hover over a module until the “cross” icon appears and then drag.
Effect, Routing, and Output Modules
When you load a new generator, you will notice other options:
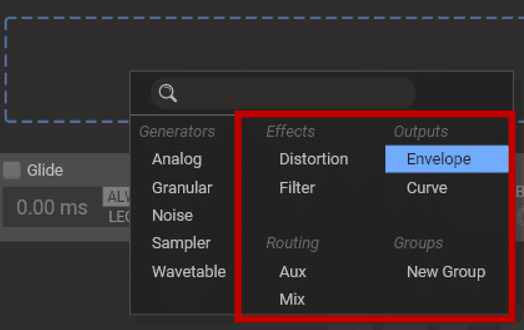
These are not modules that generate sound. However, they allow you to process and route your generators in different ways.
There are two different effects that you can insert in the generator section:
- Distortion: distorts the incoming signal from the modules above it
- Filter: applies a variety of filters to the modules above it
There are also two different output modules you can insert:
- Envelope: this is the ADSR module I mentioned previously
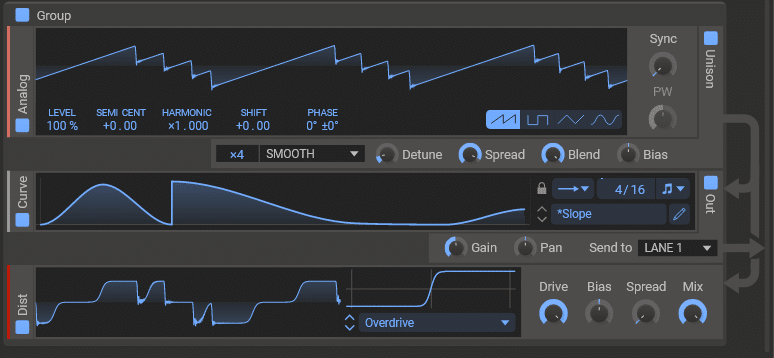
- Curve: this is a fully customizable ADSR module:
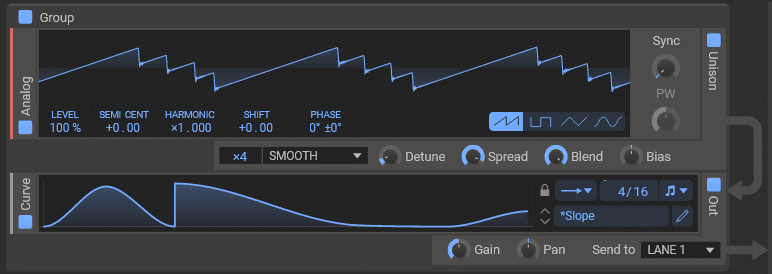
Note that without an “Output” section, Phase Plant does not produce a sound!
Similarly, the order of modules is crucial. If you place a Distortion module after an Output module, the distortion won’t apply:
Phase Plant’s Effects Area 💥
Next, let’s look at the effects area of Phase Plant:
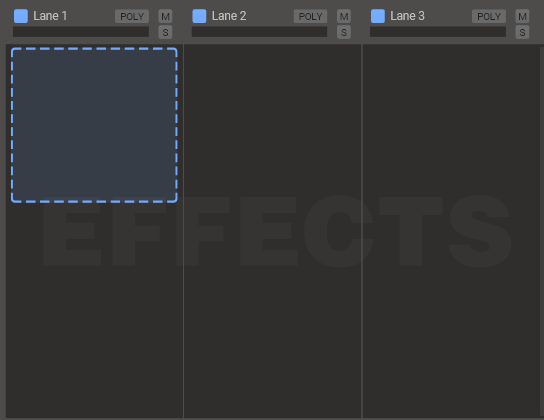
The effects sections are grouped into 3 different lanes. This allows you to route different generator groups to different effects chains:

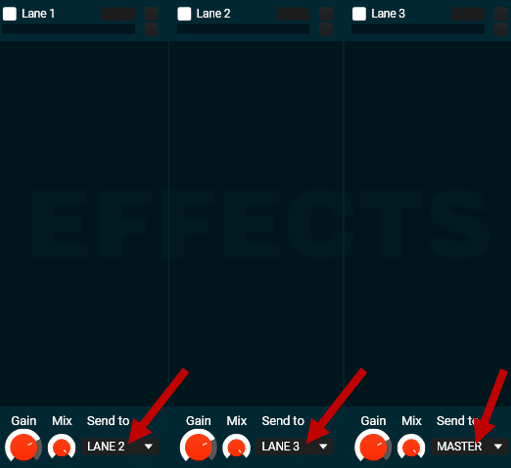
Note that, by default, Lane 1 flows into Lane 2. Lane 2 then flows into Lane 3. And Lane 3 finally flows into the Master output.
Each lane has its own gain-staging settings too:
The list of effects is quite sizeable, so I won’t run through all of them. Here are some of my favorites:
- Bitcrush. Give this one a try if you want that old-school vinyl rip effect.
- Ensemble. A beautiful ensemble chorus that gives the impression of several voices playing at the same time.
- Formant filter. Can create some really cool vowel-like filtering:
- Ladder Filter. A great analog-sounding low-pass filter.
- Nonlinear Filter. Another great sounding filter that adds a retro-style saturation:
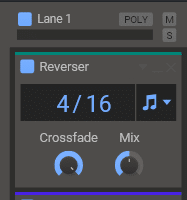
- Reverser. A handy tool that plays back reversed sections of the input signal. Great to create glitchy effects and build tension:
- Trance Gate. This is a really cool effect that lets you create custom gating effects:
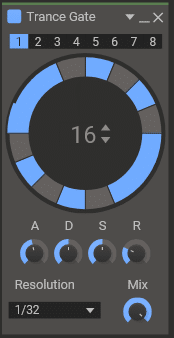
Each effect can be dragged up or down to re-arrange the signal flow. You can also save and load presets by clicking on the settings panel:
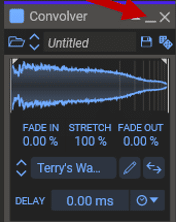
Note that kiloHearts calls their effects modules “Snapins”. You can check the full list of effects here.
Oh, did I mention they were free and also work outside Phase Plant as regular VSTs? 😍
Phase Plant’s Modulation Area 🎛️
Next, let’s move to the modulation section of Phase Plant:
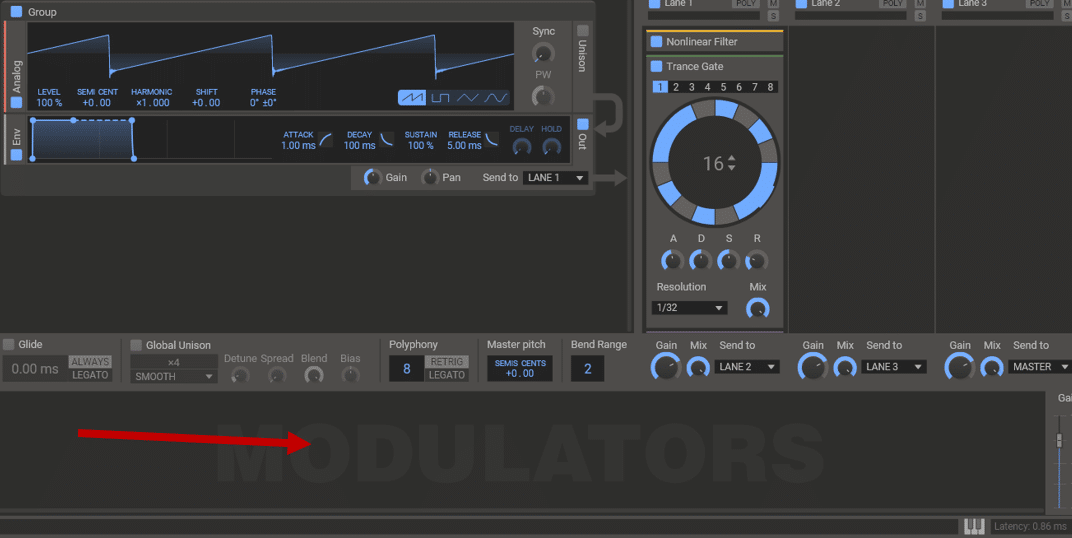
This is where you will draw your envelopes and LFO modulations.
If this sounds confusing, don’t worry. Modulations are basically a way to automate certain parameters within your synth. Here’s an example where I am modulating the frequency cutoff of a filter:
If this is new to you, you might want to check out our guides on envelopes and LFOs first 😉
But if you’ve used Serum, Vital, or Massive before, you’ll know about modulations:
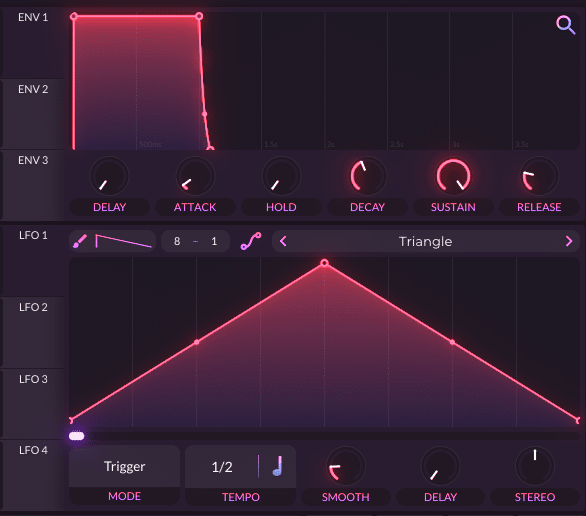
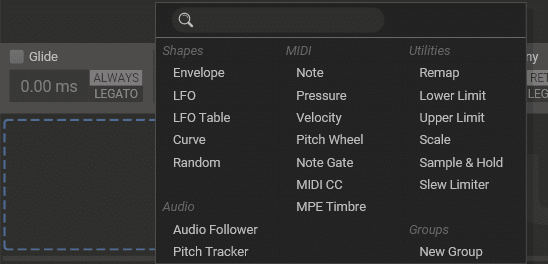
To add a modulation source, click on the blank space to open up the options:
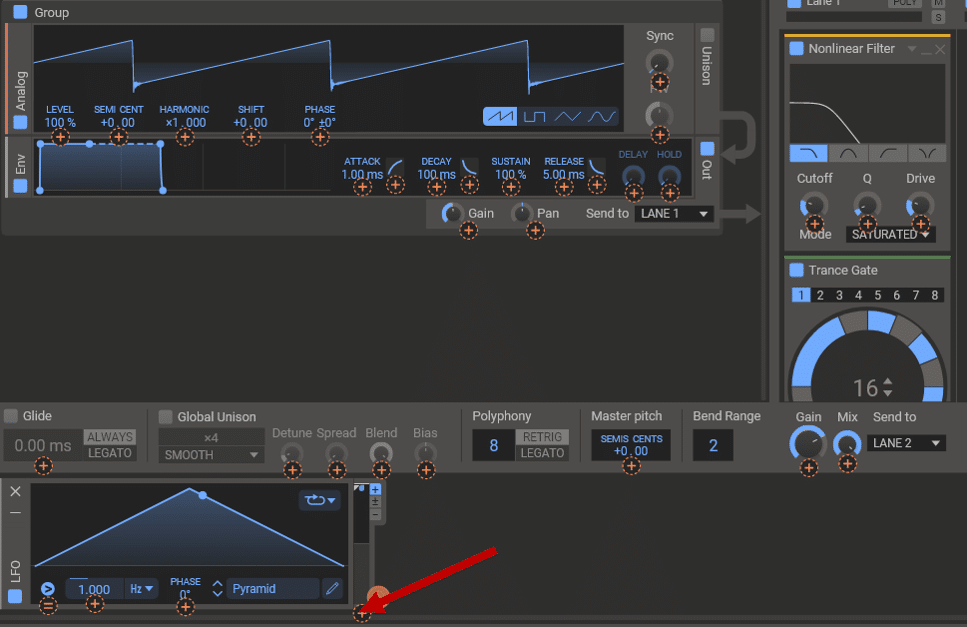
To link a modulation to a parameter, click on the “+” icon. This will show every parameter that you can modulate:
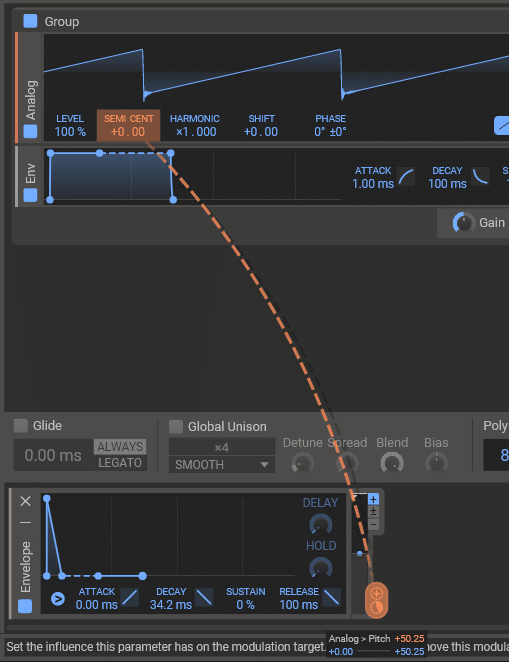
All you have to do then is select the parameter and dial in the amount.
Phase Plant offers a huge amount of modulations, so let’s go over the most important ones.
Shapes Modulation
Shapes modulation are your standard envelopes and LFOs. However, there’s a bit more to it. In order, we have:
- Envelope. This is your basic ADSR envelope to shape any parameter. In this example, I am modulating the pitch of my oscillator to add some attack:
This is what it sounds like (with and without the envelope):
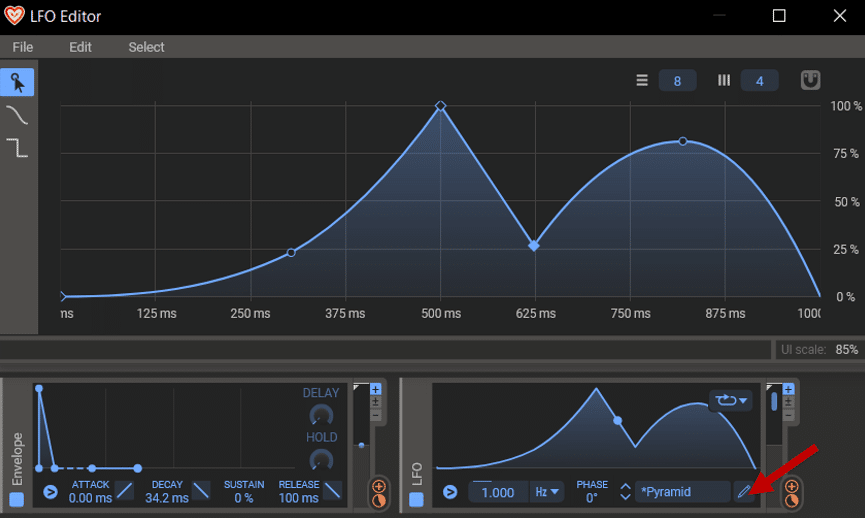
- LFO. This is your basic low-frequency oscillator. You can pick from a list of shapes, or draw your own:
- LFO Table. This is a crossover between an LFO and a wavetable module. Basically, it allows you to cycle through different LFO shapes within the same modulator:

If you want to go one step further, try modulating the frame number. You can do this with another LFO. This will create a changing modulation pattern!
In this example, my LFO Table is modulating the frequency cutoff of a filter. A second LFO is then modulating the frame selection of my LFO Table:
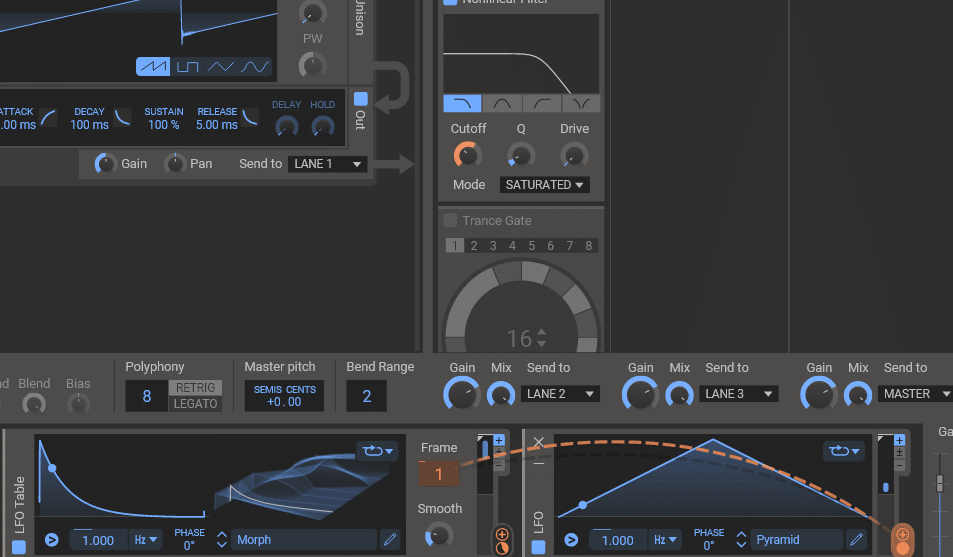
Finally, you also have Curve and Random. The Curve is a more customizable version of the Envelope module. The Random module generates random values that can be used to modulate a parameter.
Audio Modulation
Phase Plant offers two types of audio-tracked modulations: Audio Follower and Pitch Tracker:
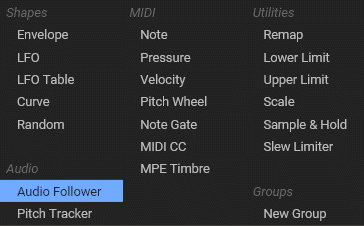
Audio Follower lets you modulate a parameter based on the amplitude of the incoming signal.
Pitch Tracker lets you modulate a parameter based on the pitch of the incoming signal.
Pitch tracking is best suited when working with audio samples. For example, with a Granular generator, you could automate the filter cutoff to follow the pitch.
MIDI Modulation
MIDI modulations are often overlooked by producers. However, they are key to humanizing your tracks. The 2 most important ones are “Note” and “Velocity” modulation.
Note modulation tracks the notes you play. It then modulates a parameter accordingly.
In this example, I have linked the modulation to:
- The Filter cutoff. As I play higher notes, the filter opens up.
- The Reverb mix. As I play higher notes, the reverb increases.
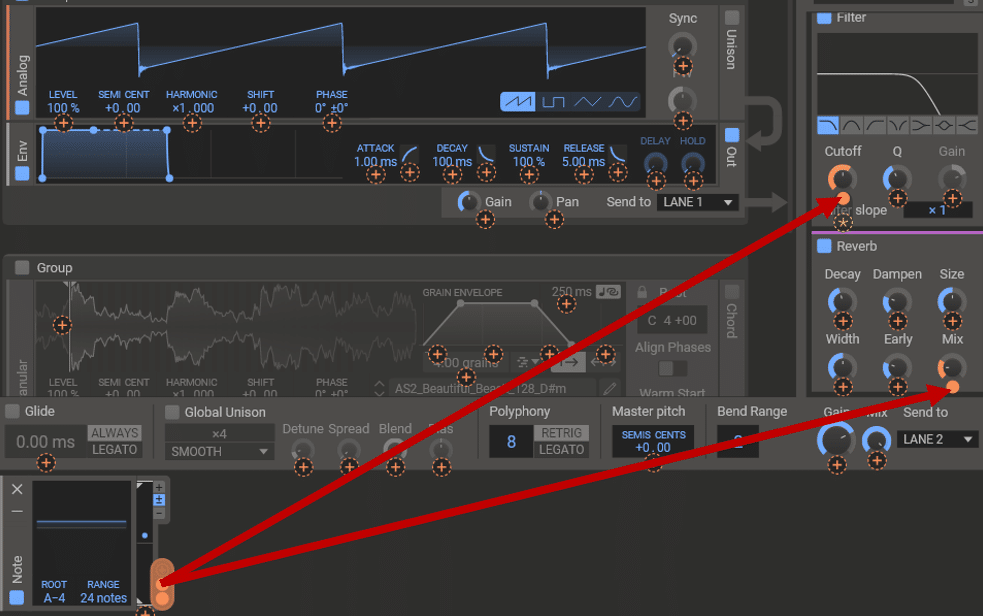
This is what it sounds like:
You can also choose your root note and range to control the amount of modulation.
On the other hand, Velocity modulation tracks how hard each note is played.
By default, each note you play in Phase Plant has the same volume. So a common application would be to link the Velocity modulation to the oscillator level. You can also open up the filter as you play harder:
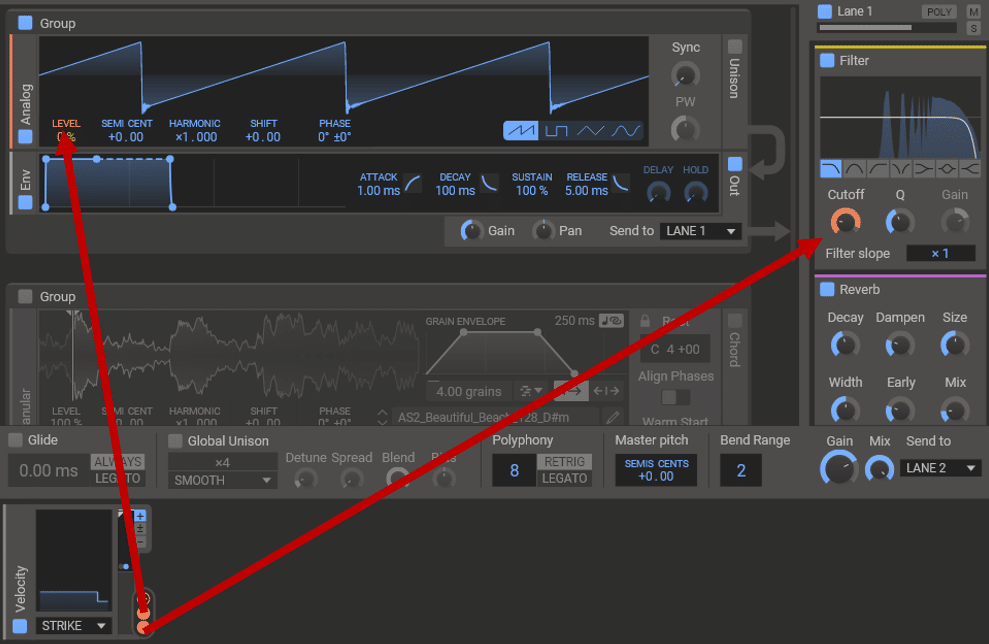
However, changing the oscillator level might affect the effects after it. So you might prefer to automate a Gain effect at the end of your effects chain instead. If you’re confused, check out our article about Gain vs Volume 👀
There are a bunch of other modulations you can choose from. But for the sake of time, let’s move on to my favorite tips and tricks 🔥
6 Tips to Get The Most Out of Phase Plant 💡
Phase Plant Tip #1 – Unison Modes
Unison is a common feature across most synths.
Essentially, it duplicates the oscillators and detunes them. This gives the sound a chorus-type effect:
By default, the “Smooth” unison is activated. But Phase Plant offers a bunch of other Unison types. In particular, you have “chord” types:
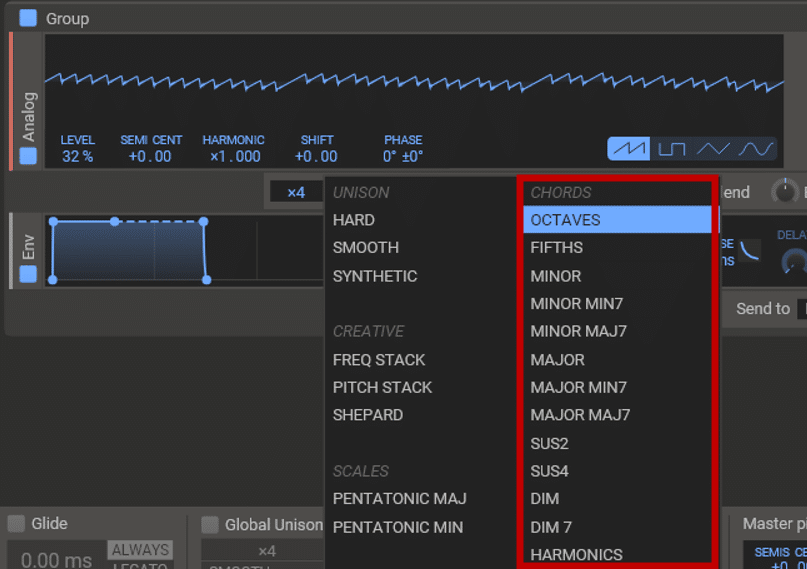
Here I’ve selected the Minor unison. This gives me a cool Chicago-style chord progression:
Another cool trick is to increase the number of voices. As you record, you can play with the number of voices to create interesting textures:
Note that when selecting a chord unison mode, you only need to play one note!
Phase Plant Tip #2: Quick Copy-Pasting
Phase Plant makes it extremely easy to copy-paste any module.
Simply hold down CTRL and drag a module to paste it:

This works for Generators, Modulators, and Effects.
Phase Plant Tip #3: Inserting Modules
When designing sounds in Phase Plant, you will often want to group modules. This allows you to easily process them together.
To quickly add a module within a group, hold down ALT. This will open a blank space:
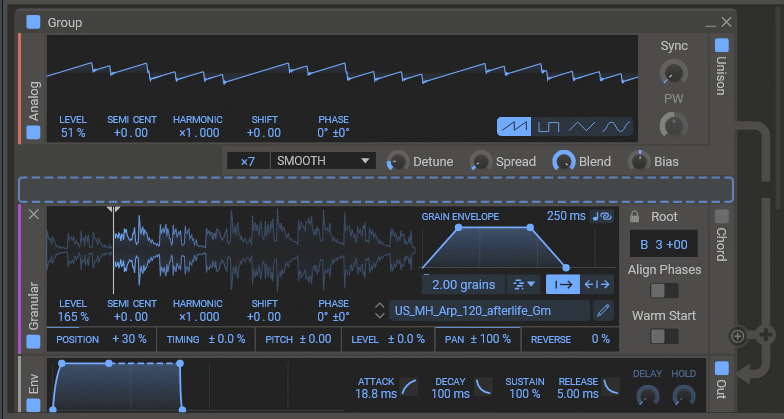
This works great when you want to add a layer without having to drag a new module.
Phase Plant Tip #4: Use the Mod Wheel as a Super-Macro
We haven’t talked too much about Macros yet. But if you’re familiar with sound design, you’ll recognize those 8 knobs at the top:

A macro is essentially a way to control multiple parameters at once.
Let’s say you want a quick way to build tension. You could for example:
- Increase the Wet amount of a reverb
- Increase the Wet amount of a delay
- Automate a high-pass filter cutoff
- And more!
To make your life easier, you can control all these settings with a Macro. Simply click on the “+” icon of the macro, then on the parameter you want to control:
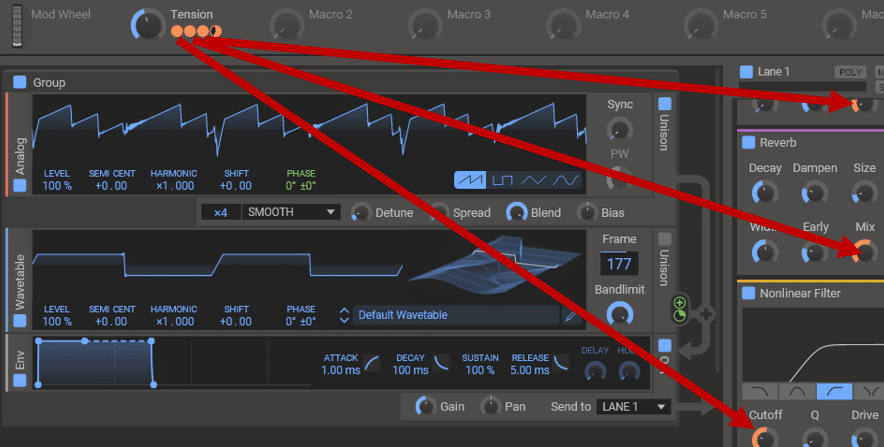
In this case, I’ve renamed Macro 1 “Tension”. This is what it sounds like:
What’s more, you can use the Mod Wheel as a Super Macro! This means controlling several macros at once with one knob:
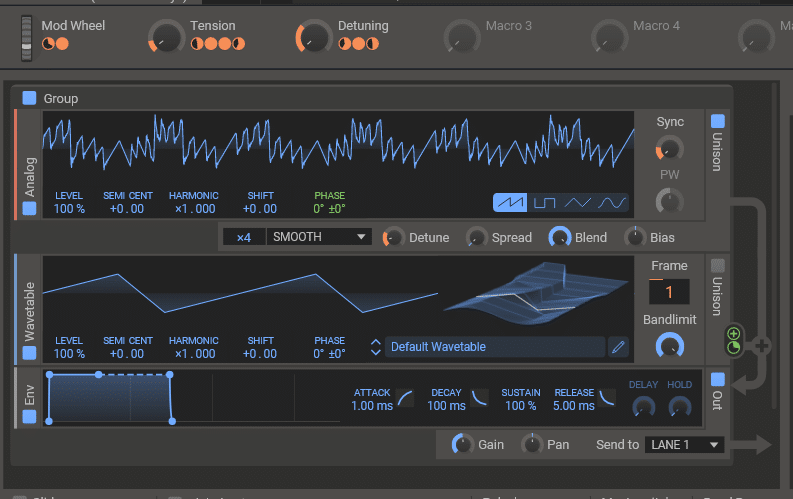
Phase Plant Tip #5: Use Audio Rate Modulation for FM Synthesis
Beyond its analog, granular, and wavetable synthesis, Phase Plant can also do FM!
If you’re not familiar with FM synthesis, you can check out our extensive guide over here 🔥
In a nutshell, FM synthesis stands for “Frequency Modulation”. It’s when you use the frequency of one oscillator to modulate another oscillator.
In Phase Plant, you can easily do this with Audio Rate Modulations. They Appear as green modulations:
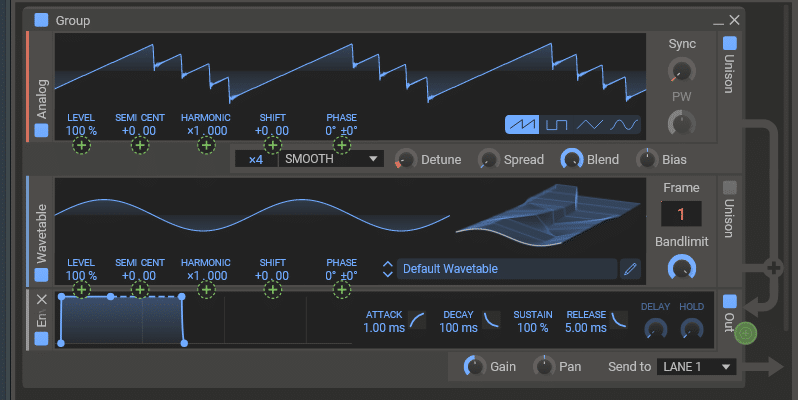
To create an FM patch, simply link one generator to the phase of another.
However, you can also experiment and link parameters at random. This is often the best way to come up with weird, unexpected results 😉
Phase Plant Tip #6: Create Custom Skins
Story time. One day, I realized I was always using the same Kontakt Instrument: Analog Dreams.
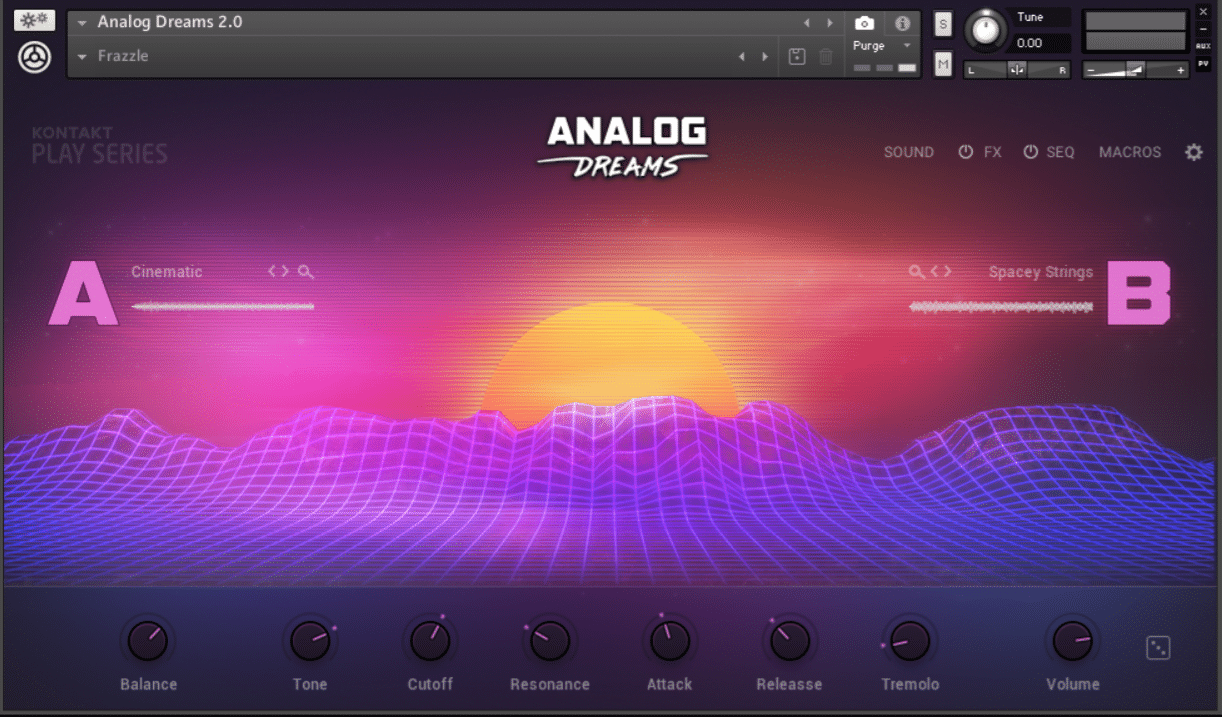
It’s not the most powerful synth. Nor the most versatile. But something about its beautiful retro design kept bringing me back.
I realized that, for me to be inspired, the design of a synth was key.
That’s why I encourage people to change the skins of their synths. With Phase Plant, you can even custom-design your very own skins!
First, navigate to the website PlanetSkill. This is a custom Kilohearts Color Theme Creator:
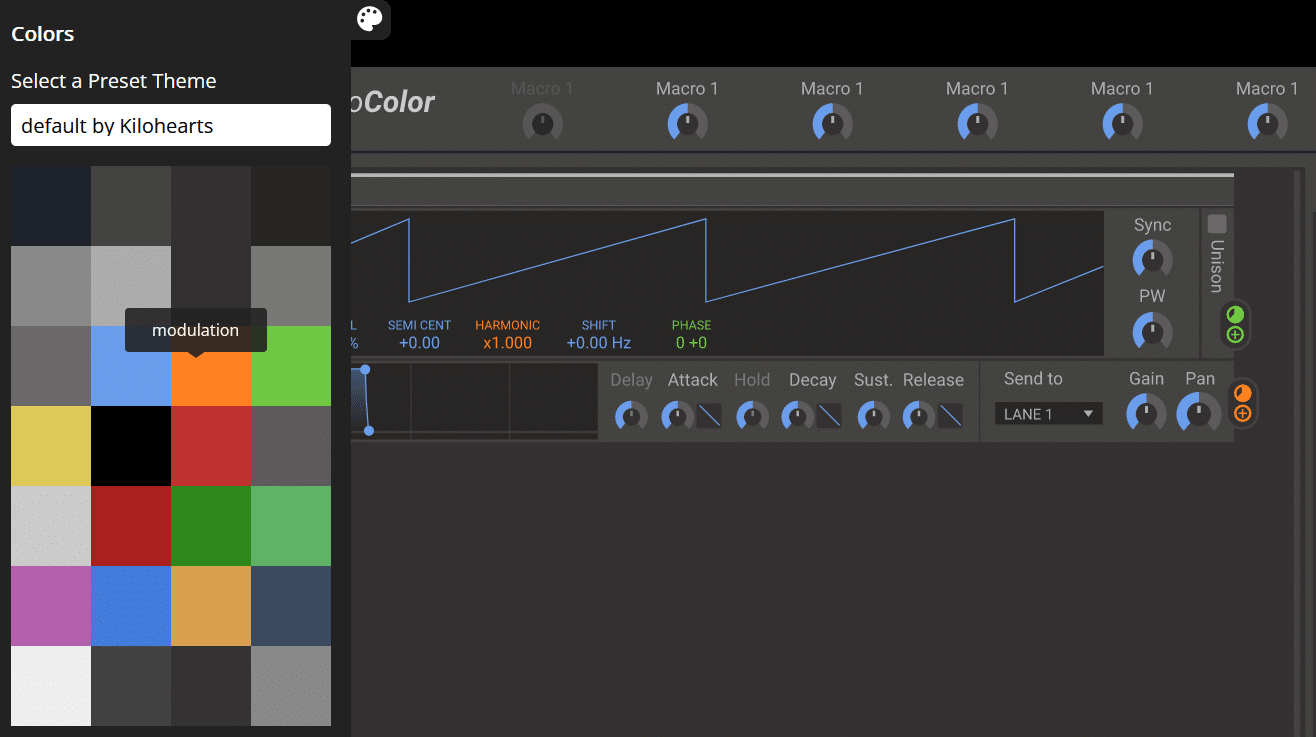
You have a few preset themes on the left. However, you can go crazy a change every single color. The preview window will then change accordingly:
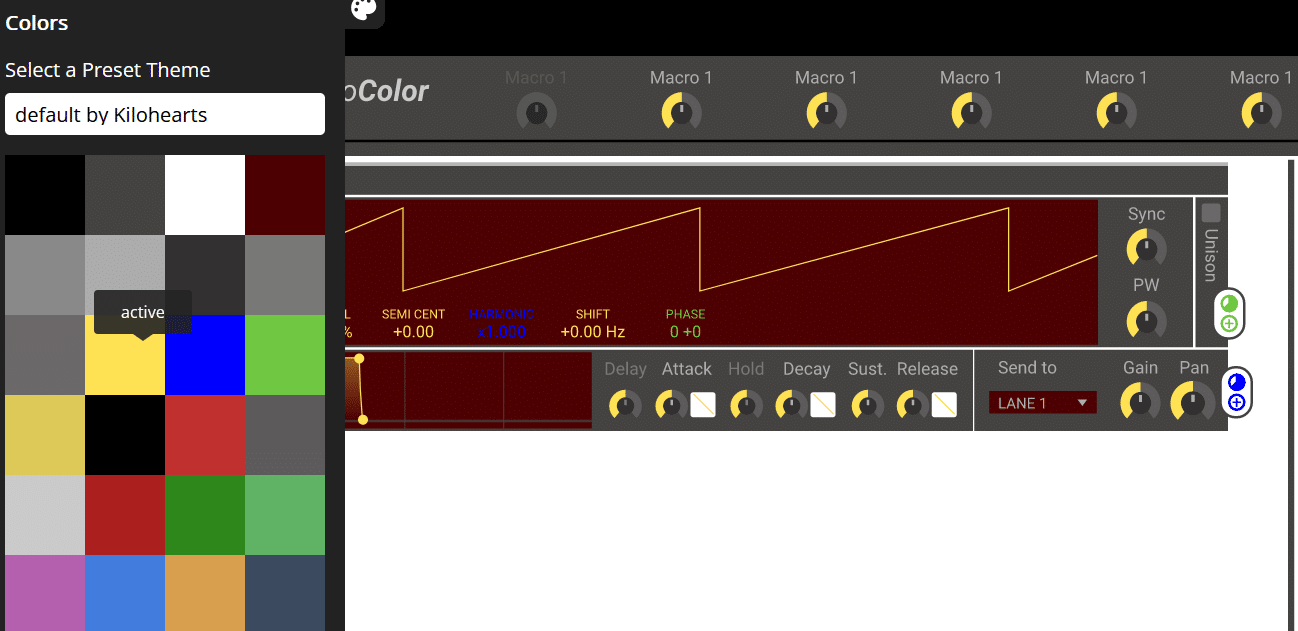
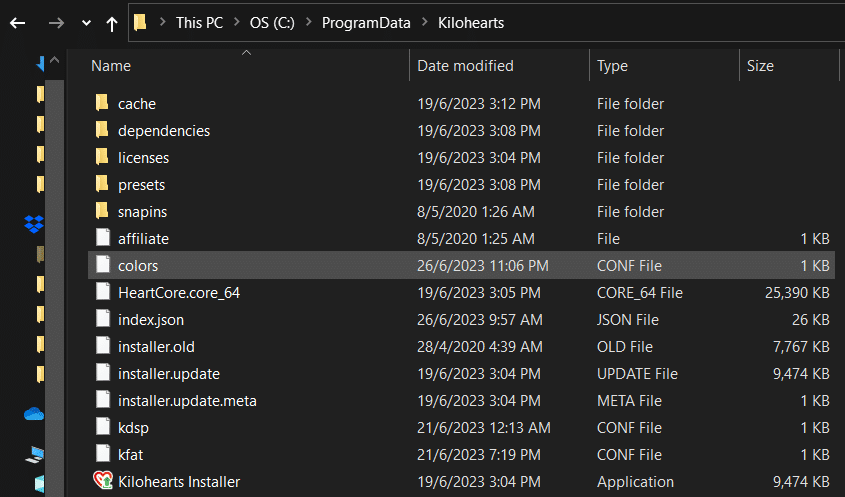
Once you’re happy with your theme, download the file. A “colors.conf” file should appear in your Downloads. All you have to do is now move that file into your Kilohearts folder:

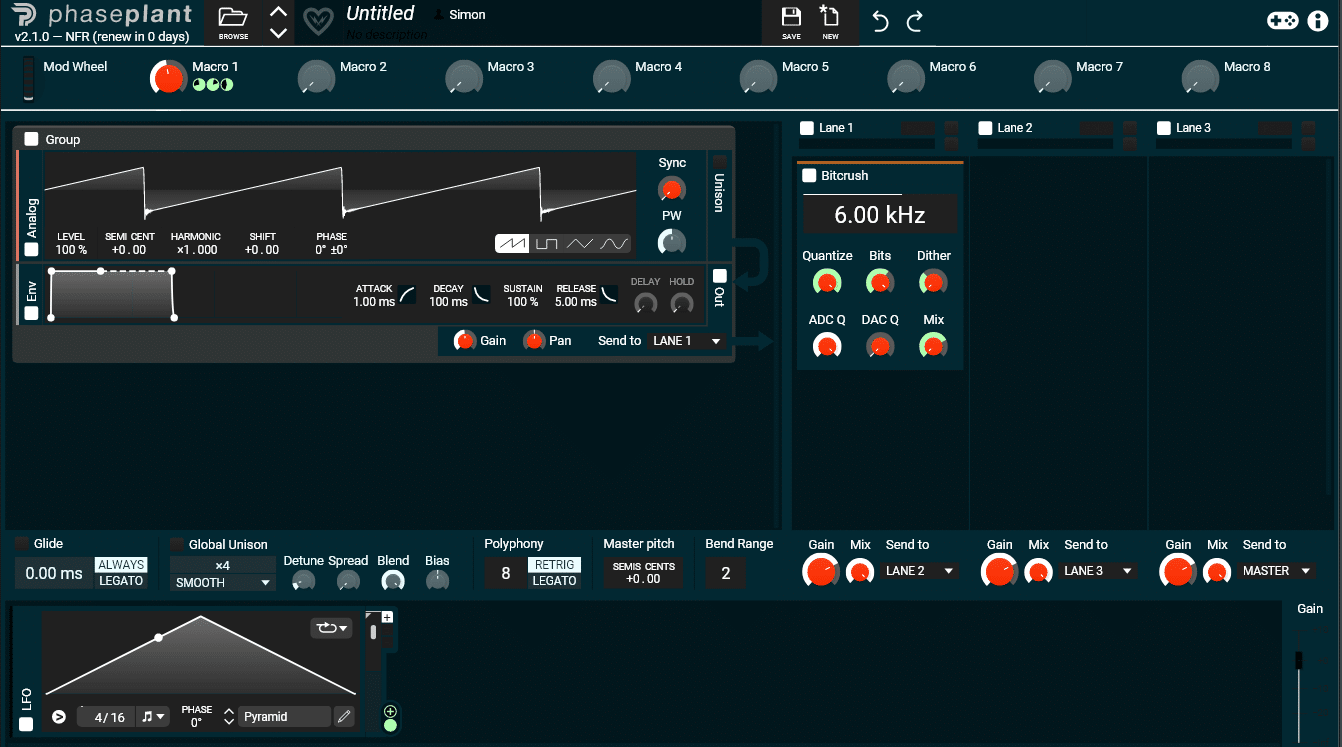
Unfortunately, the preview window in PlanetSkill isn’t the best. So you might need to repeat this maneuver a few times to see what Phase Plant looks like in your DAW:
That’s a Wrap!
That’s it for this guide! Hopefully, you now have a better understanding of how Phase Plant works and its capabilities.
Did I miss out on anything? Any questions you have, feel free to drop me a line at [email protected]


