It’s impossible to deny – the OTT plugin is synonymous with modern electronic music.
Yet, you may have wondered how it actually works? And why it sounds so good?
For these reasons, you might not be getting the most out of this simple but important tool.
In this guide, we’re going to cover everything your need to know. Ready? Let’s dive in! 👇 I’ll also talk about a hidden feature of OTT 👀
If you’re just here to download OTT, you can do so right here. Although I would recommend to read on to learn how to use it 😉
The Origins of the OTT Plugin
Believe it or not, OTT actually comes from Ableton Live.
In fact, OTT is the name of a preset on the Multiband Dynamics audio effect:
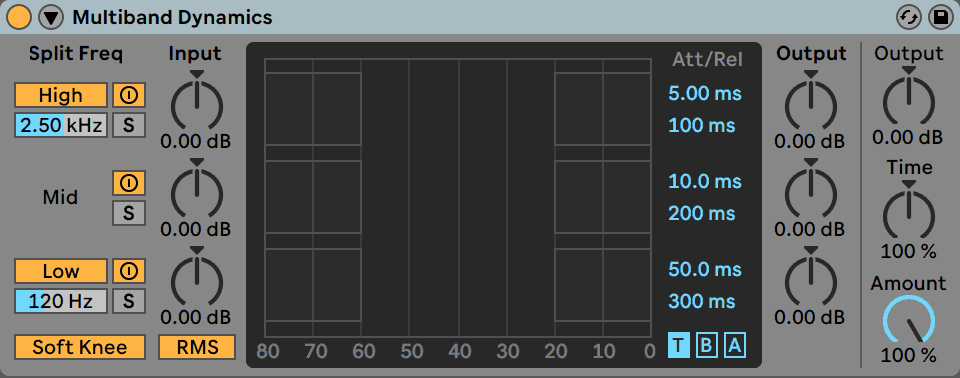
This thing is a lot more capable than a standard multiband compressor. It’s an extremely powerful plugin that can sculpt the audio spectrum in a compact, simple interface. Think EQ and compression rolled into one.
Essentially, this effect splits the incoming audio into 3 bands: High, Mid and Low. It then applies compression to each of these bands separately.
This means you can control the sound a lot more than with standard compression. If you only want two bands, you can turn off either the Low or High bands by simply clicking on the title:
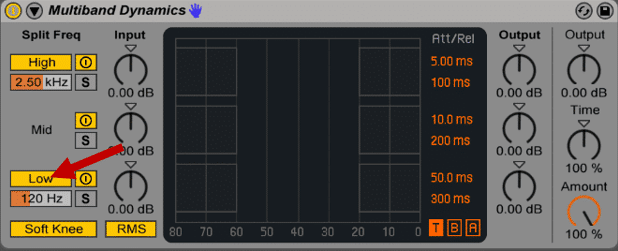
If that’s not enough control, you can also specify the crossover frequencies between the 3 bands to suit the signal you’re working with.
Main Controls
Here are the main controls of Multiband Dynamics effect:
- Bypass. You can bypass certain bands if you don’t want to process the whole spectrum. Just click the on/off switch next to the name, and a dry signal will pass through.
- Solo band. Great if you want to zero in on a specific range of frequencies.
- Input Gains. This is specific to each band. Turning them allows you to drive your sounds into the compressor.
- Soft Knee. This applies the compression gradually as it comes close to the threshold.
- RMS/Peak. This button switches between a slower RMS compression, and a quicker peak compression. Check out our full guide on compression to learn more about RMS vs Peak compression.

The central display with the three bands is the cornerstone of this effect. The ratios, thresholds, attacks and releases times are set here:
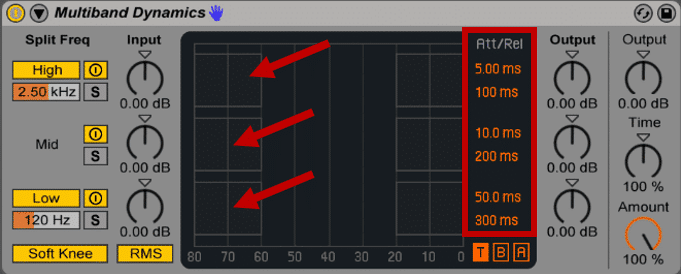
You’ll also see that there are two blocks on either side of the display. The one on the left applies below dynamics control, and the right block controls the above dynamics control. You can drag the side of each block to change the threshold, and drag up or down to adjust the ratio.
Compression Types
This means you can use 4 types of dynamics control:
- Downward Compression – above band is red – makes loud sounds quieter (this is typical compression)
- Upward Expansion – above band is blue – makes loud sounds louder
- Upward Compression – below band is blue – makes quiet sounds louder
- Downward Expansion – below band is red – makes quiet sounds quieter (this is a typical gate)
Finally, the output gain allows you to adjust the volume for each band. Your can use these knobs to color the sound like an EQ.
OTT Plugin: Preset vs. Standalone Plugin
Remember when I said that OTT is simply the name of preset? Well, here it is:
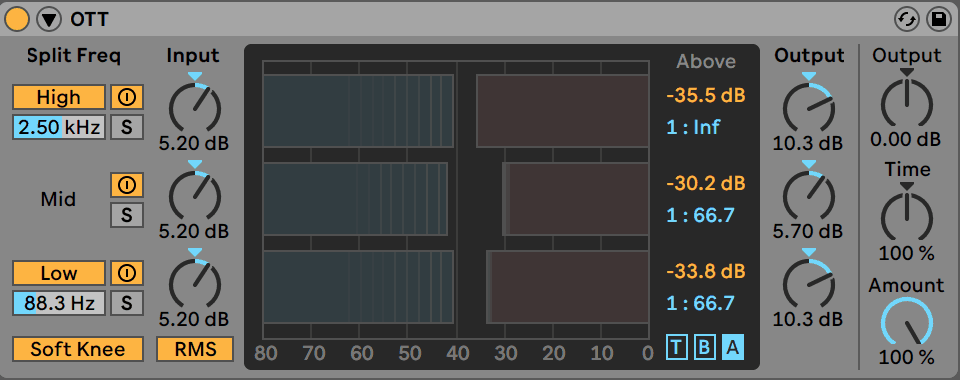
Let’s hear what it sounds like on some drums:
Pretty slammed, right? There’s a lot going on here. So let’s unpack the different settings of this preset.
The OTT preset in Multiband Dynamics
Let’s examine how the OTT preset differs from the default preset.
Firstly, the Low-Mid crossover is set at 88.3Hz instead of 250H. This allows the low band to work just on the sub range.
Secondly, the input gains are giving each band an extra 5.2dB. This really pushes the sound into the compressors:
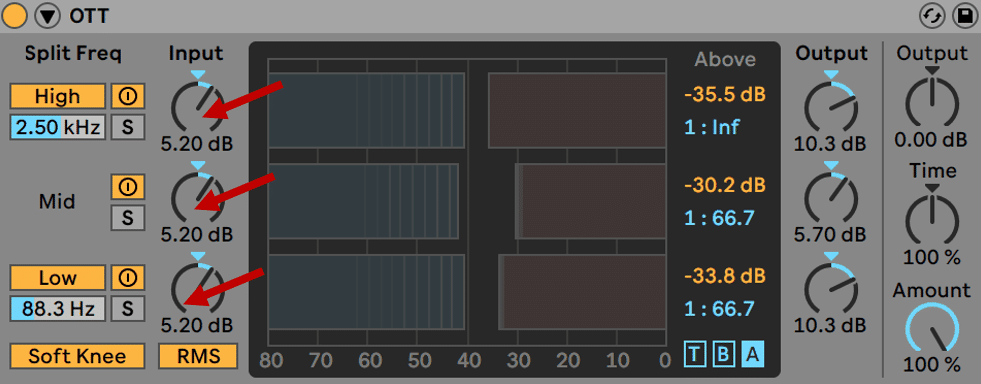
The real magic happens when we look at the band settings. For the above bands, we have:
- Highs: the ratio is set at Infinity:1, i.e. brickwall limiting.
- Mids and Lows: ratio of 1:66.7. This would also be consider heavy limiting.
This means the sound is going to get heavily squashed, especially the high end.
Looking at the thresholds, they are all set very low:
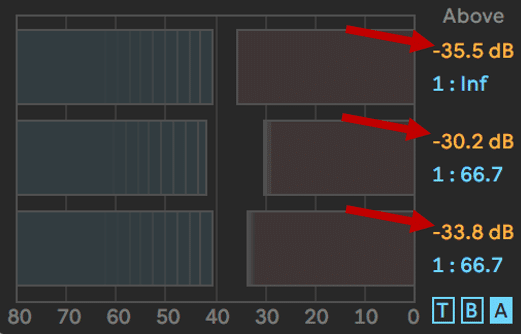
This means any sound will almost certainly get compressed.
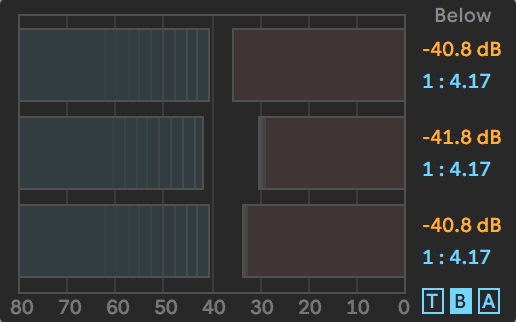
Looking at the “Below” bands, the sound is getting another dose of compression.
Here, each band has a ratio set at 4:1. Every threshold is also set extremely low, guaranteeing compression on every band:
Finally, the low and high bands get 10.3dB of output gain each. The mid-band is also getting an extra 5.7dB.
The OTT Plugin in Detail
So far, we’ve covered the origins of the OTT plugin. But what if you’re not an Ableton Live user? How do you get the same effect in another DAW like FL Studio or Logic Pro?
Thankfully, Steve Duda at Xfer Records has created a faithful emulation of the preset:
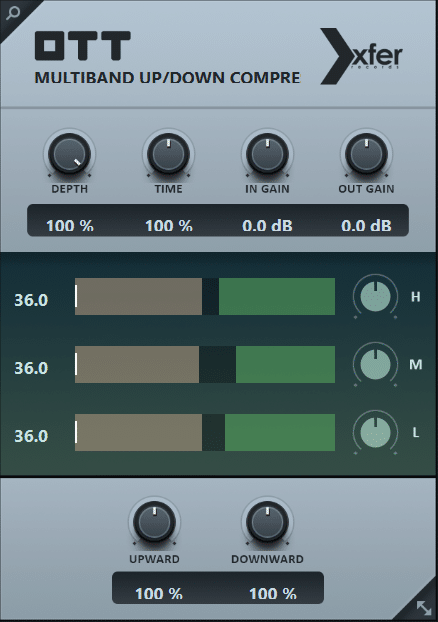
The OTT plugin is a multiband upward/downward compressor. It was developed with much of the same settings as the OTT preset in Multiband Dynamics. However, some of the controls are different. So let’s go over everything in detail.
Note this is the 2022 version of the OTT plugin which received a facelift.
Depth, Time and Input/Output Gain
At the top of the OTT plugin we have 4 main knobs. Depth controls the Dry/Wet amount. For a fully processed sound, turn all the way to 100%.
Note that if you’re using OTT in parallel (parallel compression for example), you may want to leave it at 100%.
The Time knob controls the attack and release times of all 3 bands. Decreasing this knob will translate into a faster attack and release. And vice-versa.
Finally, we have the input and output gain knobs:
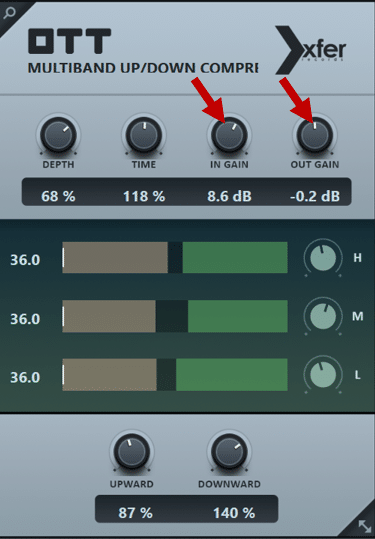
These knobs control the gain flowing in and out of the compressor. Some examples of how you might use these knobs are:
- If you want a more squashed signal, increase the input gain
- Turn down the output gain to ensure your gain-matching with the original signal. This means you’re not tricking your ears into thinking “louder is better”
Band Thresholds and Output Gains
At the center of the OTT plugin are the 3 frequency bands. The black slider lets you set the threshold for each band. On the other hand, if the signal is in the “red” (i.e. below the threshold), it will get upward compressed.
However, if it is over the threshold (in the green), it will get downward compressed.
When audio is playing, you get a visual representation of the compression. The white marker shows the original signal’s level, while the yellow is the result of compression:
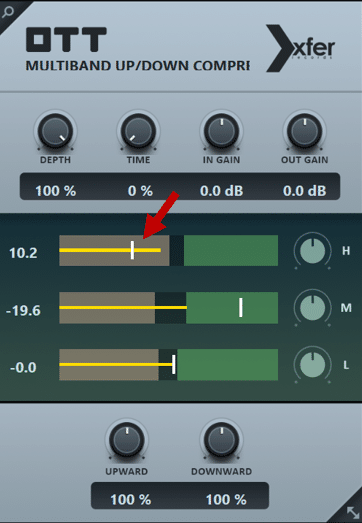
In the above example, we can see that:
- The high band is getting upward compressed toward the threshold
- The mid band is getting slammed
- The low band is untouched
The cutoff frequency for each band is the following:
- Lows: below 88.3 Hz
- Mids: between 88.3 Hz and 2.5 kHz
- Highs: above 2.5 kHz
Sadly, these frequencies are not adjustable.
Next, on the left-hand side, you can see the number of dBs added or reduced for each band.
You also have 3 output gain for each band. These let you control how much of each band is heard:
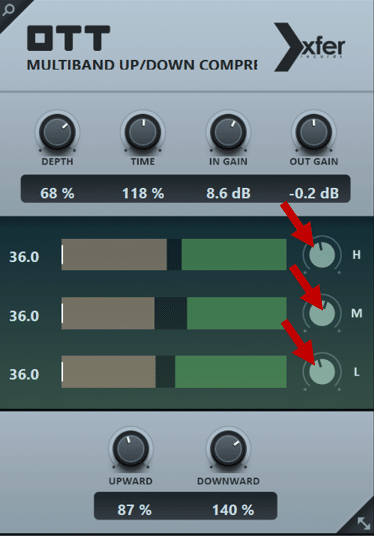
In effect, these let you “color” the sound like an EQ. Each band is labeled H, M and L for High, Mids and Lows.
Upward and Downward Compression
Finally, at the bottom of the OTT plugin are an Upward and Downward knob.
These let you control how extreme the compression is. I believe they are similar to a ratio knob. But don’t quote me on that.
Let’s take the same example as above, but decrease the downward compression:
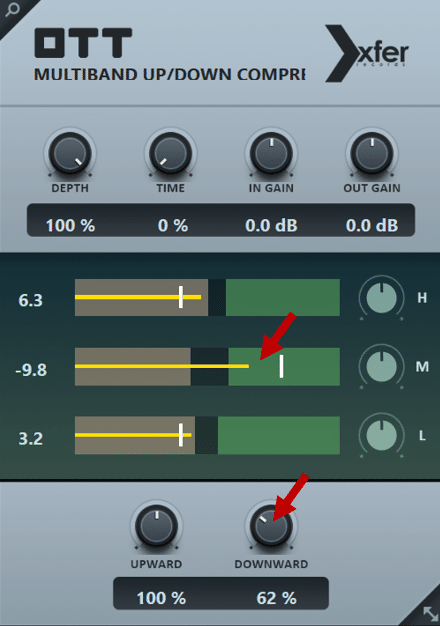
Here, I’ve decreased the downward compression to 62%. You can see that the mid-band is not being slammed against the threshold. It now has a bit more room to breathe.
OTT Plugin’s Hidden Feature 👀
Like many plugins, OTT has a shortcut to reset parameters.
In the OTT plugin, hold CTRL and click any parameter to reset it.
However, what happens if you do this on the frequency bands…?
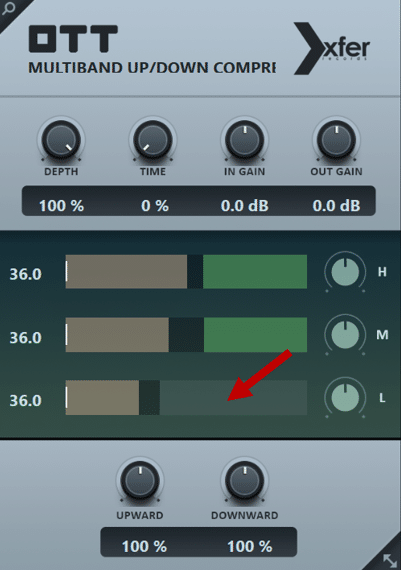
By holding CTRL and clicking the upward high-band, it turned grey. This means I’ve now disabled it!
Practically, you can use this if you don’t want any upward or downward compression. For example, you might want to leave to low frequencies completely untouched. You can therefore disable both upward and downward bands.
Putting the OTT Plugin to the Test
Knowing how OTT works is only half the story – you need to know how to use it in the context of music.
General
The most important thing is to use the Depth knob in order to blend the dry signal with the processed one.
Because OTT is so intense, it often sounds best when blended in. It’s something we rely on heaps when processing sounds in EDM Foundations. That being said, certain sounds can sound cool with it on 100%, especially in the context of creative sound design.
Drums

OTT and drums is truly a match made in heaven. Using it on a drum break or loop can help to add character to the previously quiet nuances in the groove, adding a new-found texture to your percussion.
One of my favourite tips for using OTT on drums is that you can boost the input and output gain of the low band.
This gives it a heavy but controlled low end. Blend the amount back and you can keep the natural sound of a drum loop or individual one shot.
You heard the drum example earlier? Let’s dial it back a bit to 30% and hear it applied more subtly.
Leads, Instruments & Basses

It’s important to use OTT on leads and basses to highlight the movement. By this, I mean it might require you to revisit the initial synth patch if your sound is boring.
Filter sweeps, volume or pitch changes etc. will be amplified with the OTT plugin. This gives it an almost claustrophobic quality to the resulting sound.
If you’re using a sample for a lead or bass, the chances are there will already be some interesting natural movement to the sound.
But if you’re relying on digital waveforms from a synth like Serum or Massive, you might want to add in a little something before you brutalize it. Of course, you might be going for a static sound, so this only applies when trying to add interest.
Here’s a guitar sample with OTT dialed in at 39%. I’m using a variation of the preset included in our free pack called ‘Lofi Crisp Highs Squash’.
FX/Foley

Foley is an exception to the rule of ‘always use the amount knob’.
This is generally, because organic foley has a lot of variation in dynamics that can be controlled.
On top of that, these sounds are usually blended in with other main layers, so compressing it heavily isn’t as much of an issue.
The birds foley sample below sounds quite nice once the OTT is applied, with 100% of the Amount cranked.
Master
OTT on the master is a great ‘hack’ that can be used to glue your mix together, especially when you like the bright, pumping effect is has on any sound.
Be sparing here though, as overdoing it could ruin your track. The rule of thumb I generally use is no more than 20%, and usually sticking to ~10% of the amount.
Here’s a track I’m working on that uses OTT at 16% on the master.
That’s It for this OTT Plugin Guide!
Knowing how to use OTT is only half the story – now you need to go and put this knowledge to the test.
Ok, need some motivation to go open up your DAW? Here’s a free pack of 10 OTT preset variations for you to play around with.
Let us know any cool things you come up with by emailing me at [email protected].


