Harmor is one of those synths that just doesn’t get enough praise.
With some truly unique features, Harmor could become your new favorite weapon. And while everyone is busy with Serum, Harmor might just set you apart.
But what makes Harmor different?
In this guide, we will go through everything you need to know to create the most amazing sounds with Harmor. Together we will look at:
- The basic sections of Harmor and how they work
- Resynthesis within Harmor
- Harmor’s secret weapon 👀
- How to start designing your first sounds
Let’s get into it! 👇
A Quick Note: Harmor vs. Harmless
When browsing FL Studio’s synth section, you will notice 2 similar synths: Harmor and Harmless. Not only are they similar in name, but also in design:
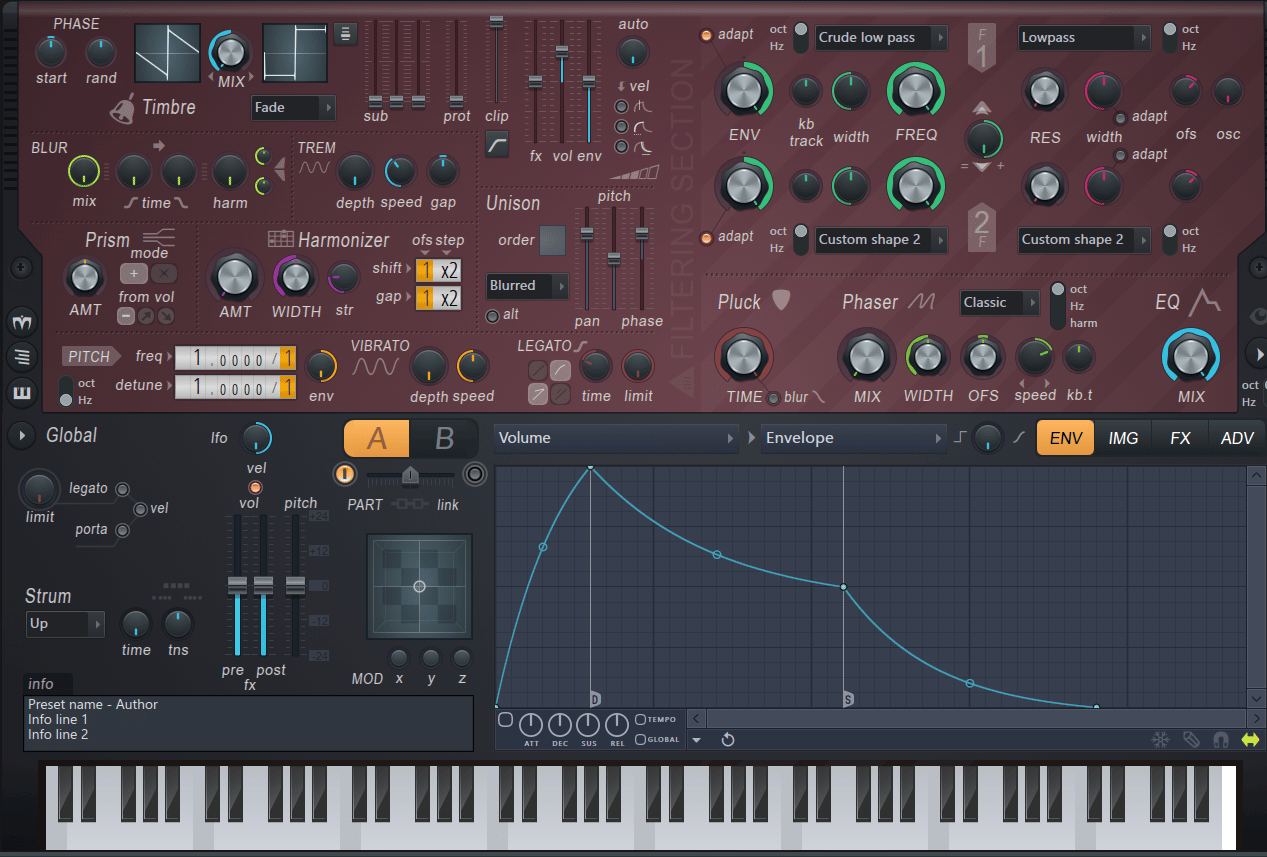
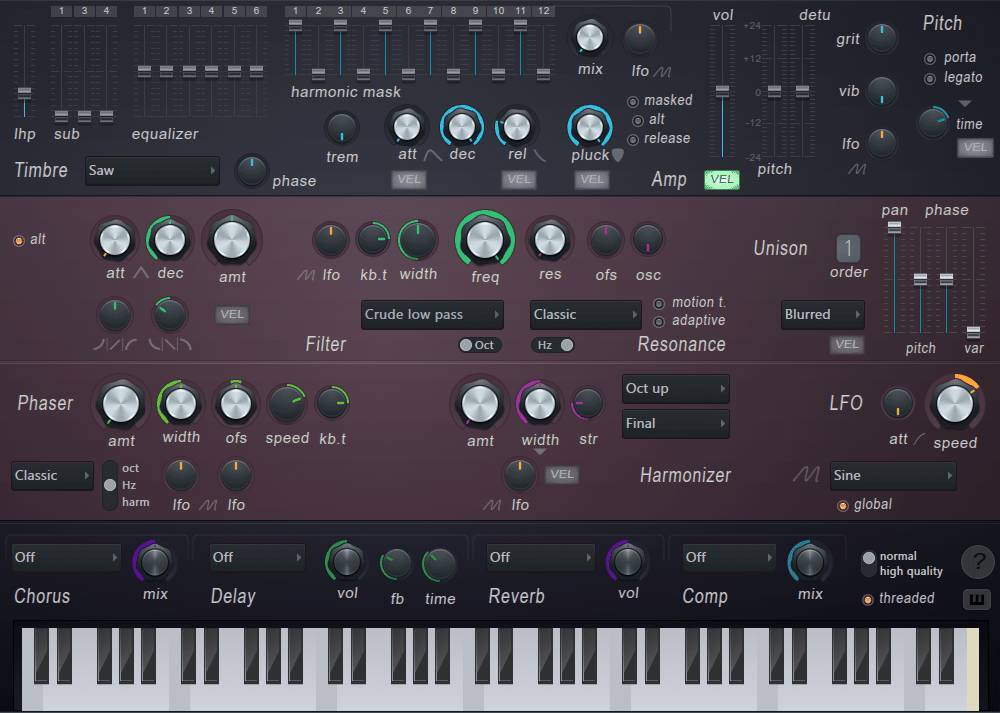
The reason for the similarity is simple – Harmless is the predecessor to Harmor.
They work in very similar ways, but you can think of Harmor as a beefed-up version of Harmless. Harmor will give you much more control and customization options over your sounds.
But if you want a lightweight version of Harmor (and less CPU-intensive), Harmless is an option. In any case, most of what we will cover here is applicable to both synths.
About Harmor
Harmor is an additive / subtractive synthesizer with image and audio re-synthesis.
You read that right. With Harmor, you can generate sound based on images. Where else can you do that?!
Let’s quickly cover what this means.
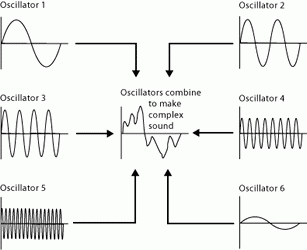
Additive synthesis is a sound synthesis technique that creates timbre by adding sine waves together. These sine waves can either be harmonic (a multiple of the base frequency) or inharmonic.
Subtractive synthesis on the other hand is a form of synthesis where parts of a signal rich in harmonics are attenuated with a filter.
Looking for a deep-dive on subtractive synthesis? We have you covered!
With Harmor, additive synthesis lets you add up to 516 sine waves per note. Each additional sine wave is then called a “partial”. Each partial contains its own frequency, amplitude, and phase information.
But that’s not all…
Harmor also offers image and audio resynthesis. Images and audio files can be dragged and dropped into Harmor. Harmor then synthesizes sound based on the audio or image file. Pretty cool!
Don’t worry if this sounds a bit complex. You don’t need to understand every technicality of Harmor to enjoy it. But the more you understand, the more intuitive the interface will become!
And if you want to get started quickly, check out the extensive set of presets that are included.
Note: Harmor is an extremely extensive and in-depth synth. Covering every single section and knob would take days. Instead, what we’ll do here is cover the basics and how to get started designing your own sounds!
The Interface
Now that we’ve covered the basics of how Harmor works, let’s see what it actually looks like:
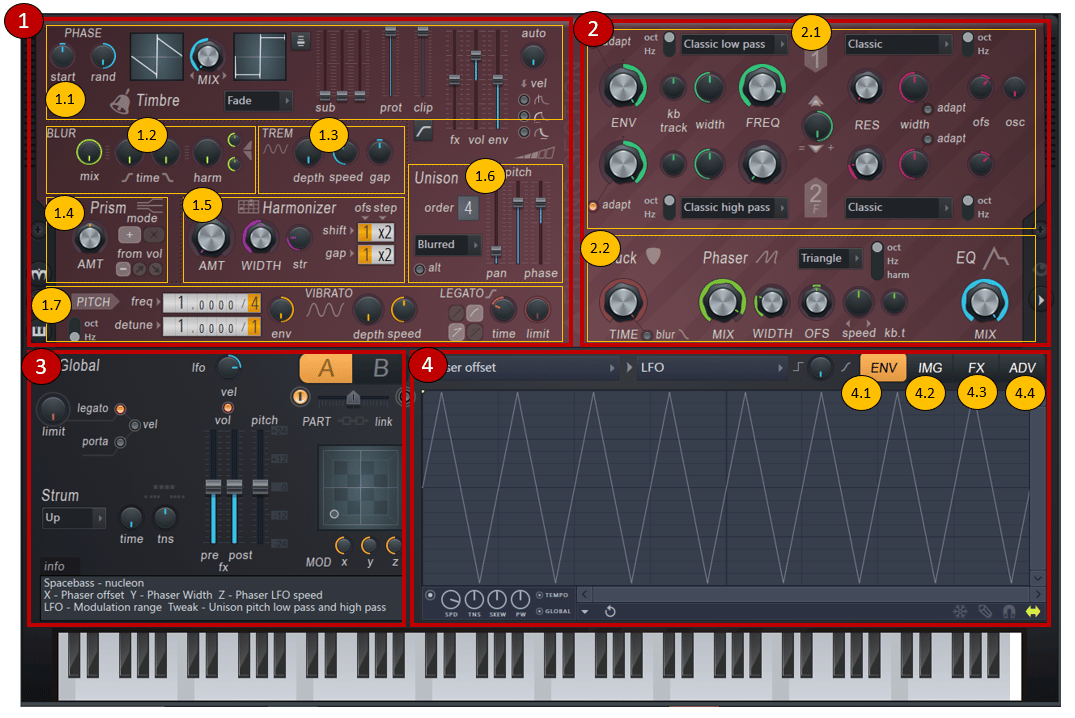
Let’s break down the different components of this layout. We’ll dive into each of them separately later on in this guide, but this is just to get you familiar with Harmor’s GUI:
- the Voicing section is where you create the sound.
- the Filtering section lets you sculpt your sound with filters, EQ, and more.
- the Global section controls parameters such as portamento, global pitch, and more.
- the Display section includes 4 different panels:
- ENV: the envelope panel lets you create modulations for any parameter
- IMG: the image resynthesis panel is where you can load audio samples or images
- FX: the effects panel contains effects such as chorus, distortion, delay, reverb, and compression
- ADV: the advanced panel is for further tweakings such as the order of FX and CPU load
The Voicing and Filtering sections contain an intimidating number of knobs and sliders. Let’s break down the main components.
In the Voicing section, we have:
- Timbre: pick the waveforms that will be the backbone of your sound
- Blur: smear the partials to create reverb-like sounds. Remember, partials are the sine waves that make up your sound
- Tremolo: recreates the rotary effects
- Prism: shifts the position of the partials, creating a more metallic or de-tuned sound
- Harmonizer: clones and transposes the existing harmonics, resulting in a richer sound
- Unison: adds sub-voices that can be panned, de-tuned, or phased out
- Pitch, Vibrato, and Legato: lets you de-tune the partials, add vibrato, and control how consecutive notes are played
Finally, in the Filtering section, we have:
- Filters: self-explanatory, this is where you filter your sound
- Pluck, Phaser, and EQ: provides more filtering options such as delay-based filters and local EQ’ing.
OK, I’ll admit that’s a lot to take in. Let’s just catch our breaths for a second…
All right, ready to move on? Let’s do this 👊
Note: if you’re already familiar with Harmor, feel free to skip to the section that interests you the most!
The Voicing Section
First things first, let’s hear the default patch when you open Harmor:
Let’s see how we can shape this sound into something unique…
Timbre
Timbre is often referred to as the quality or the tone of a sound. Think of a piano and a violin playing a D5 note. It’s the same note, but the sound is completely different. That’s timbre.

By default, we have a saw wave and a square wave loaded up. Use the MIX knob to blend the two.
Unlike other synths such as Serum or Vital, you don’t get any other waveforms to pick from. To access other waveforms, you have 3 options:
- Load custom waveforms. To do this, right-click the window and select “Analyze single-cycle waveform”
- Generate random waveforms. Simply right-click the window and select “Randomize”
- Draw your own waveforms. For this, left-click on the waveform. This will open up the harmonic content of the waveform in the Display window:
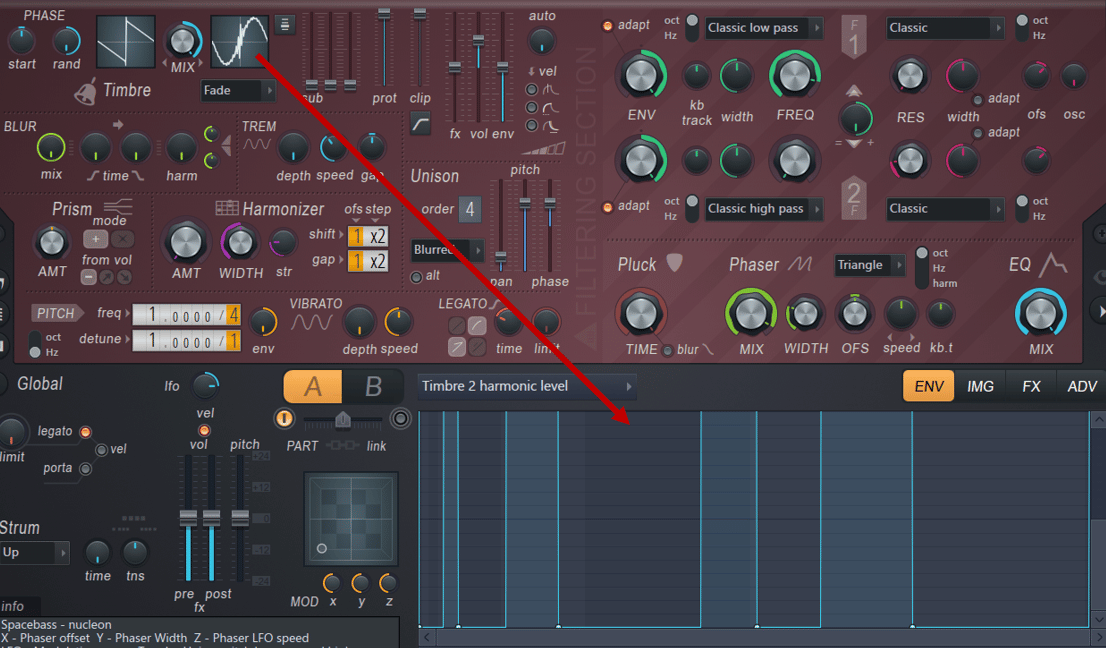
Remember the 516 partials we mentioned earlier? This is where they are!
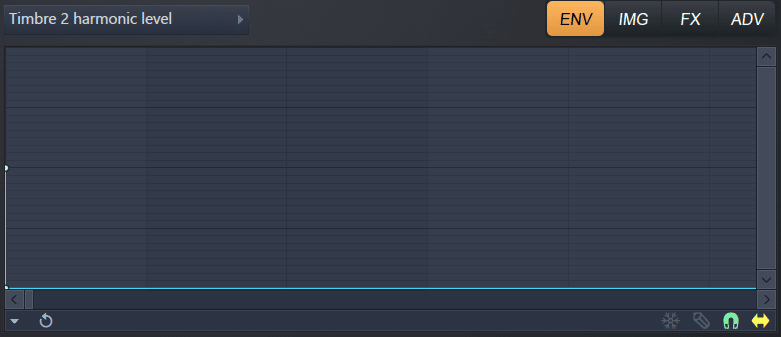
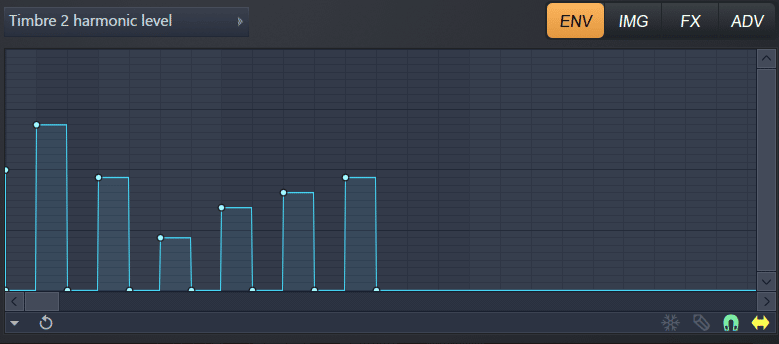
Here you can draw in the harmonics you want and their level.
For example, for a pure sine wave, we only want the first harmonic:
Adding more harmonics will provide a richer tone:
The 3 “sub” sliders let you add sub-harmonic frequencies. This is especially handy when designing bass sounds:
Two other parameters worth mentioning here:
- fx: controls the dry/wet level of effects. This is useful if you already have an effects chain in place, but want to refine your waveforms
- auto: controls the audio levels as a function of velocity. This works similarly to a compressor that protects the output level from clipping.
Blur
Blur is a great tool to add more density to your sound. Let’s listen to an example:
These were the settings I used:

“Mix” controls the amount of blur. The two “time” knobs act almost as a transient shaper, removing attack or adding decay.
Finally, use the “harm” amount and the 2 associated knobs to blur additional high or low frequencies.
Tremolo
As the name suggests, this section adds a tremolo effect. If you haven’t heard it before, this is what it sounds like:
Tip: automate the “speed” knob to create tension before a drop!
Prism
If you’re looking to create weird sounds, the Prism section is a great place to start. Prism shifts the partials of your signal, making them less harmonic.
This results in a de-tuned and alien-like sound:
Harmonizer
Harmonizer clones and transposes existing harmonics. This works great for pads if you want to add information in the higher frequencies:
One way I like to use the harmonizer is to set the “amount” and width” knobs at 100%. Then, I play around with the “shift” and “gap” settings to find a sound I like. Then, I can dial down the “amount” to taste:
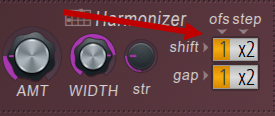
Have a listen here where I’ve recorded audio while using this method:
Unison
The Unison section creates a similar effect to a chorus:
This works really well for retro-sounding patches.
I personally like the “Blurred” or “Classic” modes. “Classic” gives especially interesting results when you push the “pitch thickness” close to 100%:
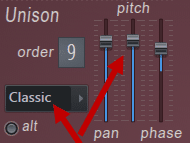
You can almost hear a sort of arpeggio effect. Not quite sure why this happens but it sounds cool!
Pro tip: be careful with the number of voices you add! Unison can be particularly CPU-intensive.
Pitch
The Pitch section lets you de-tune either the fundamental frequency or the harmonics. I find that gently de-tuning the harmonics is a great way to add a bit of tension to your patch:

The Filter Section
Now that we’ve added a million frequencies left and right, it’s time to clean up our mess!
Filters are the key to any form of subtractive synthesis. They let you keep the essentials in a sound, and can create great movement when automated.
So let’s see how filtering works in Harmor:
The Filters
With Harmor, you get 2 filters to play with:
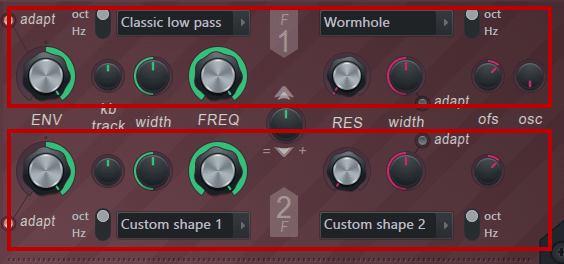
Let’s look at the main parameters you will need.
On the left-hand side:
- The drop-down menu lets you select the type of filter. You can also draw in your own filter with a “custom shape”
- “FREQ” determines the cutoff frequency
On the right-hand side:
- The drop-down menu lets you select the type of resonance around the cutoff frequency
- “RES” boosts the frequencies around the cutoff frequency according to the selected type
Pro-tip: set you filter type and cutoff frequency. Set the resonance to 100%. Now switch between resonance modes until you find something you like!
Some examples:
Finally, the mix knob lets you select how the two filters are applied. You can decide to have them act in parallel, in series or in solo:

Looking for a more in-depth filtering guide? We got you!
Pluck, Phaser and EQ
Pluck is possibly one of my favorite features of Harmor. Essentially what it does is create time-delayed filtering. The goal is to replicate a plucked string, where the high frequencies are quickly cut off.
But a sound is worth a thousand words (I think that’s how the saying goes…):
Pro-tip: automate the Pluck amount instead of a standard low-pass filter. This will create a more interesting result:
Phaser is… well, a phaser. And EQ is an EQ! We cover both topics more at length in our dedicated guides here and here.
One thing worth mentioning about Harmor’s EQ is the global/local mode.
In local mode, the EQ curve is applied relative to the note being played. This means each note played will roughly retain the same volume.
The EQ acts as a normal EQ over the full frequency spectrum in global mode.
The Global Controls Section
The Global Controls Section controls performance parameters such as legato, portamento and strum. It also hides Harmor’s killer feature… More on that later.
First, let’s look at portamento and legato. Both parameters are activated in the Global section, but fine-tuned in the Legato section:
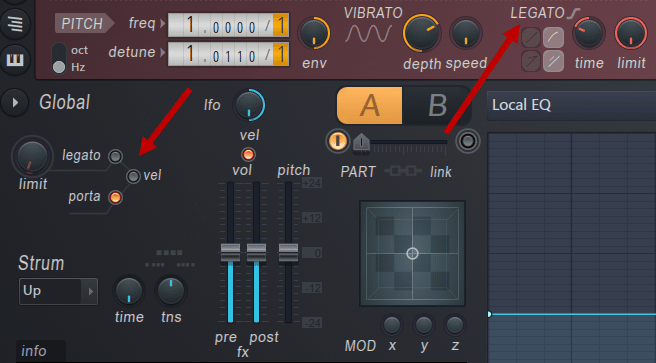
Legato mode results in over-lapping notes not re-triggering the envelope generator:
Pro-tip: play with the “limit” knob to “catch” only certain notes with the legato:
Porta mode slides the pitch up or down between notes. It’s the classic “gliding” effect:
Next, try adding just a small amount of portamento. This is a great way to add some character to your notes’ attack.
Last but not least, Harmor’s killer feature…
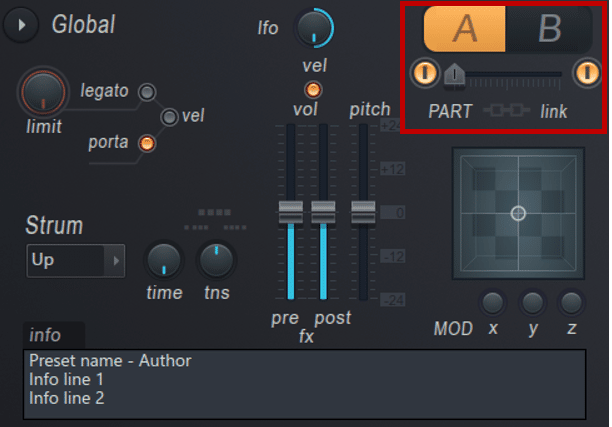
Switch from A to B – and the entire synth resets…
This is because Harmor gives you access to 2 identical and independent synthesis sections.
Yep, that’s right. Everything we just went through can be duplicated in a separate bank. You can then slide between the 2 banks to blend them in:
For me, this is where the true potential of Harmor lies.
The Imaging Resynthesis Section
I did sell you an “image and audio re-synthesis” section in the intro. So let’s see what this is all about.
First, let’s look at audio re-synthesis. To do this, drag any sample into the IMG section of Harmor. The sample will load up with a visual representation of its harmonic content:
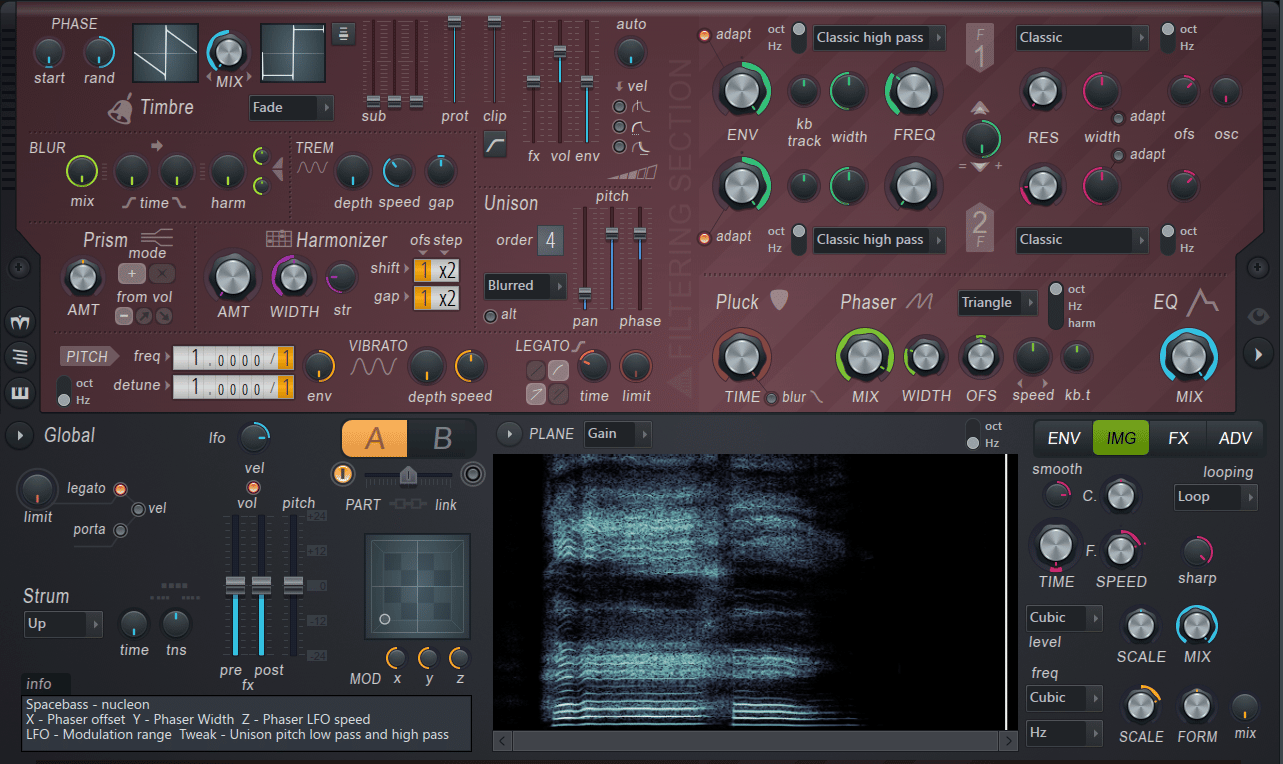
By clicking on the image, you can decide where the sample is triggered. This is a cool trick to create vocal chops for example:
You can also decide to speed up or slow down the sample with the “Coarse speed” and “Fine speed” knobs.
Now, let’s load up an image:
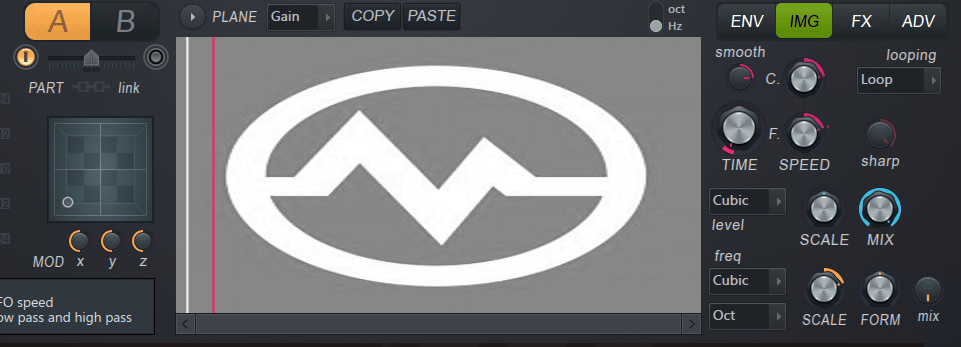
Let’s look at a spectrum analyzer to see what happened to our sound:
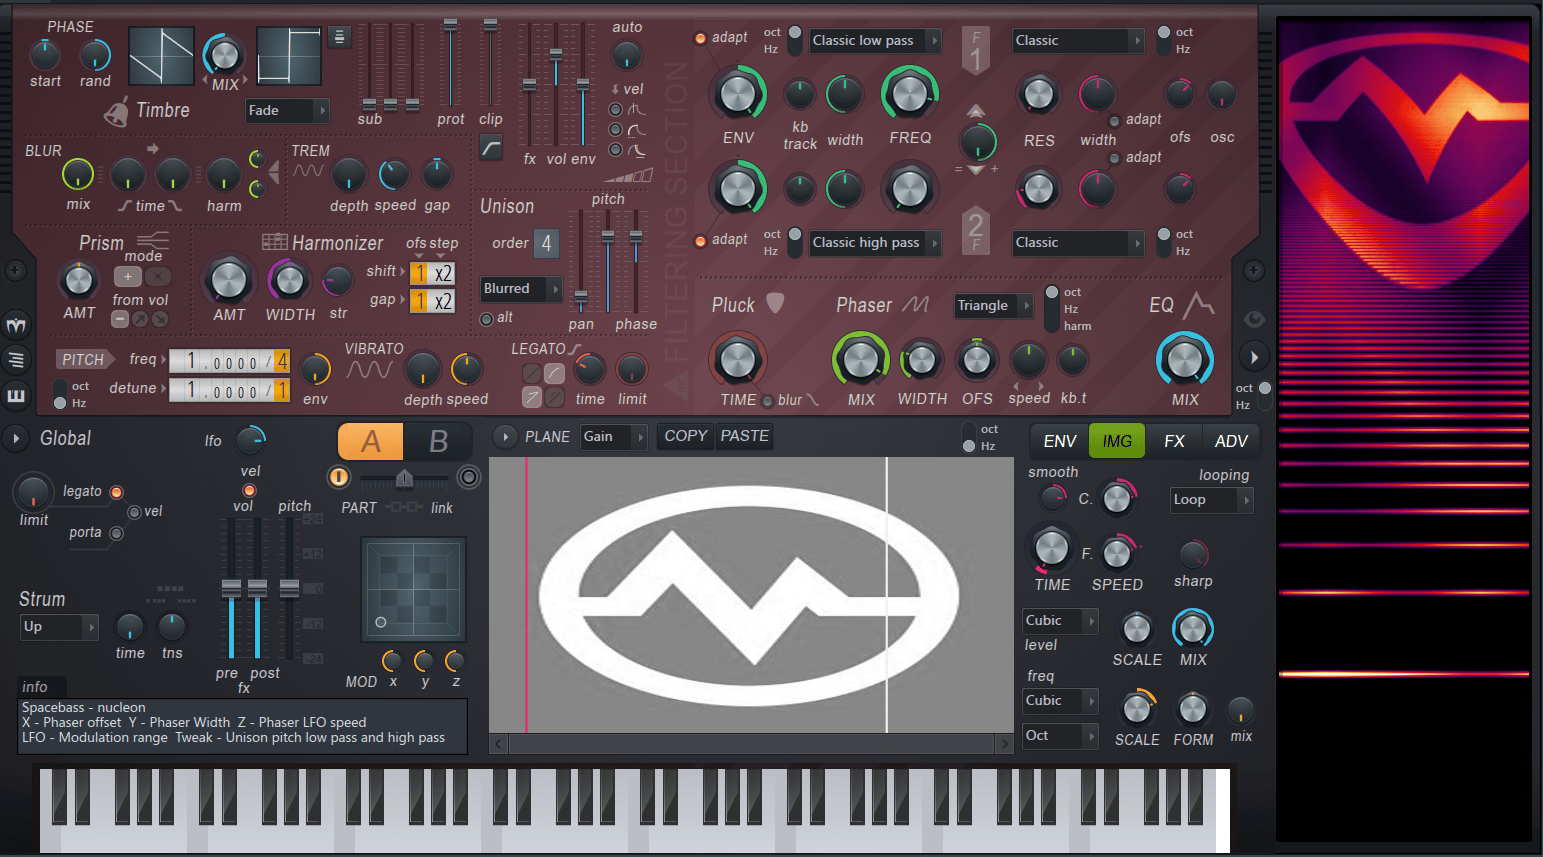
Our logo just appeared in Harmor’s spectral view!
What Harmor is doing is using a picture as a template to generate its partials.
Load up Edison and switch to “Spectral view” and you’ll see this:
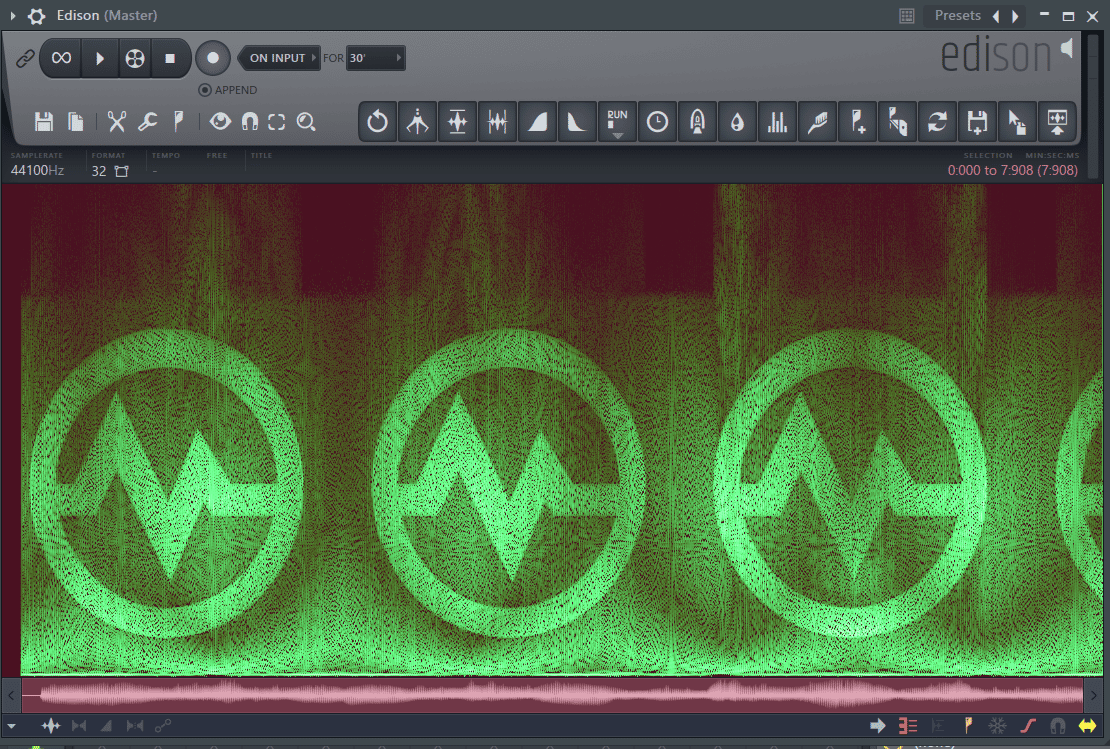
Without getting too technical, Harmor is using the pixels to generate partials. And it uses the pixel’s brightness as the partial’s level.
For example, an image that is 15 pixels high will play the first 15 partials of the sound. The level of each partial varies from 0% (black) to 100% (white).
By using different pictures, you can warp your sound in different ways:
The FX Section
The FX section of Harmor contains the effects listed below. But I won’t spend too long on these. If you want to learn more, check out our dedicated guides in the hyperlinks:
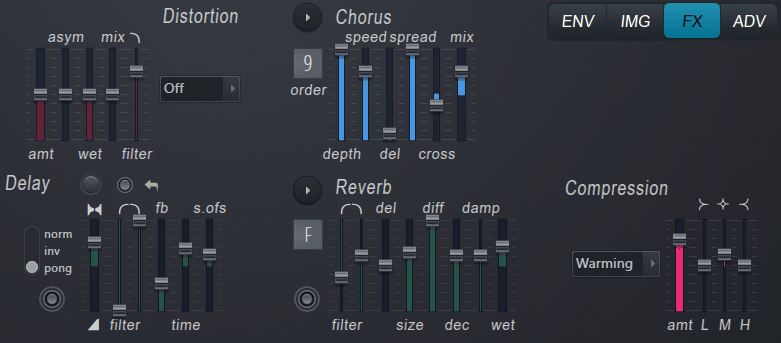
I do however want to mention a few things.
First off, all these effects work in “post”. This means they are applied after the additive and subtractive synthesis of Harmor.
Secondly, Harmor’s distortion unit is pretty nasty. And I mean that in a good way.
Check this out:
The compressor unit is also a nice inclusion. In “limiting” mode, this allows you to brickwall your sound.
It’s also worth noting that the effects apply to each synthesis bank independently.
The Advanced Controls Section
Finally, let’s wrap up this guide with a look at the Advanced Controls section.
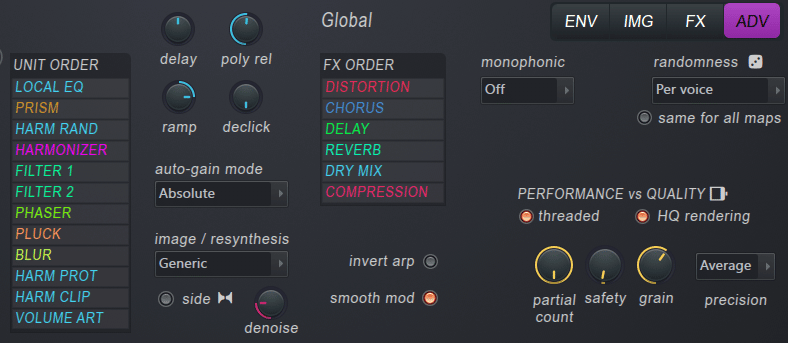
As mentioned earlier, you can re-order the effects under the “FX ORDER” tab. Simply left-click on any effect to move it down the chain. Or right-click to move it up.
You can apply a similar process to the synthesis units. For example, you might want to blur your sound before applying Filter 1. In this case, simply move the BLUR unit up the chain.
At the bottom of the window, you have the “denoise” knob:
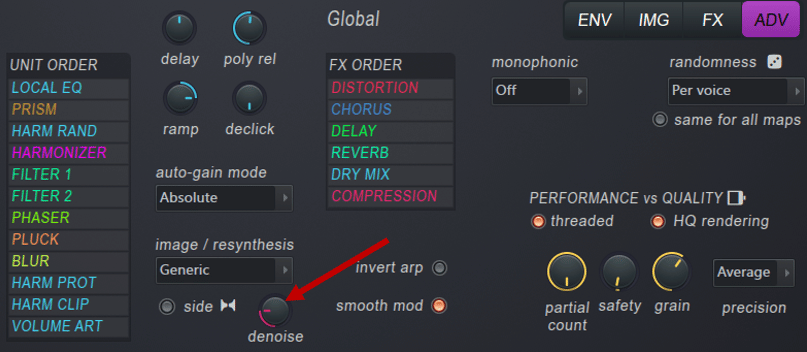
This is a fast way to remove noise from a sample you loaded in the IMG section.
Under “monophonic”, you can choose to “kill” playing notes.
For example, when writing a bassline, you rarely want two notes playing at the same time. Enabling monophonic mode under “kill all” would be a good option then.
Finally, you get your performance vs. quality trade-off. If you’ve spent any time with your DAW, you know the struggle of CPU load. To save up CPU, you can:
- reduce “partial count”. This will remove some brightness in your sound but lower the CPU load
- reduce “grain”. This will make sound changes less smooth, but also reduce CPU load
- set “precision” to average
However, when rendering, always select HQ rendering. This does not impact CPU load while playing but will enhance rendering quality.
Last Words
As you’ve probably realized, Harmor isn’t for the faint of heart.
If you like to roll up your sleeves, this synth is for you. If you want to get your hands dirty, hesitate no more. Harmor will reward you beyond your wildest dreams!
Hopefully, this guide inspired you to give Harmor a try. Did I miss out on any of its important features? Let me know over at [email protected]


