Making mixing mistakes is part of every producer’s journey. After all, it’s only through error that we learn.
And although I’m always learning, there are some things I wished I’d learned sooner. That’s why I’ve compiled this guide for you! 🙏
Together, we’ll look at some of the most common mixing mistakes. From stereo imaging to reverb and compression, I’ll cover as much ground as possible. And hopefully, help you make fewer mistakes in the future! So let’s dive in 👇
Note: most of these mixing mistakes are based on my own experience. They are in no particular order of importance 😊
1. Too Much Reverb 🔊
The classic beginner mixing mistake. Everything sounds better with reverb right?
However, applying too much reverb will completely wash out your mix.
It’s true that reverb is often necessary to bring sounds to life.
This is because reverberation is a naturally occurring phenomenon.
If a sound is totally devoid of reverb, our ears will notice something is wrong. But applying reverb systematically on every sound will transform your mix into a washed-out soup.
Here are a few things to pay attention to:
- Decay: make sure the reverb’s tail doesn’t last forever
- Pre-delay: make sure to separate the source sound from the reverb
- Room size: don’t overdo the size of your reverb if the mix doesn’t call for it
- Does this sound actually need reverb?
A great trick is to combine reverb with sidechain compression. But more on that later 😉
2. Using Different Reverbs 🔢
Room, plate, hall, church, chamber, convolution, spring…
There are so many types of reverb, it can be tempting to try them all.
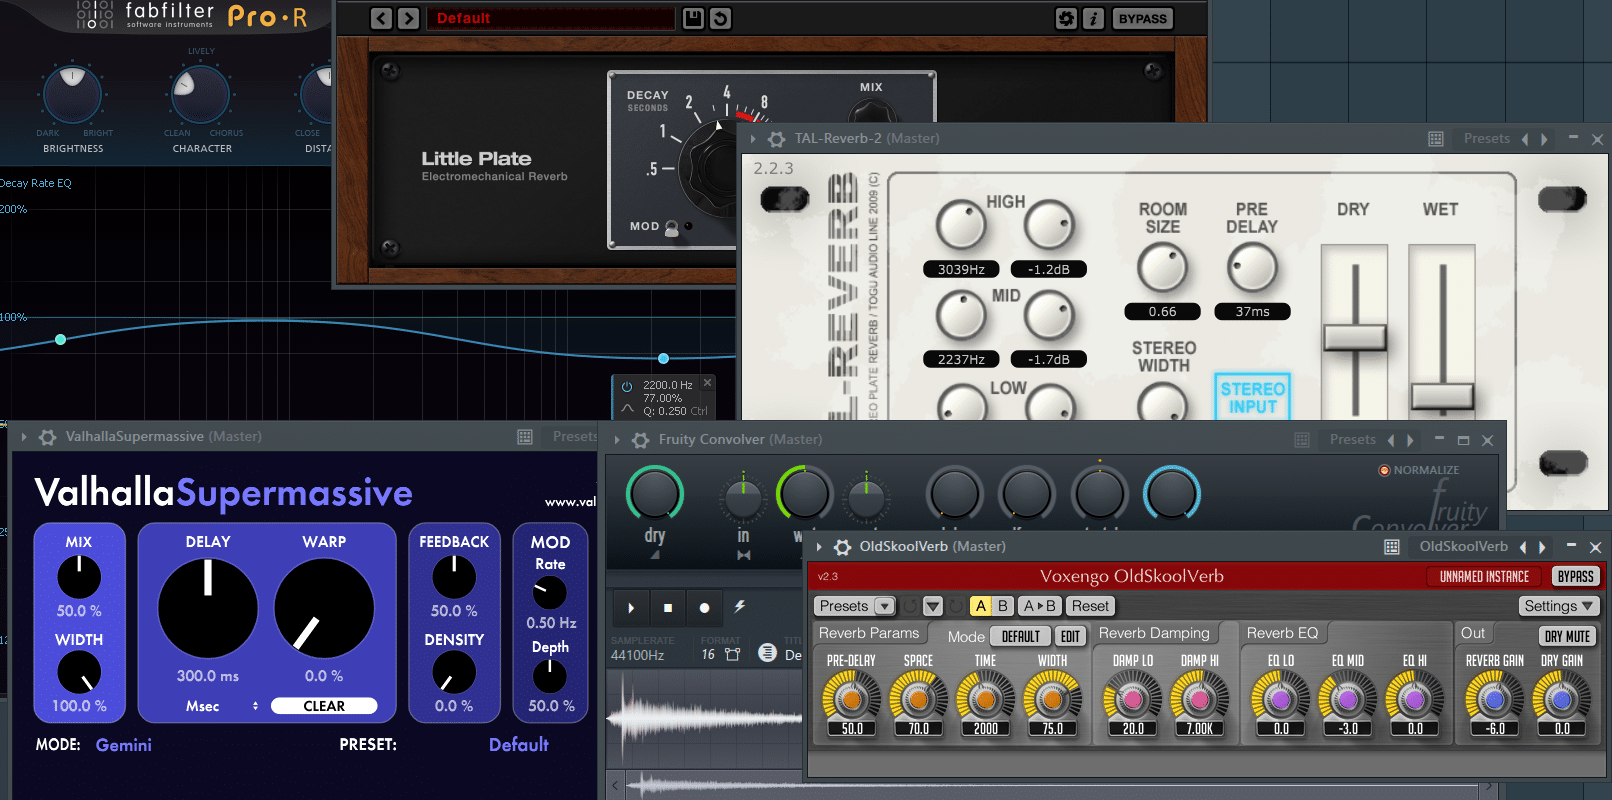
Wanting to use different fancy plugins on each sound is a common mixing mistake.
But think about it this way: reverb is meant to emulate a physical space.
What happens when you use a different reverb type on each sound? Your instruments will sound like they’re playing from 10 different rooms.
Using the same reverb on multiple instruments will add cohesion to your track.
One trick I like to use in FL Studio is the hidden “drag-and-drop” function:
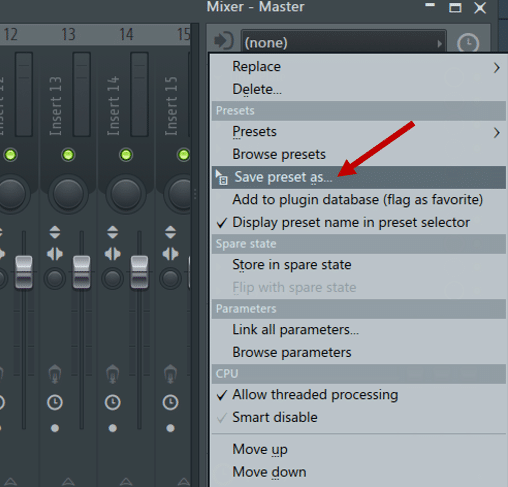
First, open the options menu of any plugin loaded in the mixer. Then, click and drag the “Save preset as…” option onto a new mixer track. You have now copied the plugin with all its parameters to a new mixer track!
In Ableton Live, you can simply use the standard copy/pasting controls. Use CTRL + C to copy a plugin state, then CTRL + V to paste it into a new track.
I try to do this as much as possible with my reverbs. This way, I know the different reverbs will sound very similar. Even if I make some minor tweaks.
A more drastic approach to avoid this mixing mistake: use SEND tracks. More on that in tip #11… 👀
Looking for the most realistic-sounding reverb? Check out our guide on convolution reverb here!
3. Too Much Compression 🗜
Compression is a black box for many aspiring producers. We don’t know how it actually works, or when we should use it:
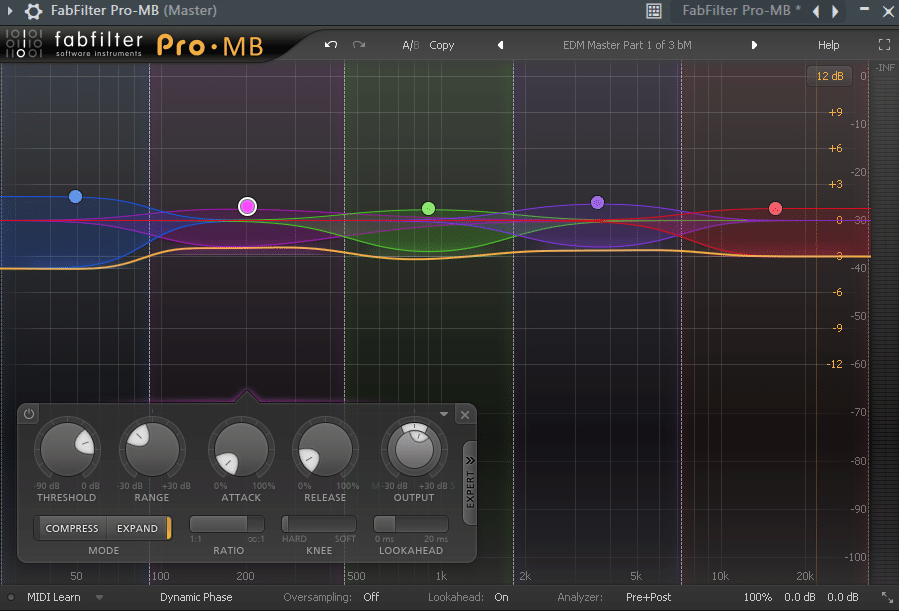
Then, once we’ve learned the basics, we start applying it everywhere!
Too much compression is one of the most common mixing mistakes. Vocals, bass, kicks, and snares, huge leads… Everything gets compressed.
But using too much compression will kill your dynamics. Everything will sound squashed and flat.
Tip #1: don’t add a compressor because you think you have to.
If your kick sounds great in the mix without a compressor, leave it that way!
Tip #2: make your compressor work in time with the track.
Tweak the attack and release times. Your compressor should have just enough time to reset before the next transient hits. We explore this concept more in detail here.
4. Driving the Master Bus Too Hot 🥵
A common mixing mistake is to lose track of the master bus. You add sounds on top of each other, and before you know it, your master is peaking at 0dB.
It’s common practice to leave between 4-6dB of headroom for the mastering stage.
Headroom refers to the available dB level before clipping. Say for example that your track never peaks above -4dB. This means you have 4dB of headroom.
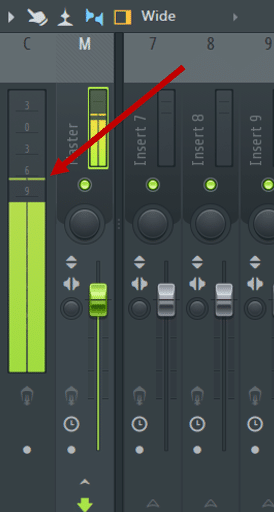
Gain staging is an essential part of any good mix. Essentially, you want to control each sound to make sure nothing is clipping.
A great habit to get into is to check your master level often.
If it’s starting to peak above -3dB, it’s time to re-adjust your individual tracks.
Confused about the difference between volume and gain? We cover the topic in depth over here.
5. Using the Solo Button 🔴
This is one I confess to doing for wayyy too long… 🙋♂️
Here’s what I wish someone had told me earlier:
What sounds great in isolation doesn’t always translate to the full mix.
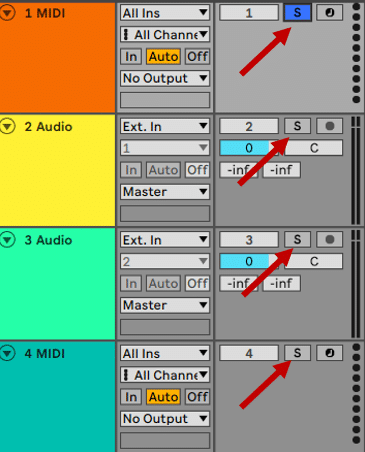
A classic example is when it comes to EQ’ing. A pad might sound nice and full when soloed. But re-introduce it in the track, and it clashes with the bass. Suddenly, your mix sounds muddy.
Remember: the goal of mixing is to make everything fit together.
When you solo a track, your focus is on making it shine on its own. That is why mixing decisions should be taken in the context of the full mix.
Pro-tip: If you’re struggling to hear the difference, boost the level of your sound.
This way, the changes you make will stand out. Once you’re happy with the processing, dial the volume back. Of course, this isn’t to say that you can NEVER use the solo button. But try to keep those excursions as brief as possible.
6. Not Checking in Mono 🎧
Here’s another mistake I did for way too long 🤦♂️
Checking how a mix sounds in mono is a must for every producer.
The reason for this is simple. Not everybody will be listening to your track on headphones. Or good quality speakers. Your song might be playing from a lonely iPhone. Or a Bluetooth speaker:

More importantly, most clubs have a mono sound system.
This is why it’s crucial to check if your mix still sounds good in mono. Does anything sound drastically different? Have elements disappeared?
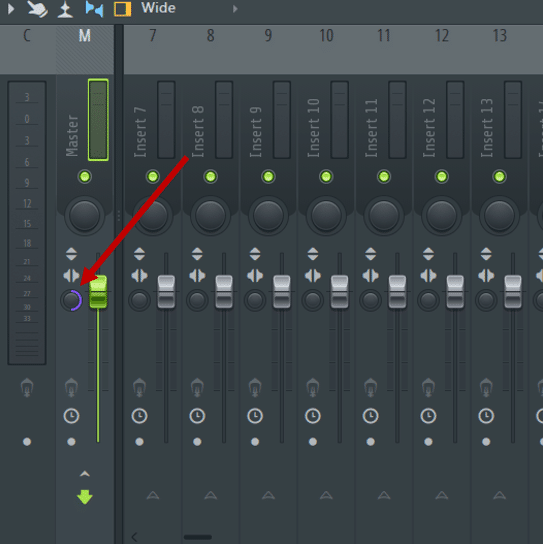
In FL Studio, simply turn this knob 100% to the right. This will merge your entire mix to mono:
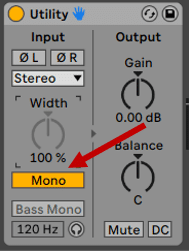
In Ableton Live, insert a Utility plugin on the Master channel. Enable “Mono” to convert your entire mix to mono:
Wanna dive further? We’ve dedicated several articles to the art of stereo imaging and mono compatibility.
7. Using Reference Tracks Too Early 💽
As I started my production journey, I heard a lot about reference tracks. And it’s true that comparing your tracks to professional ones is important.
But here’s the mistake I was making. I kept using a reference track at the start of my project.
Result? I was getting demoralized super quickly. I was comparing my little 8-bar loop to a Grammy-worthy track. What was I expecting? Down the line, I learned to stop doing this.
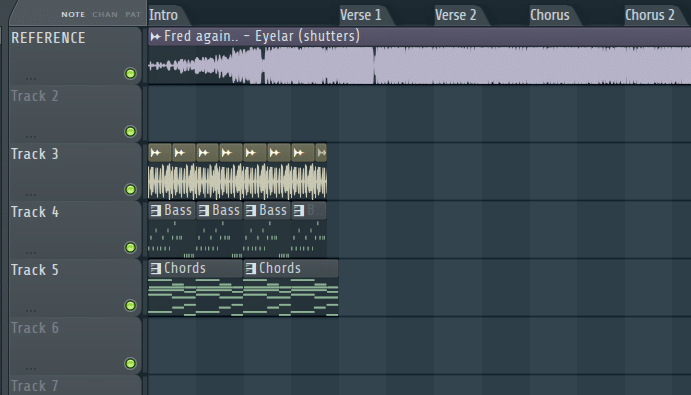
Referencing your track is great for the mixdown stage.
In isolation, you might not notice if your track has too much bass. Or if the vocals are too prominent. Bringing in a reference track will help you balance out all the elements. Just don’t do this when you’re sketching an idea!
8. Over-Processing Your Sounds 👨🔬
Has your snare channel ever looked something like this?
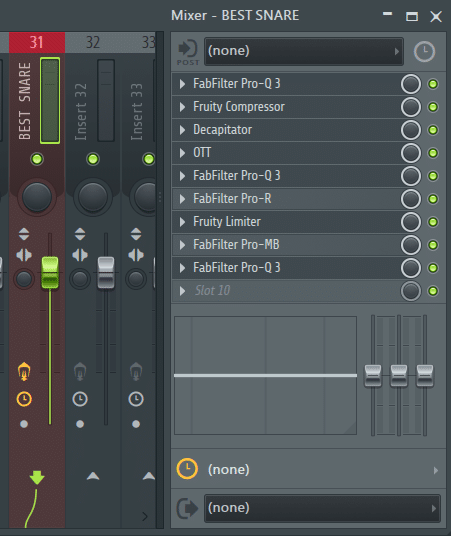
Chances are, you picked the wrong snare to start with.
Over-processing is a trap we can all fall into. We find a sound we like and think “That will do, I’ll fix it with some effects”.
Good sample selection is the key to a great-sounding mix.
Start with a good sample, and the mixing will take care of itself. This is also true with sound design by the way! One last drawback of over-processing? Your CPU load will start fuming.
9. Sticking to the Grid 📏
Want a mix that sounds really unnatural and robotic? Then stick to the grid.
This is true of drums, but also of melodies and chord progressions:
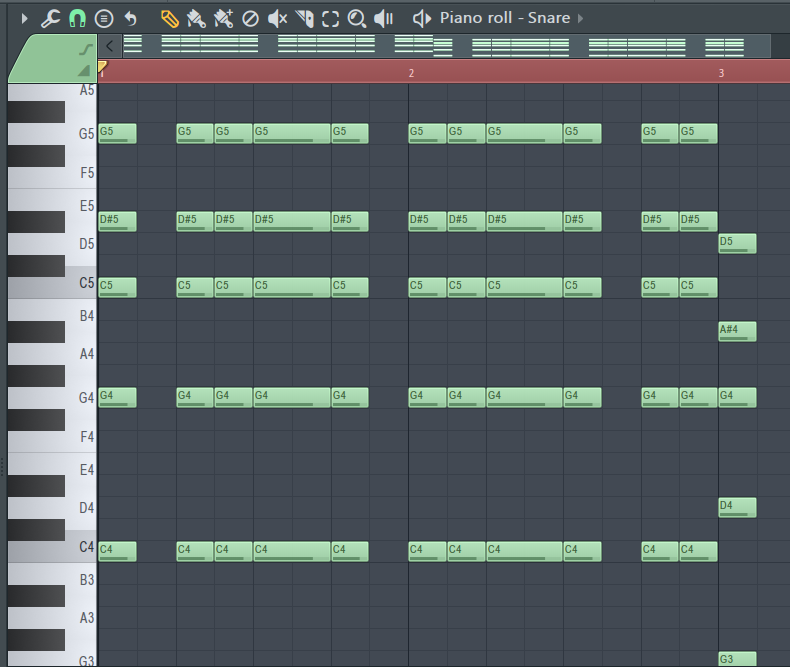
Let’s listen to these 2 examples. See if you can sense the difference:
There are 2 simple ways to get your notes “off-grid”:
- Record yourself playing, then fix anything that is too far off the grid
- Draw in MIDI notes. Then, manually displace them so they are slightly off-grid. Use ALT + dragging for this.
If you’re curious, Aden dives deeper into the topic in this video:
10. Not Using SEND Tracks 📩
I mentioned Send tracks in Tip #2 about reverb.
Effectively, Sends let you run multiple sounds through the same FX chain. You simply “send them” to the same effects channel. Most DAWs have Send channels ready to use:

Note: some people call them Send and Return channels. Others just call them Sends for simplicity.
There are two big advantages to using Send channels:
- Your mix will sound more cohesive. This is because multiple sounds are running through the same FX chain.
- Using Send tracks will lighten your CPU. This is because you are using only 1 instance of each plugin.
Here’s how you do it in FL Studio:
- Say you want to process multiple sounds with saturation and reverb. Load a Fruity Send on the instrument you want to process. Then, sidechain it to the FX track with the saturation and reverb:
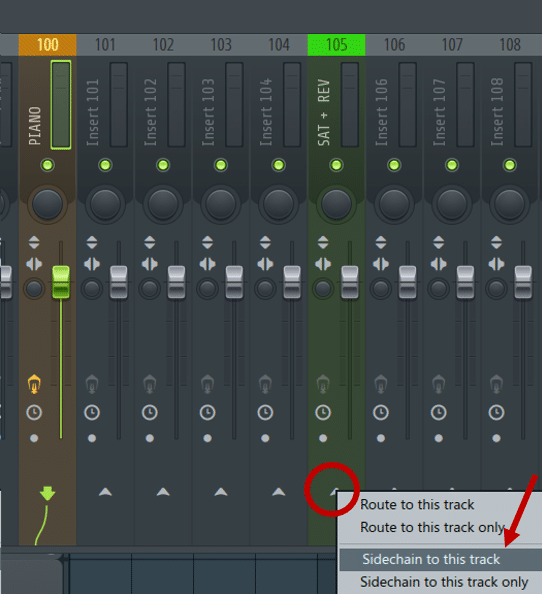
- In Fruity Send, select the FX track:
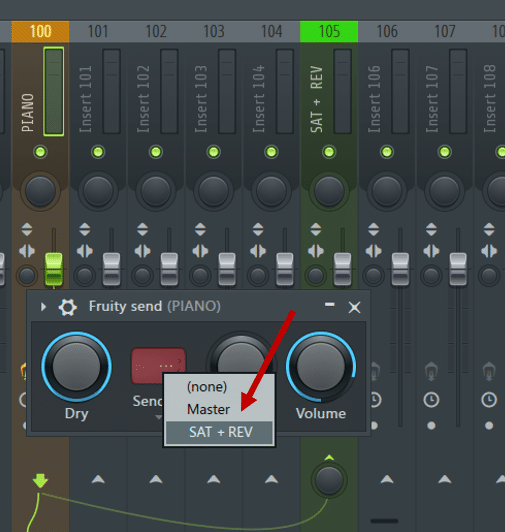
And you’re done! For effects like reverb and delay, make sure to set them to 100% Wet.
In Ableton Live, all you have to do is use the Send knobs:
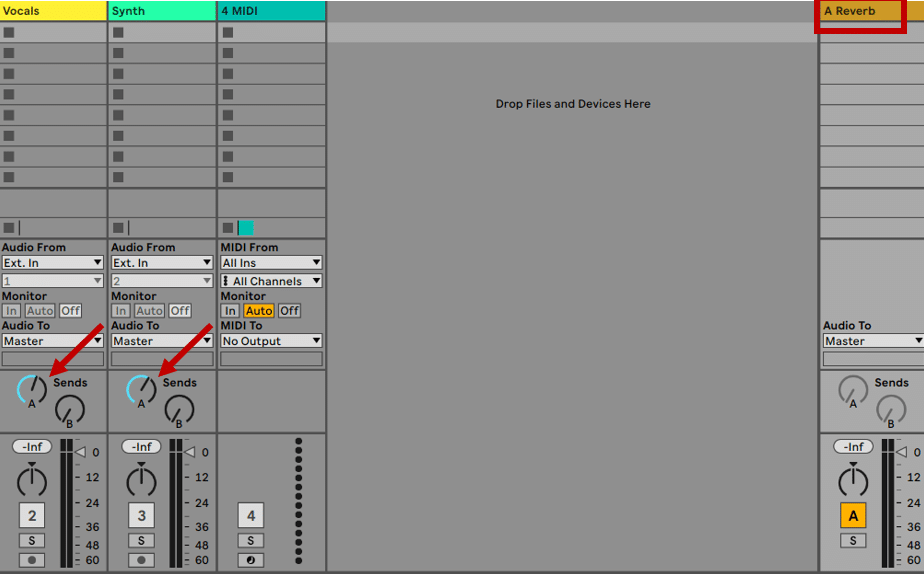
In this example, I am applying reverb to both the Vocals and the Synth tracks. The knobs act as dry/wet controls.
11. Bad Acoustic Treatment 🏠
This might be the number one mixing mistake when you produce your first tracks.
The room you produce in affects the way you hear the sound.
Most likely you’ll be working in an untreated room. This will often trigger issues with the low end. The bass frequencies either get trapped or hang around in the room.

This means the bass will sound way louder than it actually is. Which in turn will lead to bad mixing decisions.
Most of us don’t have the luxury of acoustically treating a room. This is why one of my pieces of advice is to work on headphones.
12. Mixing Too Loud 💥
Another common mixing mistake we’ve all done is mixing way too loud.
A higher volume makes everything sound better.
Your bass sounds thicker, your vocals clearer, and your drums punchier. It’s only when you turn down the volume that things sound unbalanced. However, a mix that sounds good “quiet” will sound good loud.
Another issue is “ear fatigue“:

Ear fatigue is “a phenomenon that occurs after prolonged exposure to an auditory stimulus”.
Its effects include tiredness, discomfort, pain, and loss of sensitivity. And, I might add, hasty mixing decisions. Mixing at lower volumes will let you make better decisions.
13. Overloading the Bass 🎸
Another common mixing mistake is a lack of balance in the low end.
This is often caused by mixing in untreated rooms. Low-end sound waves build up, making it hard to make the right mixing decisions.
But there’s another reason too. Have you ever noticed how an EQ plugin shows frequencies?
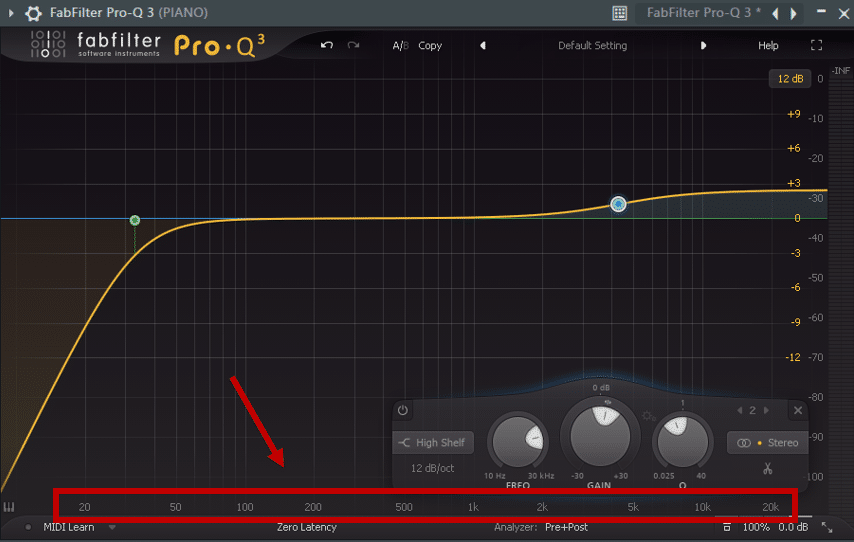
The first half of the spectrum goes from 20 Hz to about 1000 Hz. The second half goes from 1 kHz to 20 kHz.
This means there is about 20 times more “room” for sound in the mid-to-high frequencies.
This type of scale is called “logarithmic”. This means you have to be super picky with the sounds that sit below 1000 Hz.
Low-cutting sounds below 20 Hz is generally recommended. In addition, most sounds that don’t belong to the low end can be cut a bit higher. But be careful of systematically low-cutting every sound! It can quickly weaken and thin down your mix.
14. Not Having a Goal 🎯
We usually want to get through a mixdown as quickly as possible. I know that was my case.
I would jump into my session and start EQ’ing things left and right.
Did I have a plan in mind? Something I wanted to achieve? Nope. A better approach would have been to determine what I wanted the track to sound like first.
If you know what you’re working towards, you’ll know when to stop (see #17 for more on this 👀).

Here are some questions you can ask yourself:
- What is the mood I’m going for? Dark? Light? Relaxed? Dancefloor?
- What is the main element of my song? Of each section? What do I want the listener to pay attention to?
- What were some of the mixing mistakes I made in my previous track?
- What track can I use as a reference for my mixdown?
Having a goal will help you avoid turning knobs endlessly.
15. Not Organizing Your Session 📋
Nothing everyone may agree with this one. But I find that the more organized my session is, the more efficient I am.
Here is what my standard template looks like in FL Studio:
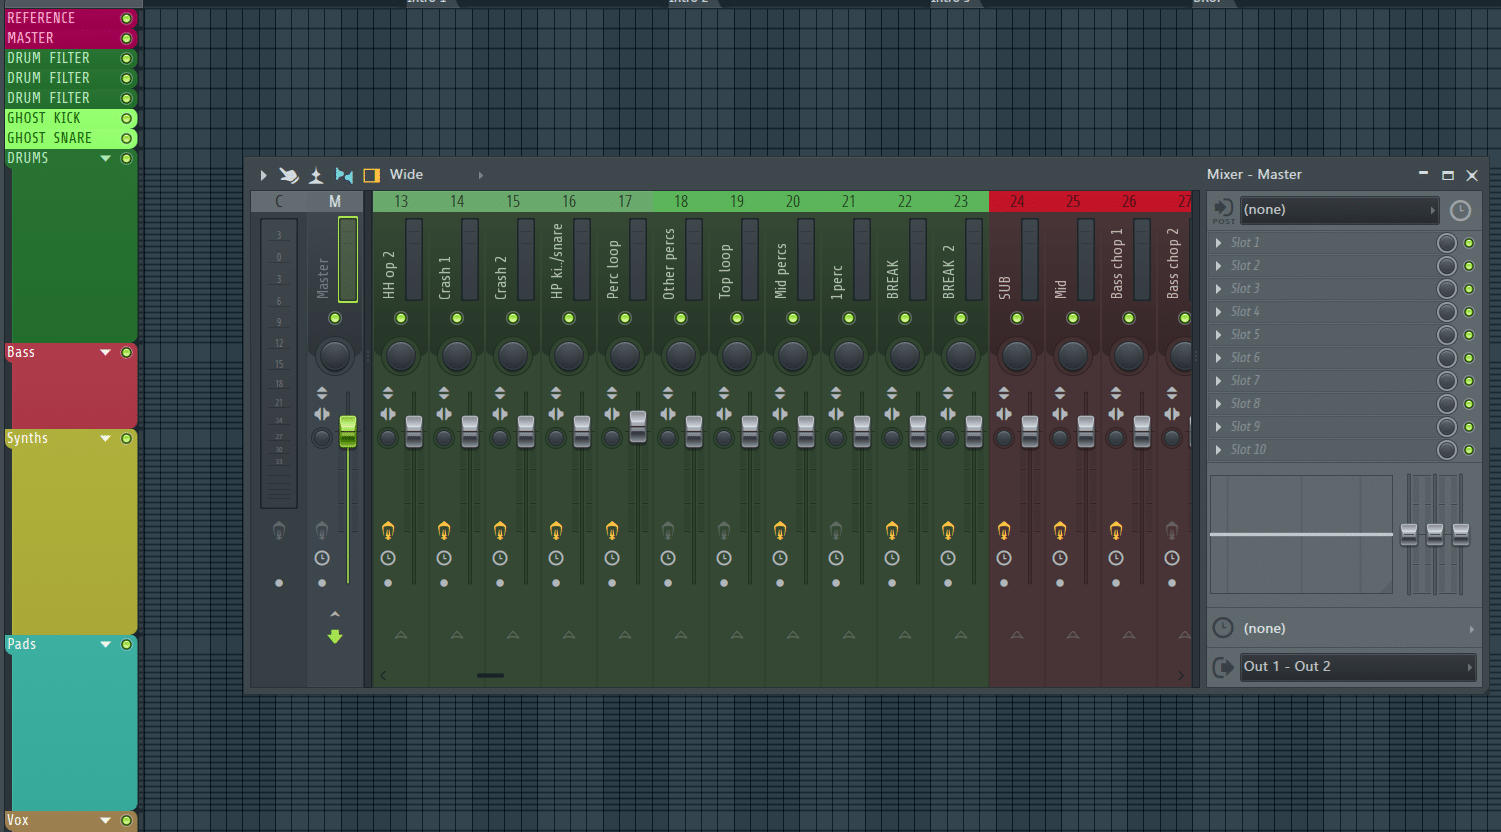
Whatever project I work on, I know it will have drums, pads, bass, etc. So it makes sense to have those channels labeled.
Keeping your session organized will speed up your workflow. It will also make your mixdown faster.
If you want to work on a specific sound, you don’t have to go looking for it. You know immediately where it is. If you want to process multiple pads, they are already grouped in the mixer.
I’ve seen many producers work in the completely opposite way. No labeling, no coloring. I have no idea how they manage 😅
If you want to take your template to the next level, you can even pre-load plugins.
16. Not Taking Breaks ☕
A common rule of thumb is to take a 20min break every 2 hours. They are multiple reasons for this.
Firstly, ear fatigue is real (see tip #12 about mixing too loud).
Ear fatigue can in turn lead to mixing mistakes. But more importantly, taking breaks gives you a fresh perspective. You step away for a bit, come back, and suddenly notice your snare is way too loud. Sound familiar?
Secondly, it can simply be hard to stay motivated for hours on end.

And that’s normal. Give yourself a break, go for a walk, or listen to a podcast. You’ll be surprised at how many new ideas you have away from your DAW.
Finally, try taking longer breaks from a song. Step away from a track for several days or even a week. When you come back to it, you’ll have fresh ears and will notice new details.
17. Knowing When to Stop ✋
Knowing when a song is done can be hard. Actually, it’s almost impossible.
One of my favorite quotes is “There is no perfect, only finished”.
I forgot who said it, but it has always stuck with me. No song is ever perfect. But it’s up to you to decide when it’s finished.
Mixing follows the law of diminishing returns. The more time you spend on it, the smaller the improvements. Until the changes you make become barely noticeable:
Learning when to say “stop” is a real struggle for beginner producers. And it’s what can lead some to have a folder full of unreleased tracks.
Using a checklist is one way to make sure you finish a track.
Once the checklist is covered, your track is done. Time to move on to the next one!
That’s a Wrap!
That’s it for this guide! Hopefully, you’ve learned how to overcome some mixing mistakes you were making 😊 Did I miss out on anything? Any mixing mistakes I forgot to mention? Feel free to get in touch with me at [email protected].


