Synth pads are what give our tracks their density and their fullness.
Without a good pad, your track will sound thin and empty.
Besides filling up the frequency spectrum, a pad also gives movement to our track. So it’s worth knowing different methods to create them.
That’s what we’ll cover in this guide! Together, we’ll look at my favorite ways to create pads, including:
- Designing your own from scratch
- The arp-and-reverb method
- Creating pads through huge reverbs
- Using Granular synthesis to create glitchy pads
And more! So without further ado, let’s dive in 👇
First Things First: What Is a Synth Pad? 🤔
A pad’s main function is to add “density” to a track.
By density, I mean that it needs to fill out the frequency spectrum. But without standing out too much.
A pad’s role is essentially to fill out our track but in a discrete manner. We don’t want to draw the listener’s attention to it. But if we remove it, we notice something is missing.
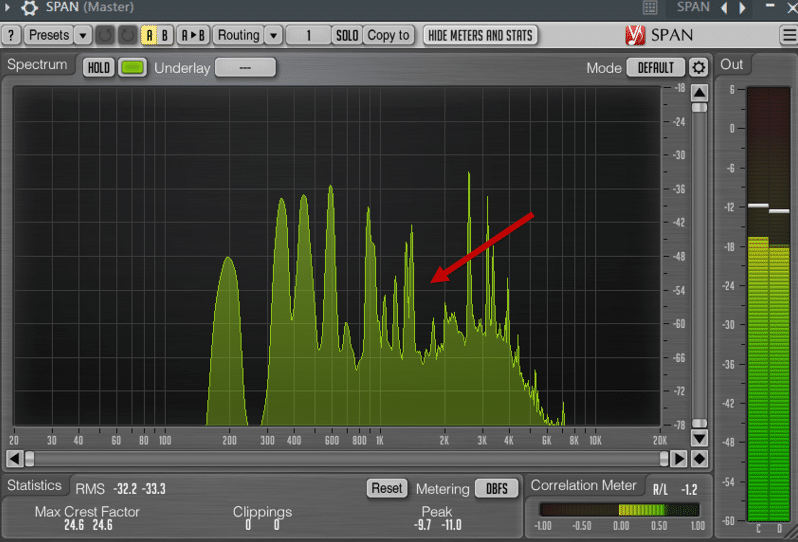
Here are some of the characteristics that make a good synth pad:
- Slow attack and release. We want something that creeps up and then disappears slowly. Think the opposite of a stab or a pluck.
- Some basic chords. We don’t want to get fancy with weird chord shapes, or complex melodies. Remember, the goal is to hide in the background
- A sense of movement. Our pad will be playing almost constantly. So we don’t want it to remain static. Movement can be achieved in many different ways, which we’ll explore 😉
- A chorus feeling. In classical music, a chorus is also known as a choir. Basically, it’s when several singers sing with almost the same timing and pitch. This in turn gives a rich, dense quality to the sound.
So with that in mind, let’s dive into 9 different ways to create unique pads 👇
Note: I will be using the synth Vital for a lot of this guide. It’s free, and awesome, and you should definitely grab it. If you need a refresher on how it works, we have you covered here 🔥
Method #1: Design Your Own Synth Pads
Let’s start with the most important method: sound design.
There are a few reasons why this is a good place to start.
Firstly, sound design gives you maximum control over what you want to achieve.
Secondly, the concepts we’ll cover here are transferable to other methods we’ll explore.
So let’s dive into Vital and design our first pad!
First, load up a waveform or wavetable into OSC 1. Pick something that already sounds pleasing to your ears:
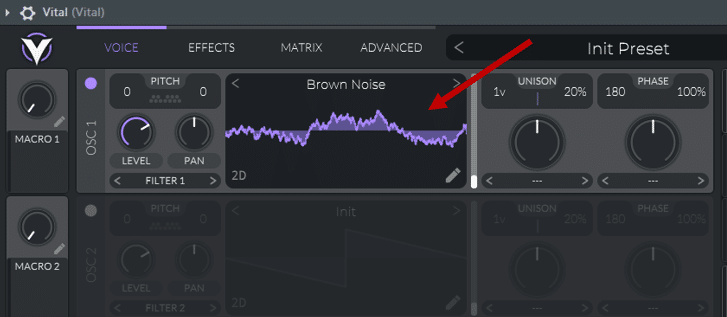
I’ve gone with a Brown Noise; this is what it sounds like:
Next, we are going to shape the ADSR envelope.
ADSR stands for Attack-Decay-Sustain-Release. It basically dictates how the volume of a sound changes over time.
We’ve done a comprehensive guide on that too by the way 😉
First, we are going to lengthen the attack and release. This will give us that slow, pad-like quality:
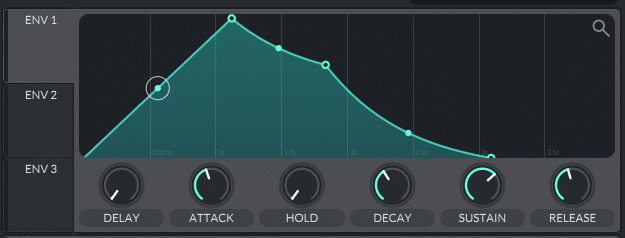
I’ve also decreased the decay and sustain a bit. But that’s really up to taste. This is what it sounds like:
Next, we want to add some density to our pad.
First I’m going to add some voices to OSC 1 and de-tune them slightly. I’m also going to add a second oscillator, playing 1 octave below OSC 1:
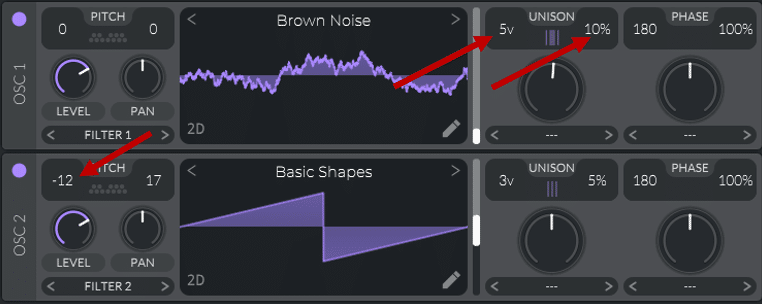
I’ve also de-tuned OSC 2 slightly. This is what we got so far:
Adding Movement with LFOs
Next, we need some movement! For this, we are going to use some LFOs.
I am going to assign LFO 1 to the frequency cutoff of Filter 1:
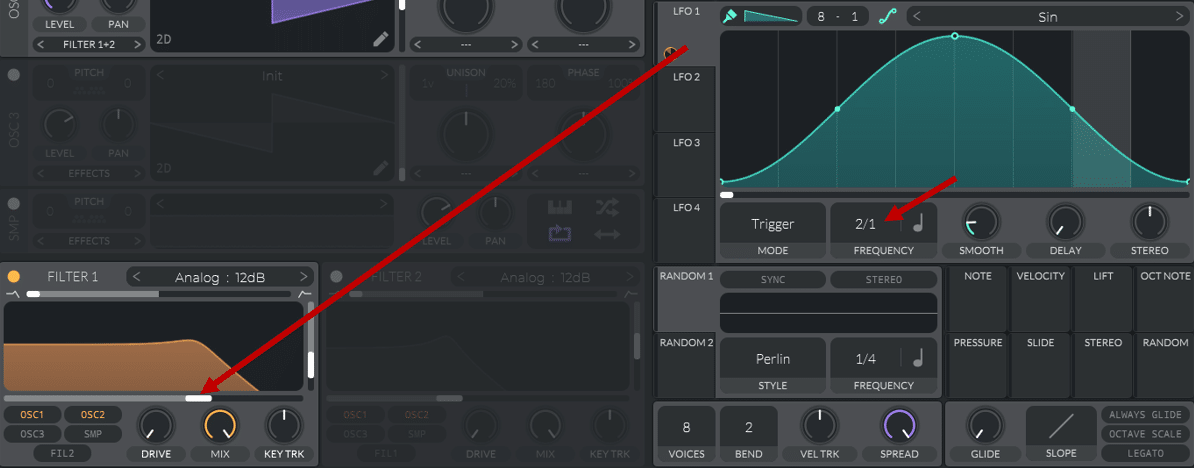
I’ve chosen quite a slow frequency here. Remember, we’re going for slow, subtle movement:
Make sure you are sending both oscillators to Filter 1. You can also assign an LFO to the wavetable position of OSC 1:
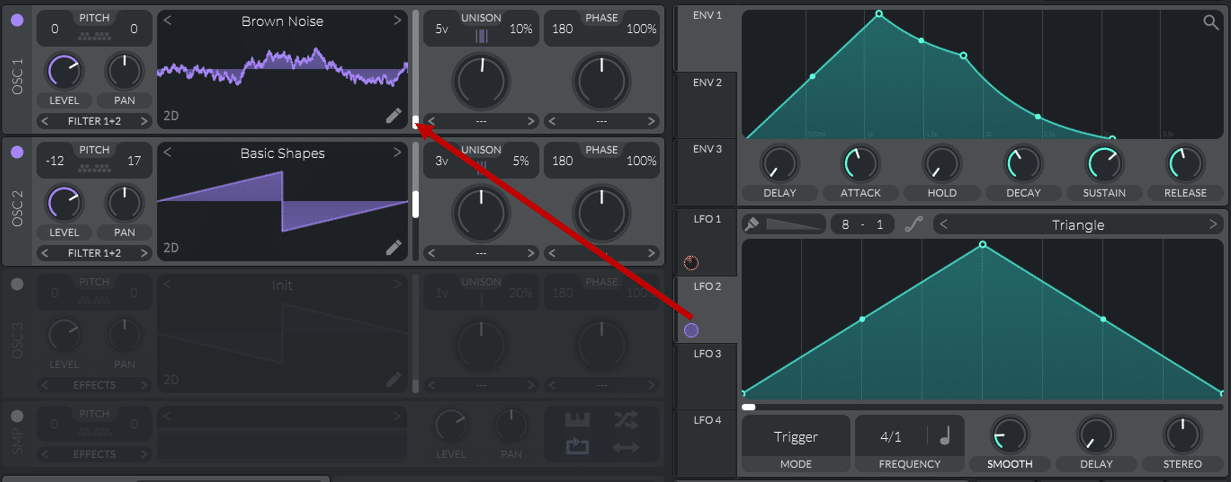
Now, we need to fill up the higher frequencies.
For this, I love to use a noise layer with Vital’s Sampler section.
What’s great is that you can load any noise or ambiance you want. Here, I’ve used a rain texture:
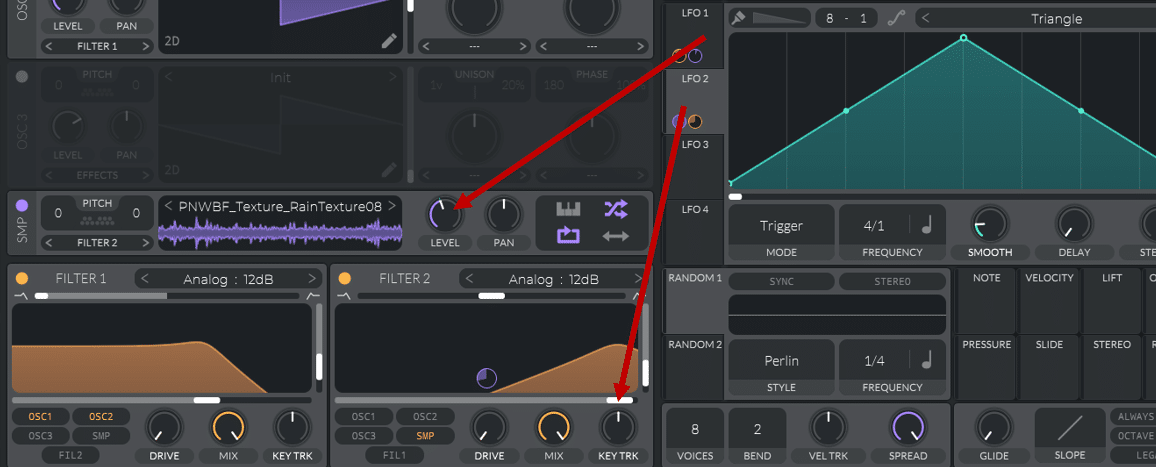
Again, I am automating both the level and frequency cutoff with LFOs. This is what it sounds like:
Using real-life sounds is a great way to add an organic element to your tracks.
Finally, let’s add some effects! Reverb, delay, chorus… Anything that will make our synth pads sound thick and washed out:
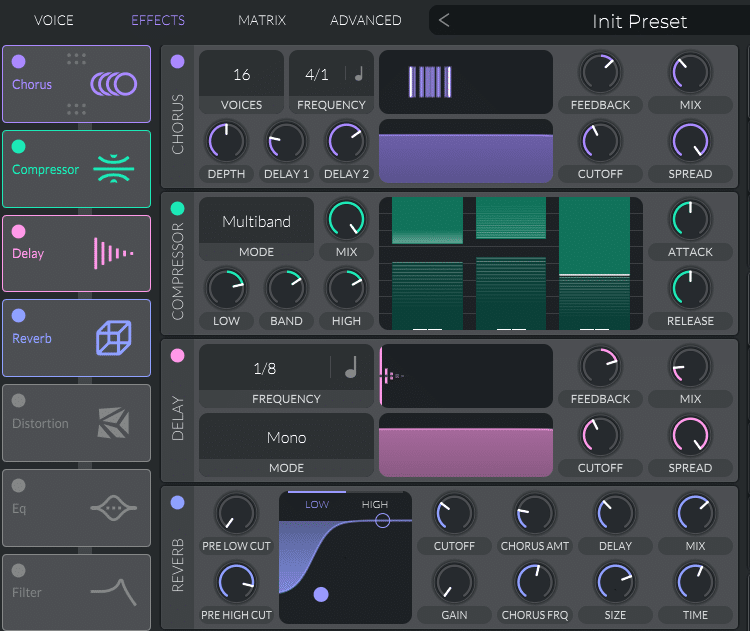
This is our final result:
Not bad! 😎
This is the basic approach to designing your own synth pads.
But the beauty is that they can sound like anything you want! Use your favorite effects plugins to transform the sound even further. Experiment with LFOs on random knobs to see what happens. Everything is fair game!
If you need a refresher on all things LFO, we have you covered 😎
Method #2: Arpeggiate and Reverb
This is own of my favorite methods 👀
First, start with a short plucky sound. It could be a piano or an actual synth pluck.
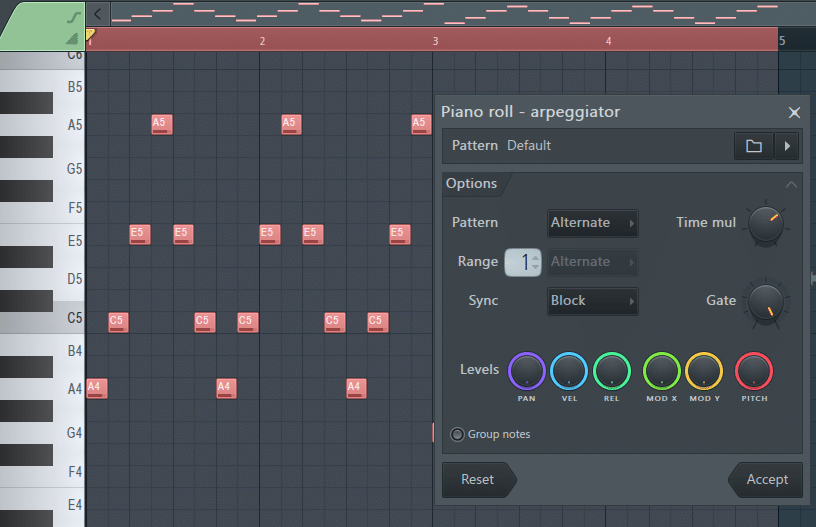
Next, write a simple arpeggio in your piano roll. In FL Studio, you can draw in a chord, then select it and press ALT+ A. This will bring up the Arpeggiator tool:
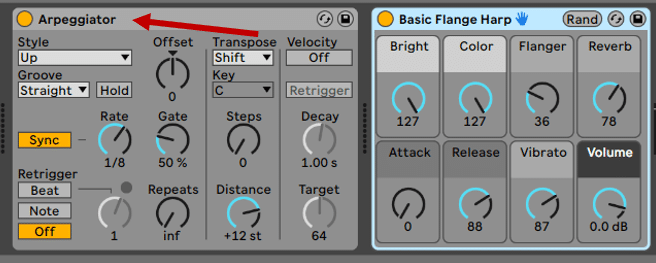
In Ableton Live, load up an Arpeggiator as a MIDI effect. This will transform your chords into arpeggios:
Now, we need to add a TON of reverb.
For this, I like to render the arp to audio first. In FL Studio, right-click on your sample and click “Edit in audio editor”:
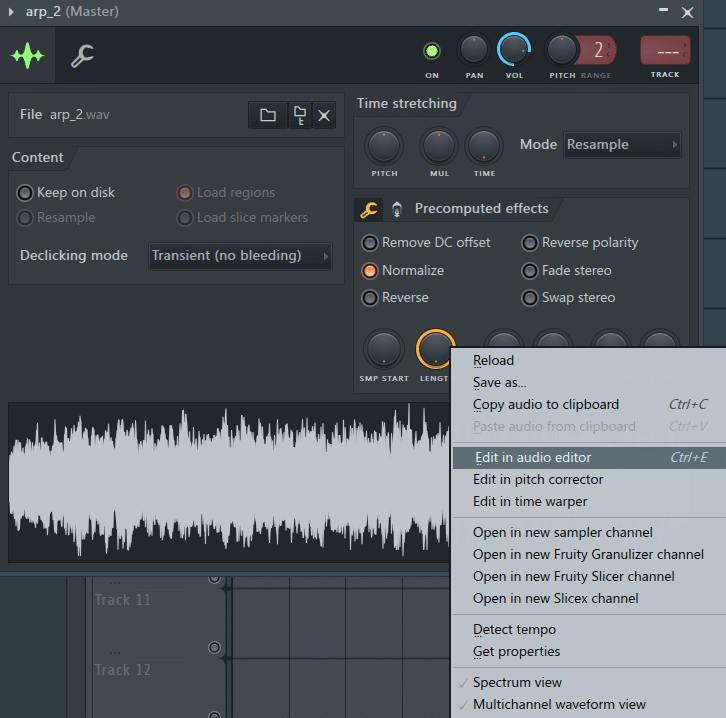
This will open up Edison. Here, use the Blur tool to create a washed-out effect. This is the result:
From here, you can fine-tune with some more filter automation to add movement. You can also vary the notes of your arpeggio. This will add even more motion to your pad:
Of course, you can also use your favorite reverb plugin. Use the Dry/Wet knob to control how much the pad is washed out:
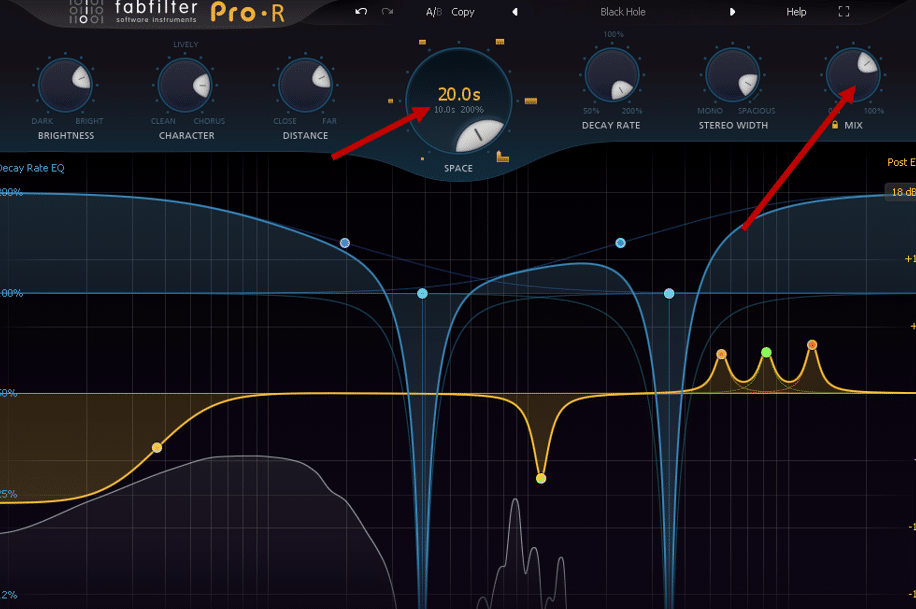
Make sure to set your decay rate high. And use sidechain compression on your pad to make it “breathe”.
Method #3: Super-Strech Any Sound
Time-stretching is another cool technique to create unique synth pads.
Pitch-shifting and time-stretching are techniques we’ve covered in the past. In particular, we’ve talked about Paul’s Extreme Sound Stretch (PESS for short):
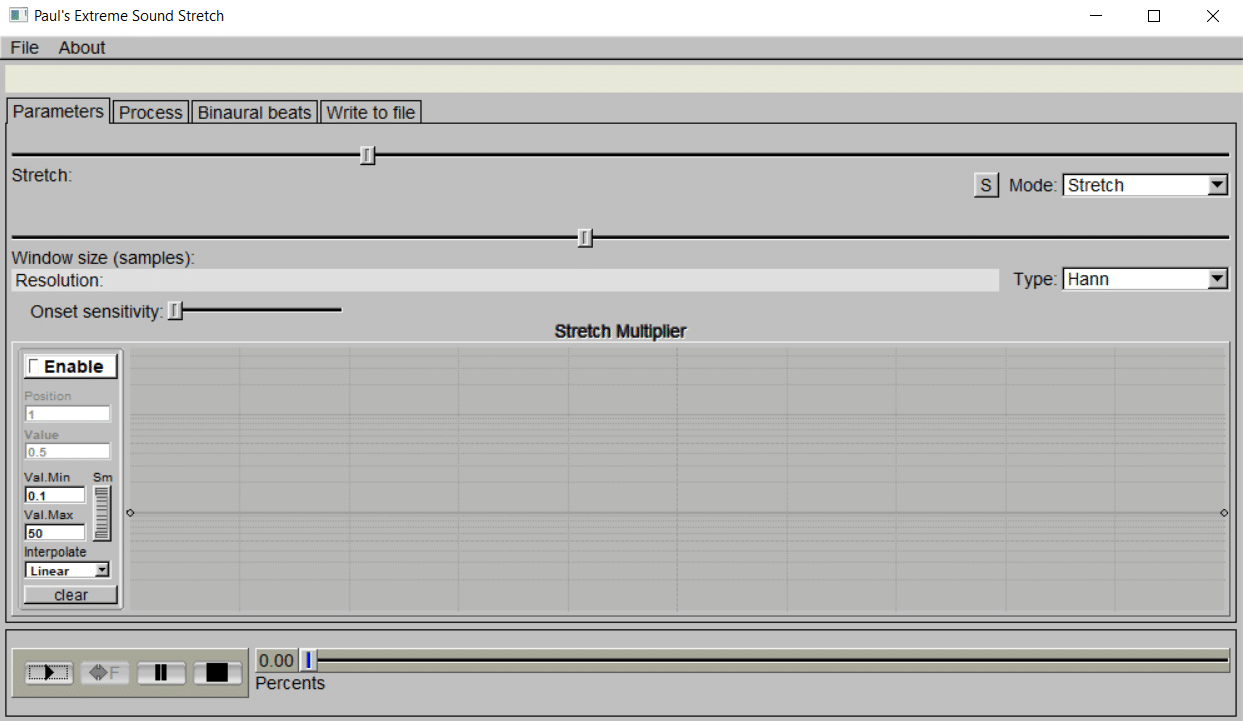
Although its GUI is straight from 1998, its capabilities are impressive. And it’s free 😉
Let’s say I have this guitar loop in my track. And I want to make a pad out of it:
Pop it into PESS, and you can stretch it out to… 10,000 times slower! For reference, this is would turn my 5-second guitar loop into… a 14h-loop 😅
So you do need to be careful when rendering out from PESS. If you are doing extreme time-stretching, try rendering just a small portion:
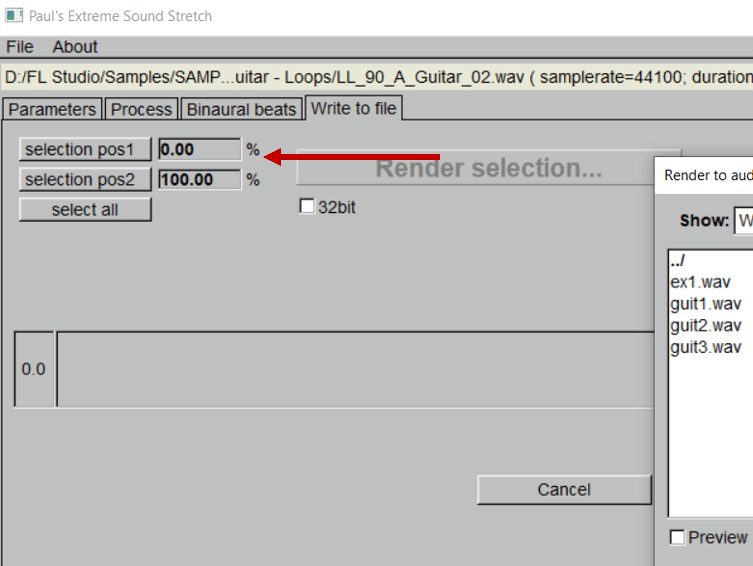
Here’s what I got from stretching at 50x:
This is a great way to create pads based on the elements already present in your track.
Method #4: Use Valhalla Supermassive to Create Synth Pads 😍
Staying on the free plugins train, Valhalla Supermassive is one you NEED:
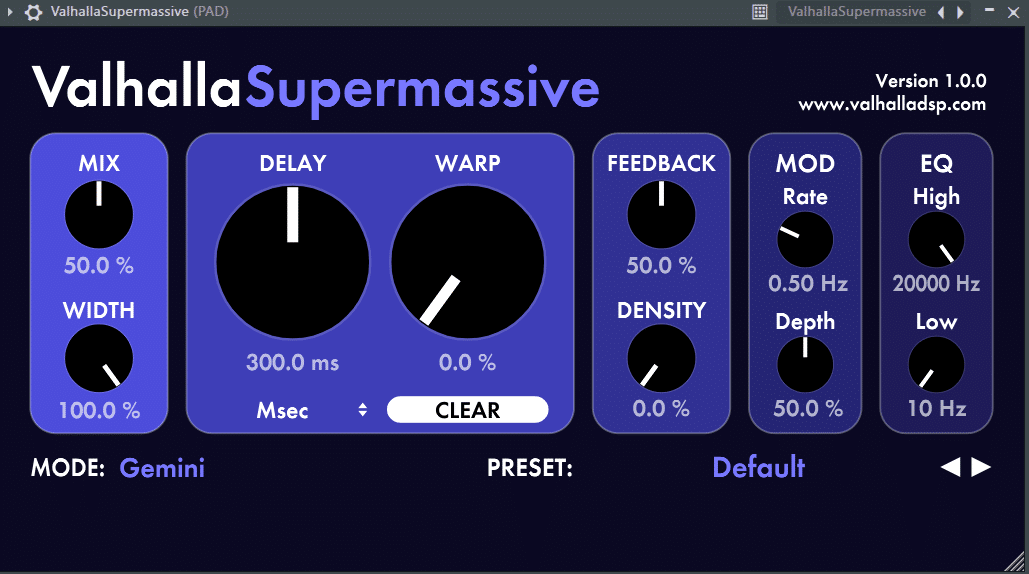
Under the preset menu, you have a bunch of SFX presets:
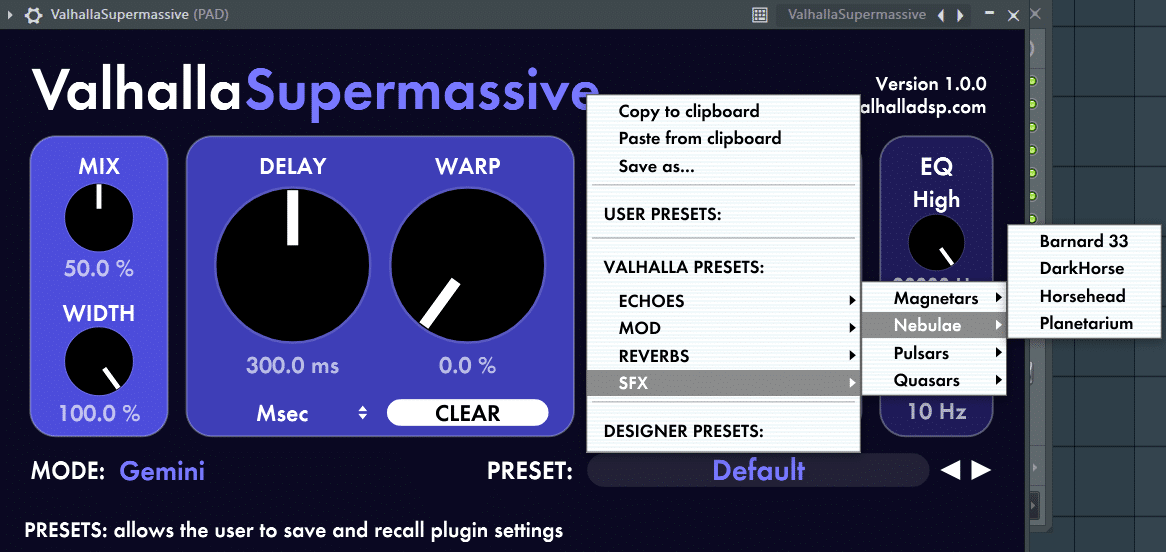
Try any of those on a short sound or chord: instant beautiful synth pad 🔥
Let me show you some examples. I’m using this guitar loop I recorded as a starting point:
I get this with the “Barnard 33” preset:
But you can use any sound you want. For example, let’s try a piano chord:
I am going to use the preset “SpaceIsThePlace”, and boost “Mix”, “Feedback” and “Density”:
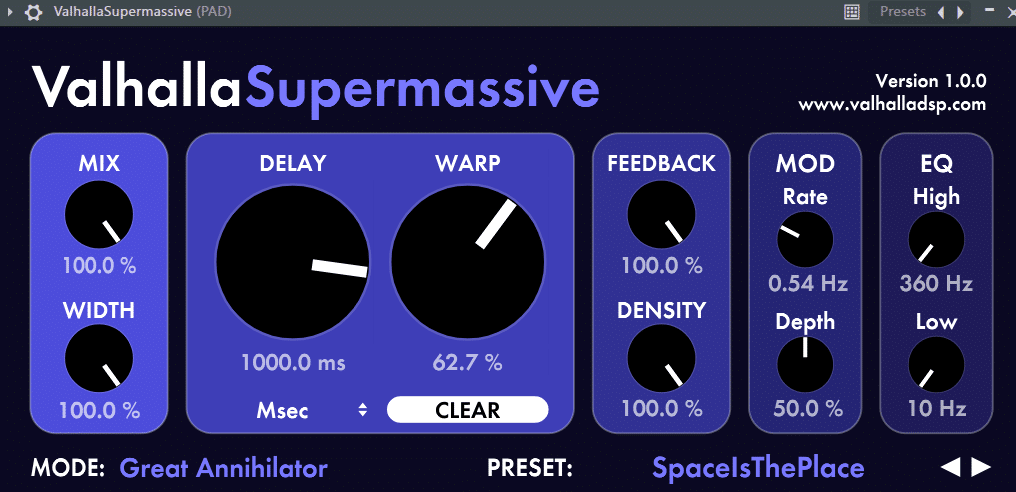
I don’t know about you, but I can already imagine an entire track around that sound 😍
Method #5: Turn Any Sound into Synth Pads!
I think you’ve guessed it by now… But pretty much any sound can be turned into a pad.
As long as you shape your envelope, anything can become an atmosphere.
Let’s look at how to do this in Ableton Live. We are going to use this bass one-shot:
To edit your sample, select a MIDI track, then drag your sample onto it:
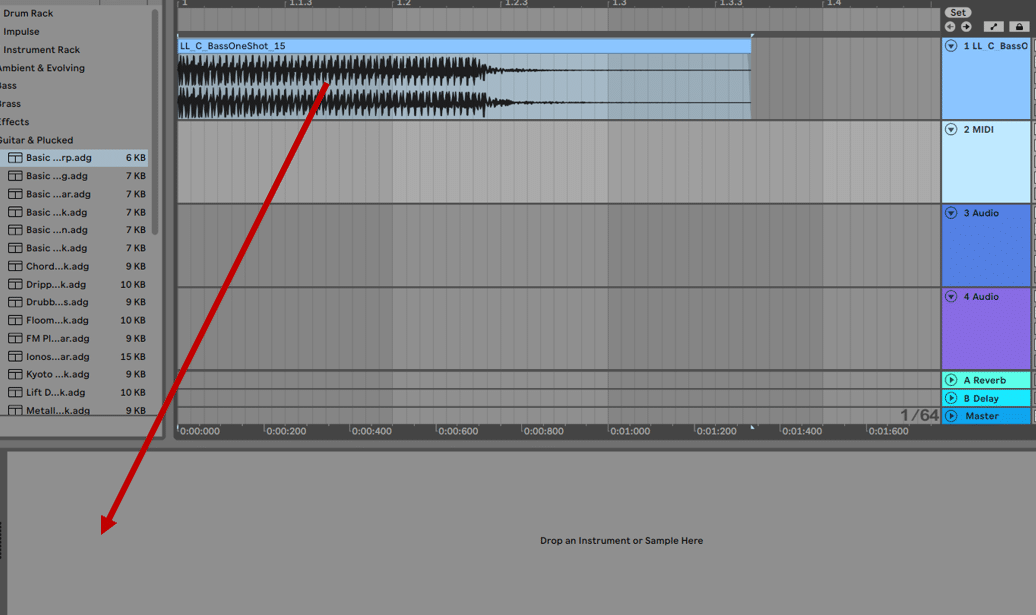
This will open up the sample editor. Here you want to hit “LOOP”, and select a region by sliding the markers:

By adjusting the “Loop” and “Fade” percentages, you will get a smooth sound:
Next, increase the Attack and Release to get that classic pad envelope. Finally, we are going to map some LFOs to create movement:

I’ve mapped a bit of volume, pitch, and low-pass filter. I’ve also set the LFO frequency quite low (1.5 beats):
Nice! Now all we need to do is add some chorus and reverb, and our pad is ready:

Lush 🤩
Method #6: Use Granular Synthesis to Create Synth Pads
Granular synthesis is a topic I rarely see covered.
If you’ve never heard of granular synthesis, you can think of it this way:
Whereas classic synths use oscillators and wavetables, granular synthesizer use samples.
By chopping and re-arranging “grains” of the sample, you get a glitchy sound.
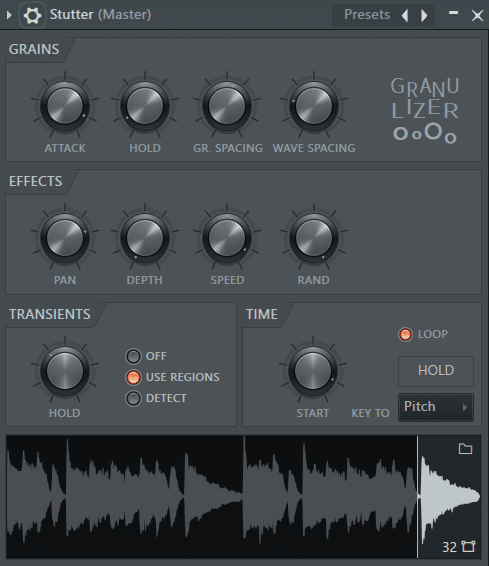
Let’s try this out with a vocal. Load up Fruity Granulizer, and drag a vocal into it. Next, increase the “Random” to 100% and decrease the “Grain Spacing”. We’ve already gone from this:
To this:
If your vocal loop is short, enable “Loop” mode. Finally, increase the “Pan” to 100%. Now, load your favorite Reverb plugin, and you’re done! Here I’ve added Fruity Convolver set to “Pink Noise”:
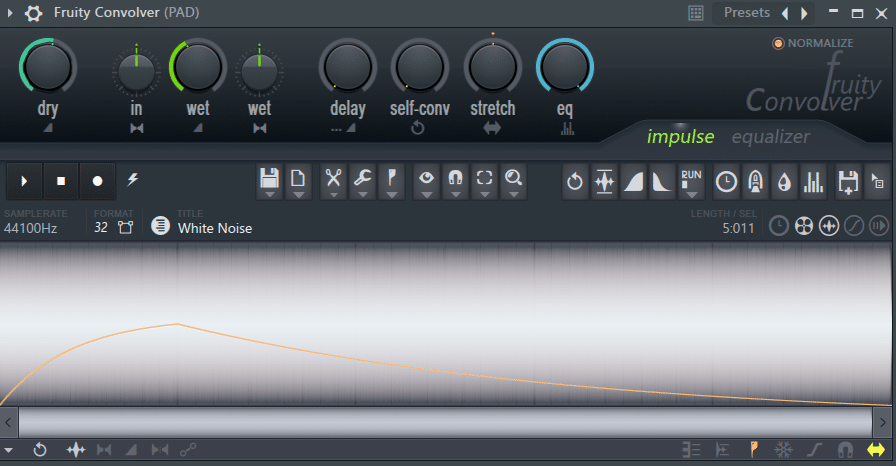
In Ableton Live, you can use Granulator to the same effect:

Method #7: Generate a Random Pad Sequence (Kinda..)
Let’s come back to Vital for a second. One of my favorite hidden features is the Random LFO generator:
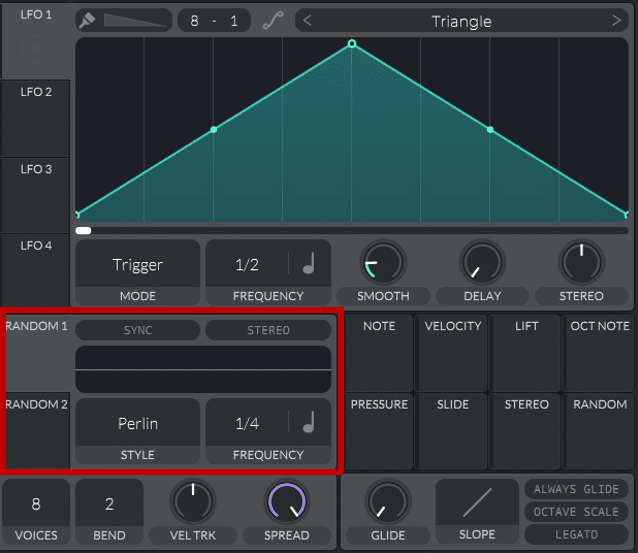
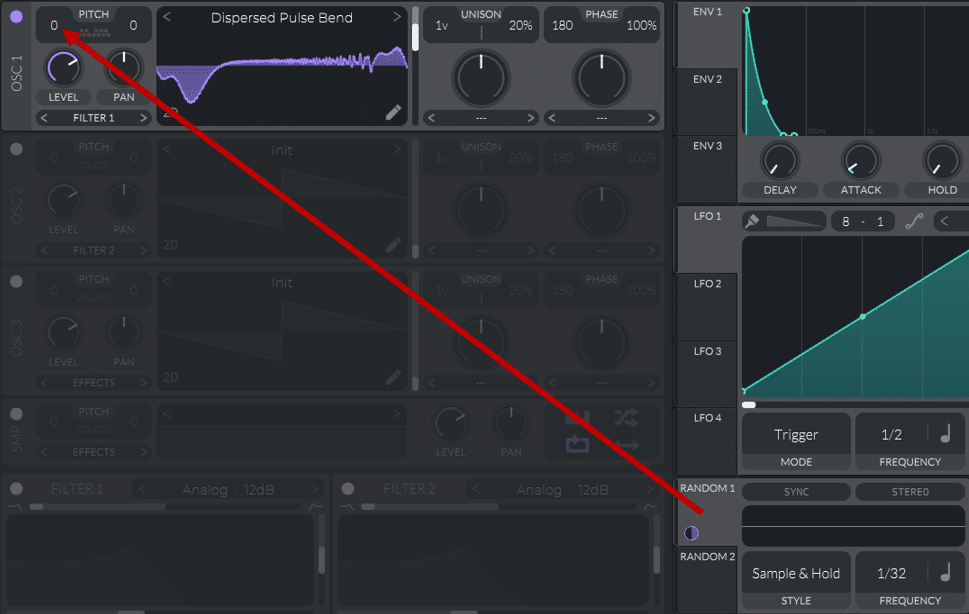
First, set the Style to Sample and Hold. Next, drag the LFO to the pitch of OSC 1:
Next, we want to enable notes within the key of our track. Let’s say our track is in the key of Em. We can enable the notes E, G, A, and B:
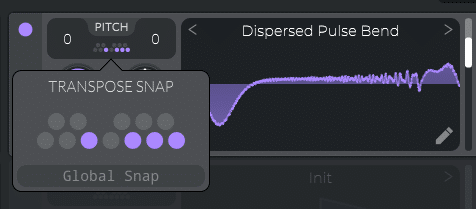
Now, by simply holding a C note, Vital will randomly generate notes within our key:
Now, add a little bit of chorus and reverb, and voila!
This also works great if you have a vocal sample!
Load a vocal sample into the Sampler section of Vital. Then set the “Sample Random Phase” on:
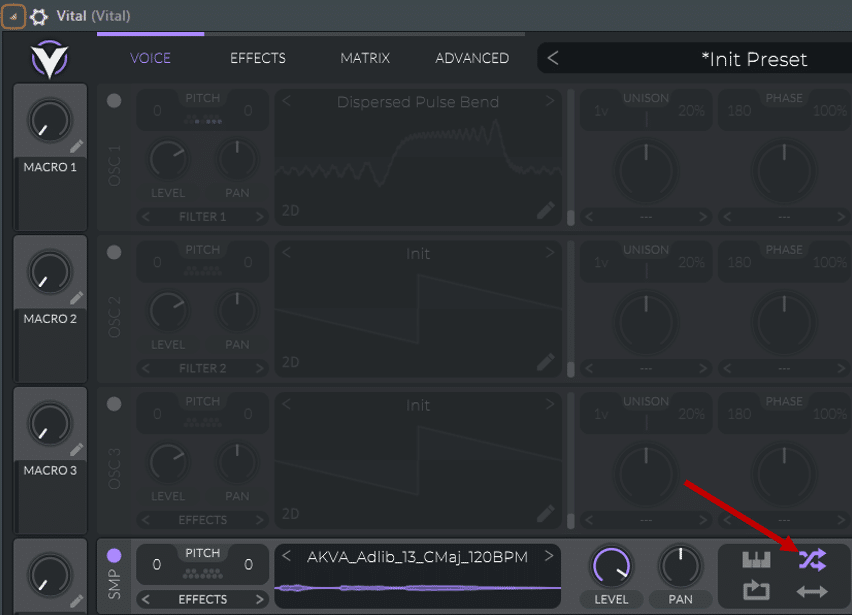
Play a series of C notes, and the sample will trigger at a different point each time!
Personally, this is my favorite way of creating vocal pads 😍
Method #8: Delay and Record
Similarly to reverb, delay can also be used to create lush atmospheres.
Here, try to use a delay plugin with a lot of character.
For example, Soundtoys’s EchoBoy:
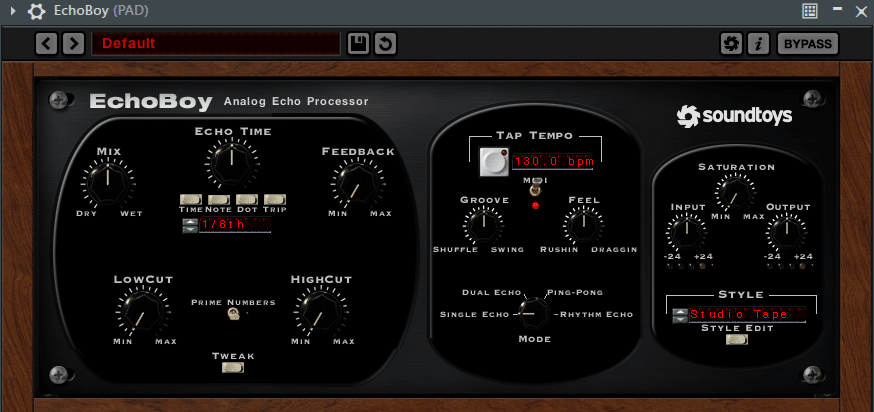
For this to work, turn up the “Dry/Wet”, “Diffusion” and “Size” knobs:
Nice! With the “Mix” knob, you can control how much movement you want in your pad.
Here’s another example, using the “Octave Chopper” preset:
Another cool technique is to stack 3 or 4 delay units.
For this to work, make sure you put a limiter on your master channel. Things can quickly get out of hand!
Play with the settings of each delay until you get a nice, thick sound:
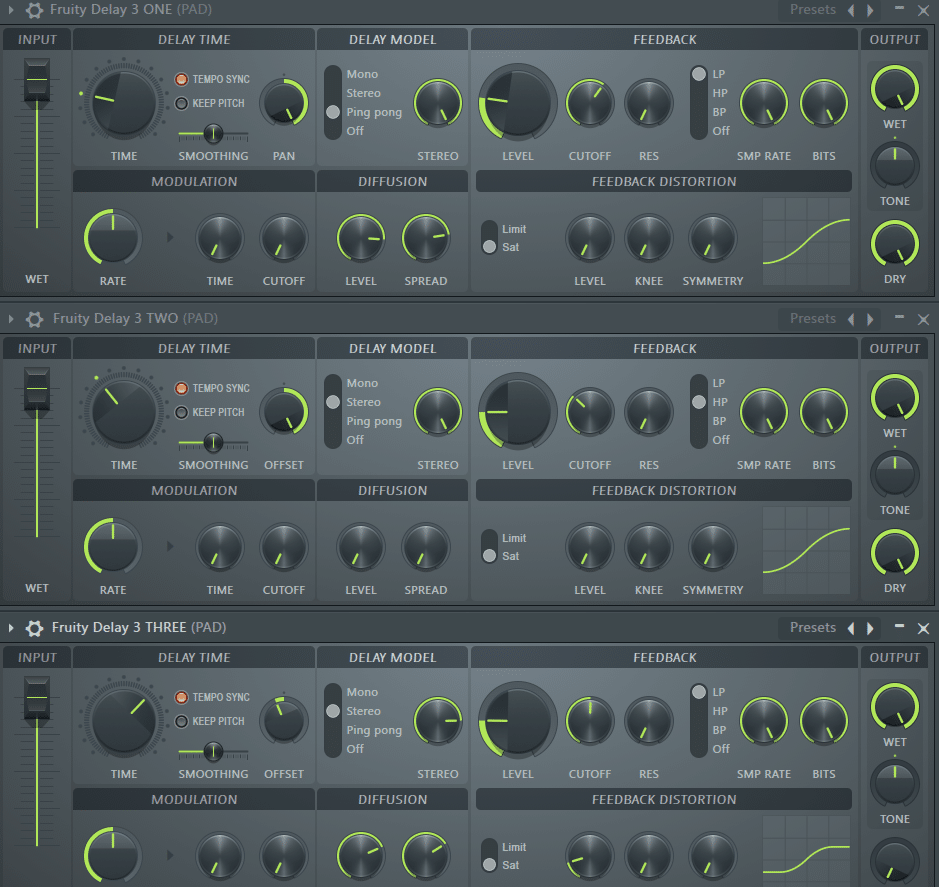
That’s how I went from this:
To this:
Method #9: Find Good Samples 😊
Last but not least, let’s not forget sample packs.
Thousand of producers have spent countless hours designing pads. So why not use them?
However, be mindful of processing them a bit. Reverse, saturate, filter, and volume automation… Make sure to make those samples… yours!
If you’re looking for some free sample packs, check out these from EDMProd:
And remember – anything can become a pad! 😉
Here’s a quick recap on how to achieve great synth pads:
- Increase the attack and release of the envelope
- Create a thicker sound with unison and chorus
- Add movement with LFOs. Modulate the filters, wavetable positions, and volume to start with.
- Add reverb, delay, and any other effect that will “drown out” your sound
That’s It For This Guide!
That’s it for this guide! Hopefully, you were inspired to create new, lush atmospheres for your tracks 😊
Any specific techniques that you wanted me to cover? Let me know over at [email protected] and we might do a Part 2!


