FM synthesis might sound like a scary topic to you. Or you might think that it’s only good for those Brostep bass growls.
However, FM synthesis is an essential building block of sound design. And although it might seem overwhelming initially, it doesn’t have to be that way.
This is why we’ve made this guide for you! Together we’ll run through:
- What FM synthesis is
- How it differs from other forms of synthesis like subtractive and wavetable synthesis
- The basic parameters when working with FM synthesis
- How to design your very first sounds
Let’s dive in! 👇
What is FM Synthesis? 🤔
FM synthesis stands for Frequency Modulation Synthesis.
As the name suggests, it’s a “form of sound synthesis whereby the frequency of a waveform is changed by modulating its frequency”.
As you probably know, the frequency of a waveform is what determines its pitch:

In this example, the waveform on the left will translate into a lower pitch than the second waveform.
However, waveforms can have a second purpose. Instead of being perceived as sound, they can be used to modulate parameters.
If you’ve played with the LFO section of any synth, you know what I’m talking about. Let’s look at a quick example:
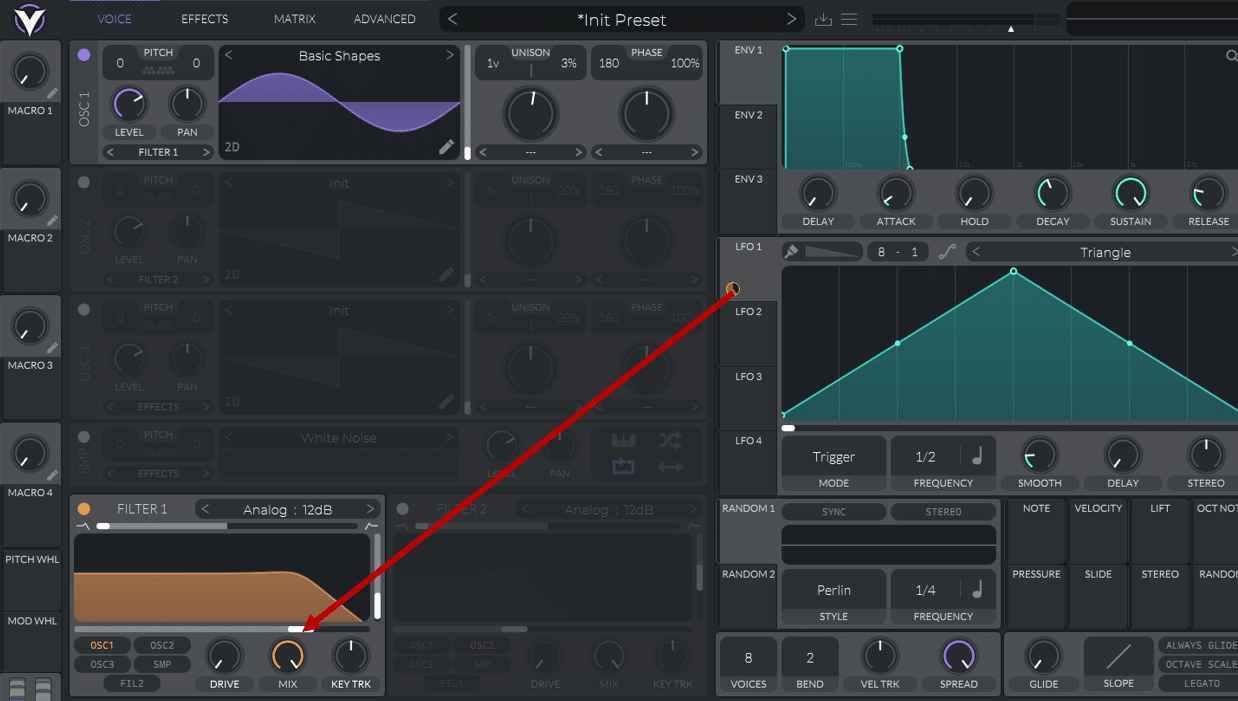
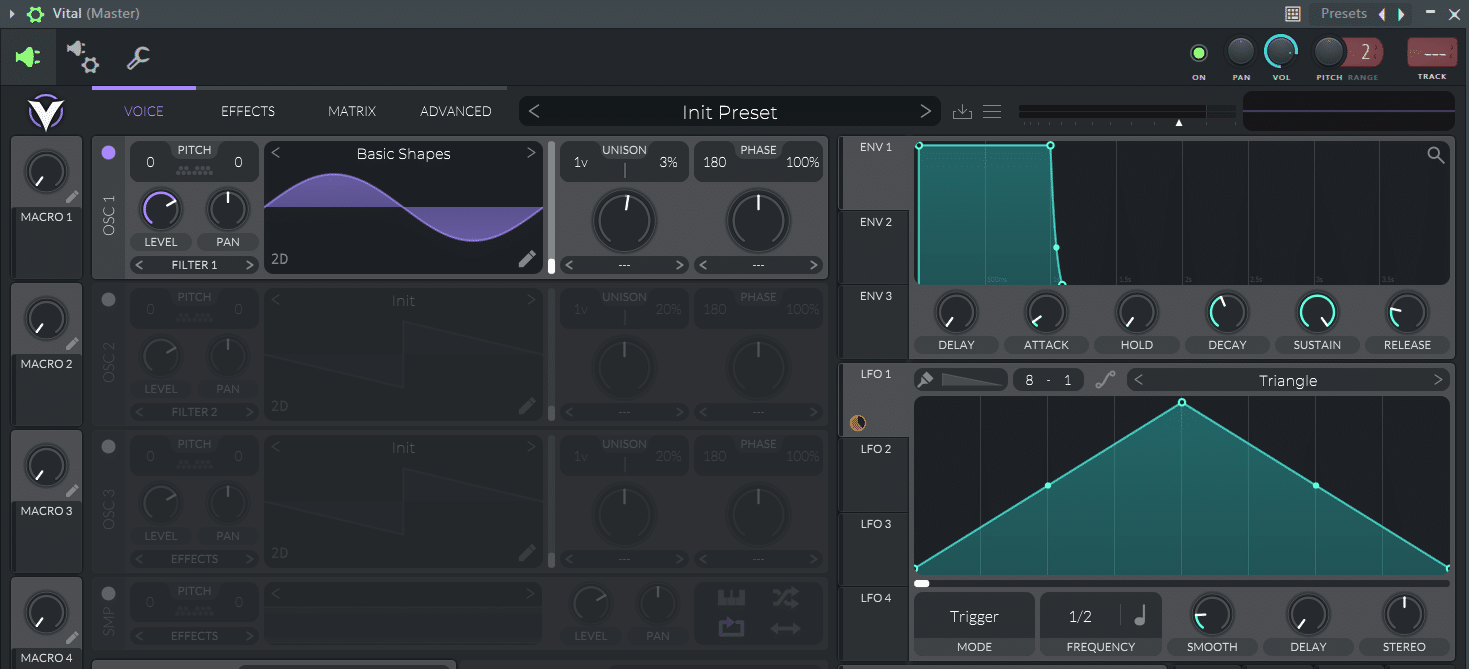
I have a sine wave playing in OSC 1. Then, I use a triangle waveform in LFO 1 to modulate the cutoff of Filter 1. This is what it sounds like:
Instead of using the triangle to generate sound, I use it to modulate a parameter. In this case, the cutoff of my filter is changing over time according to that triangle waveform. This is the concept behind LFOs.
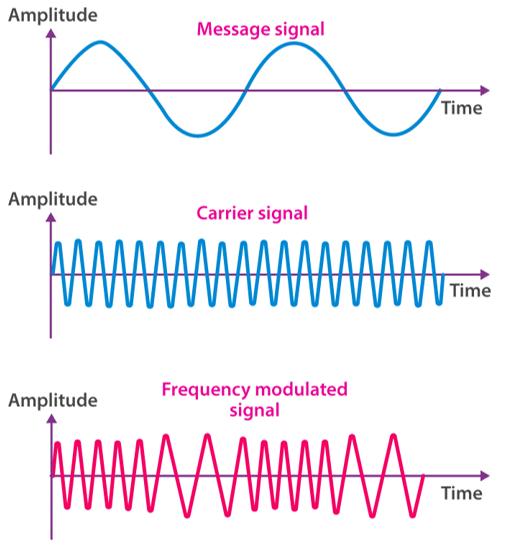
Now, what if we use the same principle to modulate the frequency of OSC 1? That’s the fundamental principle behind FM synthesis.
Essentially, we use a waveform to module the frequency of another waveform. We can even cascade this, with multiple waveforms modulating each other. This can create quite insane results… but more on that later 😉
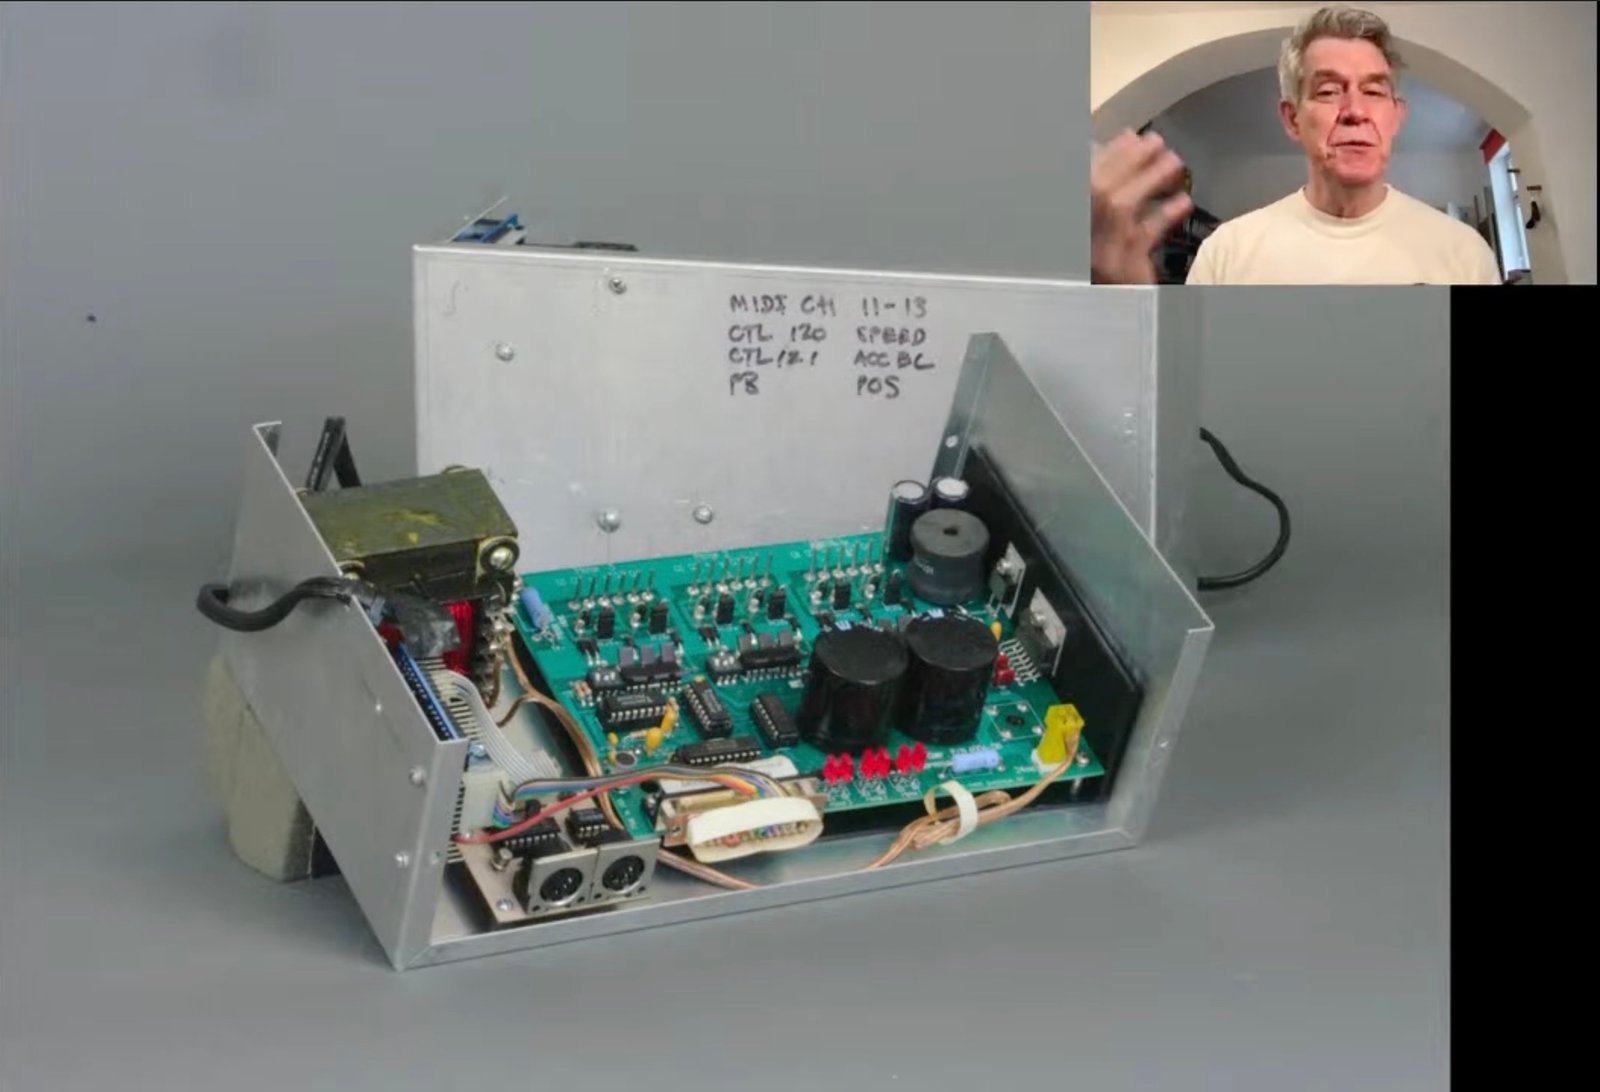
In 1974, Yamaha developed its first FM digital synthesizer prototype. It went on to release it commercially as the Yamaha GS-1 in 1980:

Yamaha then went on to release the DX7, one of the most popular FM synthesizers:

Fun fact: the DX7 was actually the first fully-digital synthesizer!
FM synthesis is often described as having a more “metallic” or “glassy” sound than other forms of synthesis.
What’s the Difference between FM Synthesis and Other Types of Synthesis? 🎹
It’s quite easy to get lost in the world of sound synthesis. So before diving further, let’s do a quick recap on what separates FM synthesis from the rest.
Wavetable synthesis uses morphing oscillator waves to create sounds. It has become a cornerstone of modern music production. It’s what synths like Serum and Vital are based on:
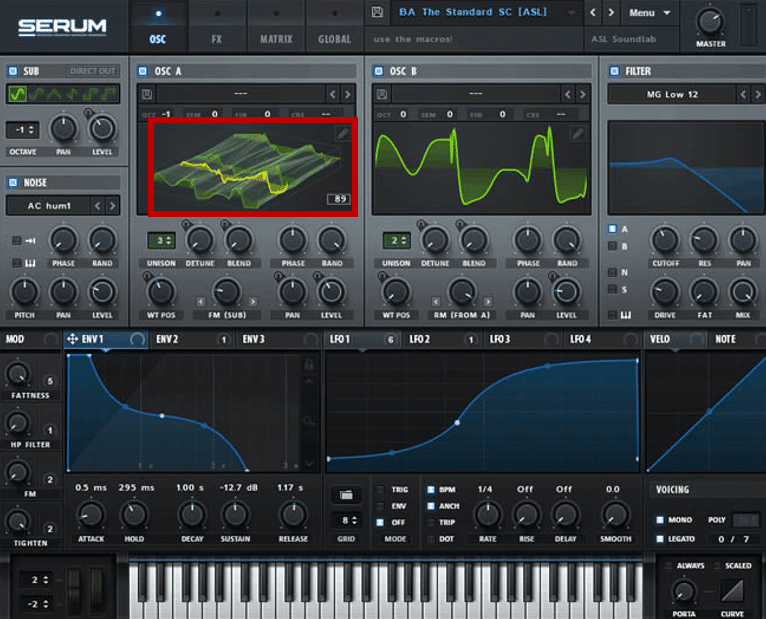
Wavetables store different frames, allowing you to scroll from one wave to the next. This creates a feeling of movement in your sound.
Subtractive synthesis on the other hand is a form of synthesis where parts of a signal rich in harmonics are attenuated with a filter.
By filtering out certain frequencies, you are able to sculpt the sound to your liking:

Finally, granular synthesis uses audio samples instead of waveforms to generate sound.
It slices up those samples into “grains”, rearranging them rapidly into changing patterns:
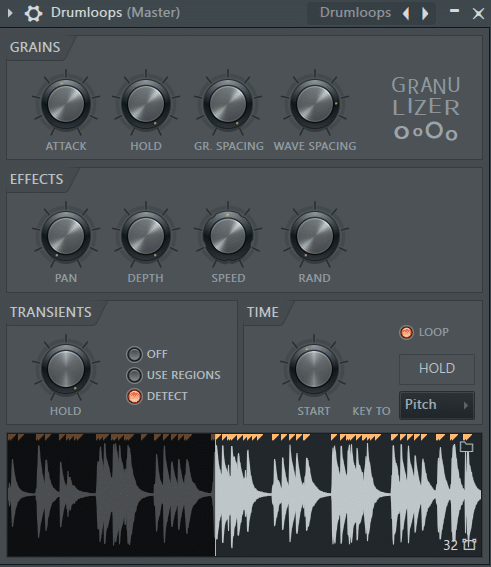
It produces a sound that can be very glitchy, making it popular in genres such as Glitch Hop, Neurofunk, and IDM.
By the way, we have full guides on wavetable, subtractive and granular synthesis 😉
The Basics of FM Synthesis 🧐
Now that we know what FM synthesis is, let’s see how it works under the hood. As mentioned, the basic principle of FM Synthesis is “oscillators modulating other oscillators”.
But there’s a bit more to it than that – so let’s dive deeper 👇
By the way, I’ll be using Vital for all of these examples. It’s free and awesome and you should definitely grab it.
FM Synthesis Terminology 📖
The world of FM synthesis uses specific terminology to describe the whole process. So let’s go over some of the key terms you need to know.
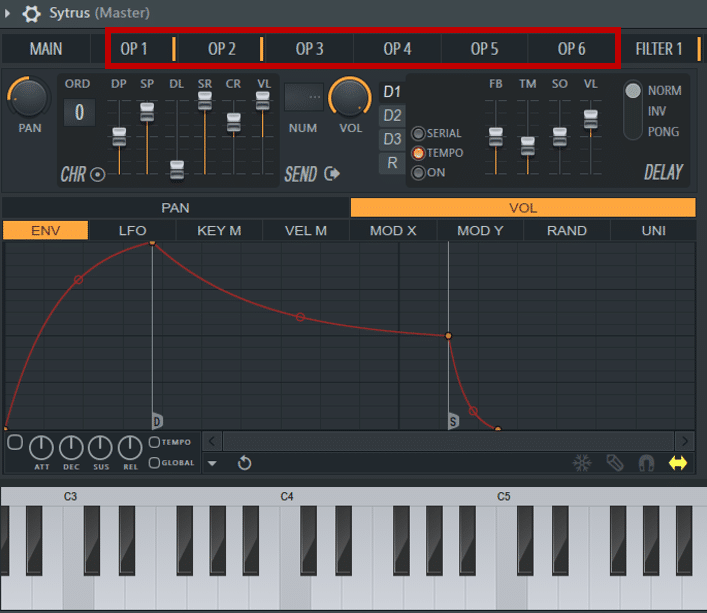
Firstly, the oscillators used to generate and modulate sound are called operators.
That’s why Ableton Live’s FM synth is called… Operator 😅 You’ll also see the term “operator” in FL Studio’s Sytrus:
The operator used to actually generate the sound is called a carrier.
But if the operator is used to modulate a sound, then it’s called… a modulator!
The specific order of carriers and modulators and how they interact is referred to as the algorithm.
Finally, the ratio (or harmonic ratio) is the relationship between the frequencies of the operators.
For example, a wave at 440 Hz modulated by a wave at 880 Hz is a ratio of 2:1. This is what determines if our sound will be harmonic or inharmonic. Or in other words, if it sounds musical or not.
Wanna design your first FM sounds straight away? Check out our video down here 👇
Creating your first FM patch 😎
Next, let’s look at how to create our first FM patch. If you haven’t yet, make sure you’ve downloaded Vital to follow along.
We are going to start with a basic sine wave in OSC1.
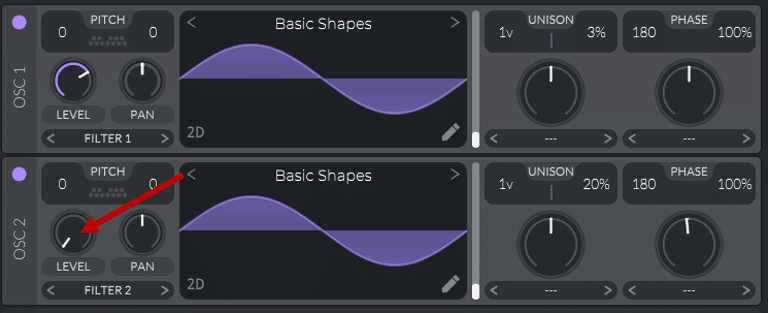
Next, load up another sine wave in OSC2 and turn the level all the way down:
Next, under the Phase section of OSC1, select “FM OSC 2”:
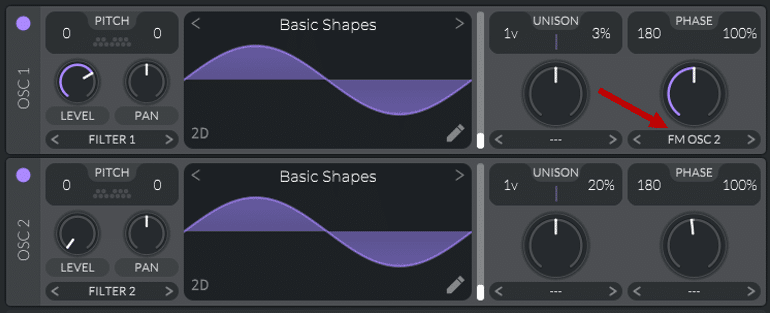
Congratulations, you just created your first FM sound!
OSC 2 is now modulating the frequency of OSC 1. You can control the amount of modulation happening with the Amount knob. This will result in different sounds:
We can refine the sound a bit more by applying some envelope shaping. I am going to draw the following shape in ENV 1 and apply it to the FM amount:
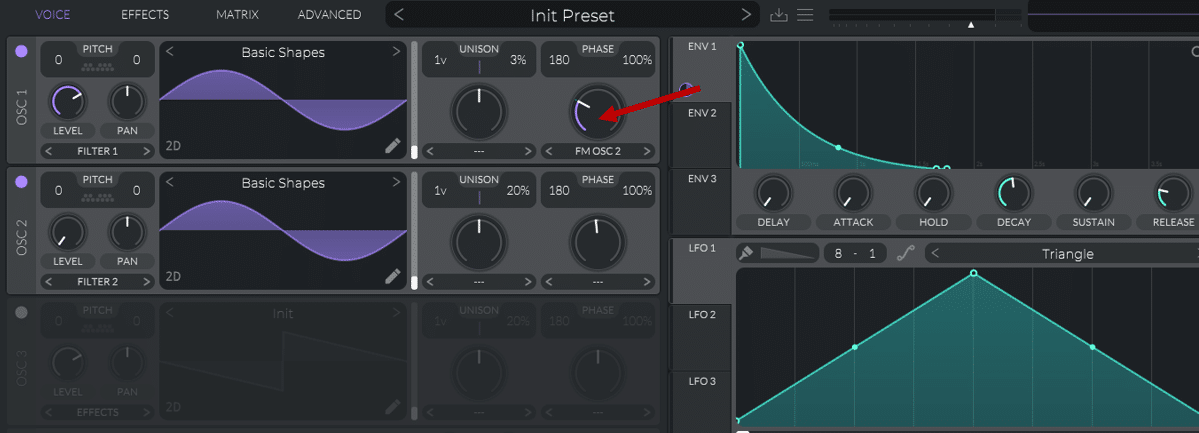
This gives me a more “plucky” sound:
A quick word on Ring and Phase modulation ❗
Along your FM synthesis journey, you might come across the terms Ring Modulation and Phase Modulation. Let’s quickly go over them to avoid any confusion.
Phase Modulation (or PM) is essentially the same thing as Frequency Modulation (FM).
Although the science behind it is slightly different, you can think of them as identical.
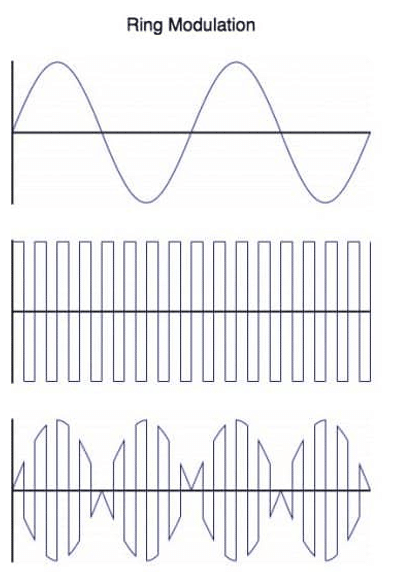
Ring Modulation on the other hand combines two audio signals to create an entirely new sound. The resulting output signal will be a combination of these two frequencies.
Although they are different, Frequency and Ring modulation work on very similar concepts. That’s why you’ll find both options in Vital:
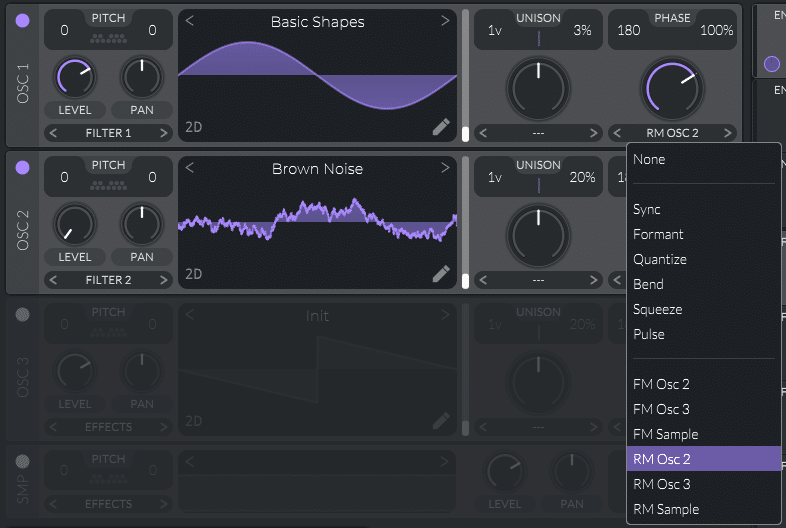
In Vital, you can choose Frequency or Ring Modulation from any other oscillator or sampler. For the purpose of this guide, you can experiment with both to achieve different results 😊
FM Synthesis: Design Your First Sounds
Now that we understand how FM synthesis works, let’s start designing our first sounds! I’ll be referring a lot to LFOs here, so make sure you’ve checked out our guide on the topic here 🔥
The Bass Growl 🦁
For this sound, we are going to load up the following waveforms into OSC 1 and 2:
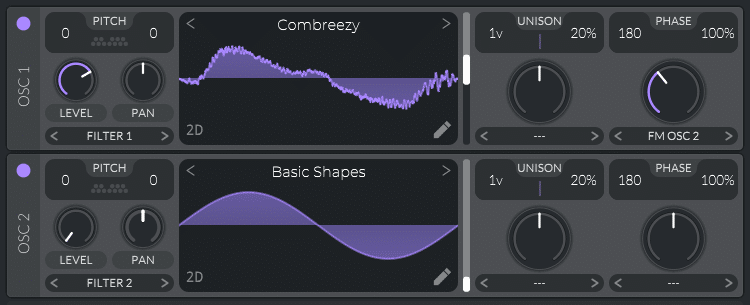
Next, set the Level of OSC 2 to 0, and select FM OSC 2 in the Phase section of OSC 1. Our sine wave is now modulating the frequency of OSC 1!
This is what it sounds like:
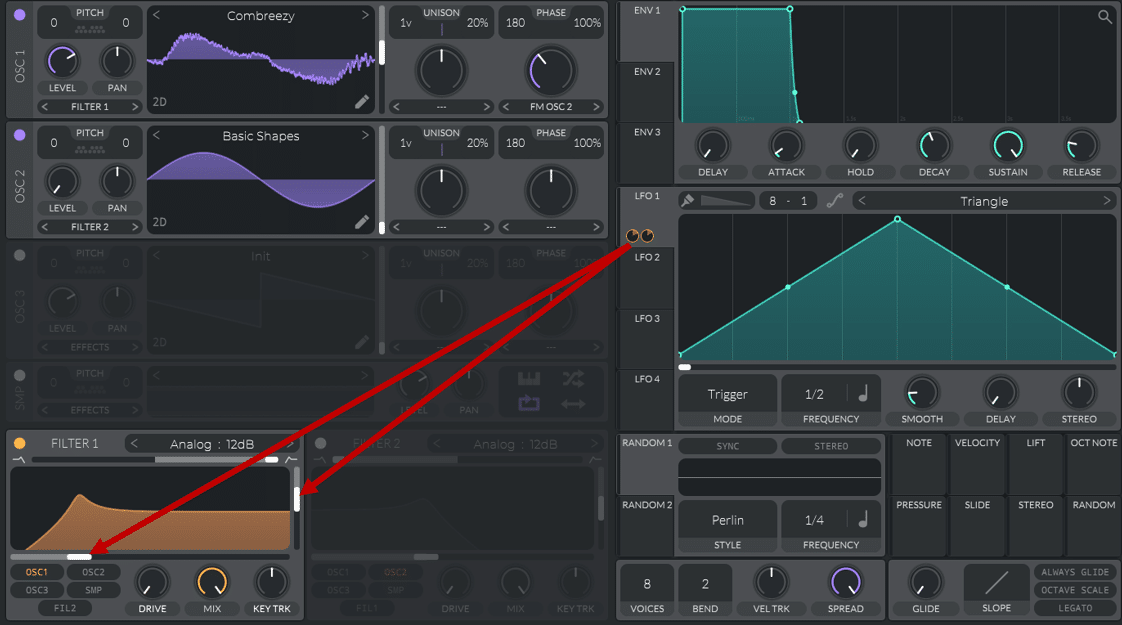
Next, set the Phase Randomization to 0 on both oscillators. Enable Filter 1 and set it to a high-pass filter. Now, enable LFO 1 and drag it to the cutoff and the resonance of Filter 1:
You can also drag LFO 1 to the level of OSC 1, and change its shape slightly:
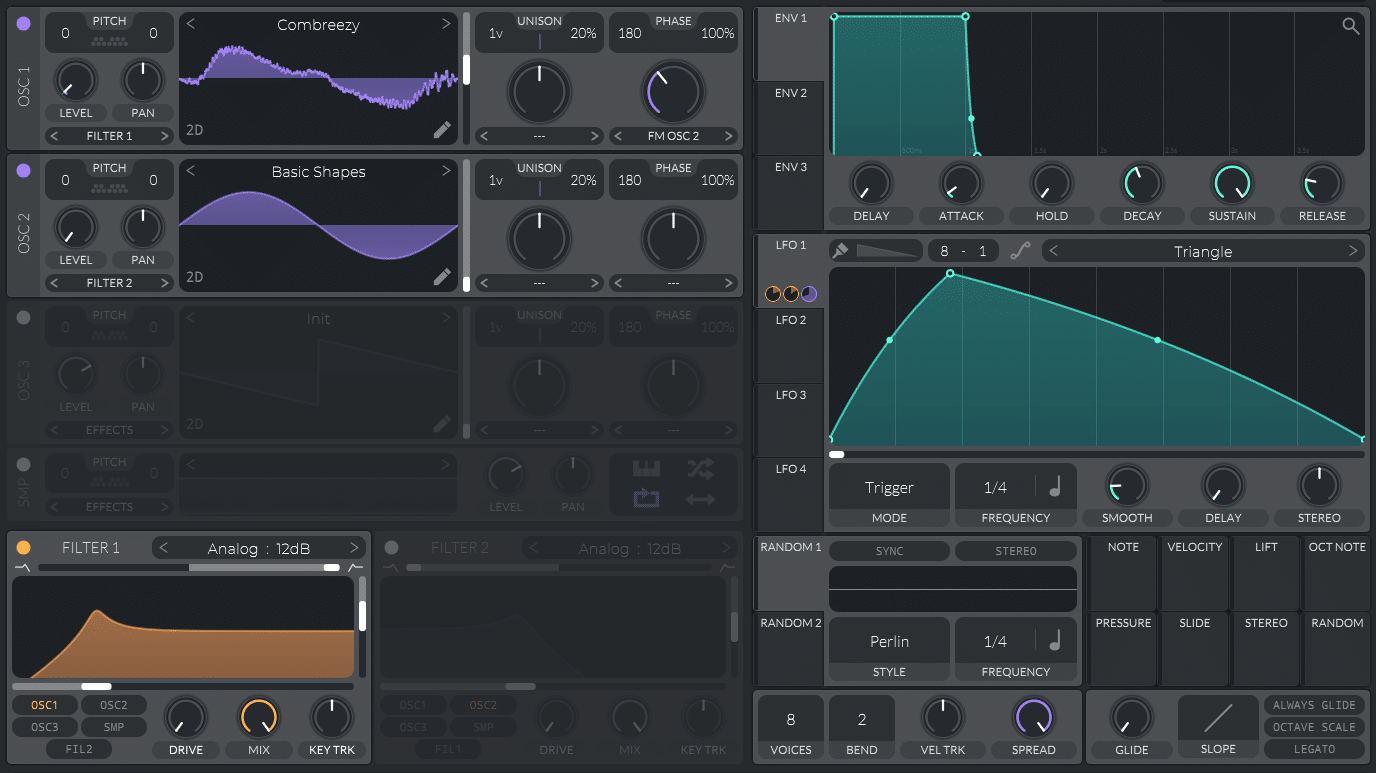
This is what you should have now:
Getting closer!
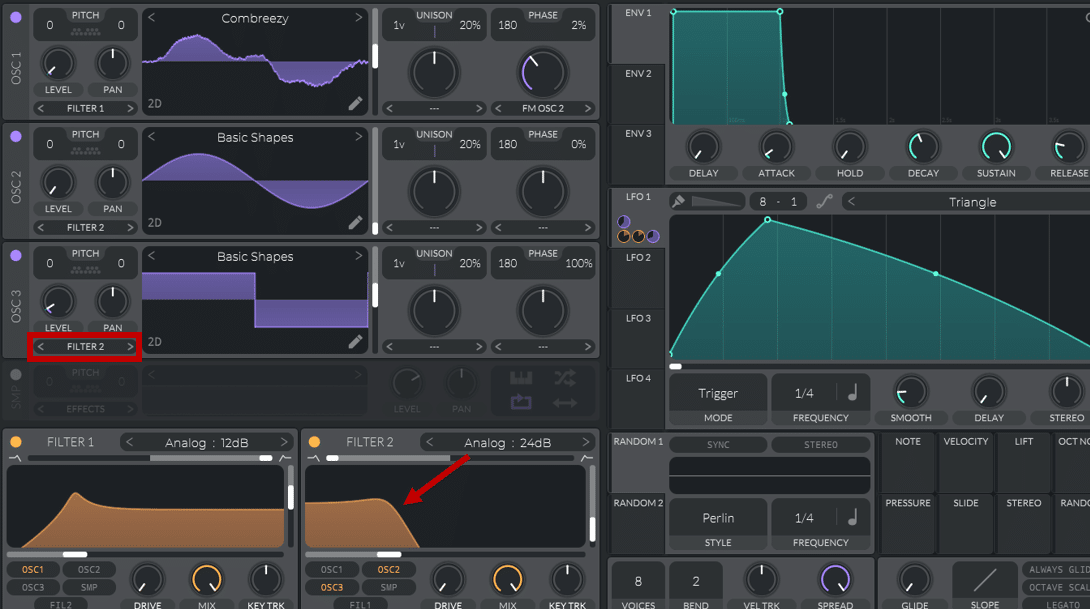
Next, we are going to use OSC 3 as our sub.
Set OSC 3 to a square wave, and apply LFO 1 to its level. Route it directly to Filter 2 and set it to a low-pass like such:
Finally, make sure to route LFO 1 to the amount of frequency modulation on OSC 1.
And that’s it!
We can do the usual post-processing with chorus, compression, and distortion to get a more aggressive sound.
You can also switch between waveforms in OSC 1 to get different results:
If you want a more in-depth look at how to create this and other cool bass sounds, check out our full guide here!
The Frozen Pad ❄️
Next, let’s look at how to create some awesome pads with FM synthesis. This is the sound we are going to design:
Beautiful 😍
To start off, let’s set our oscillators. We are going to choose the following:
- OSC 1: Sine wave
- OSC 2: Acid Rock
- OSC 3: Sine Wave
- SMP: Pink Noise
Set the levels of both OSC 2 and 3 to zero. These are going to be our modulators. Drop OSC 2 by 12 semitones.
Next, we are going to set OSC 1 to be modulated by OSC 2, and OSC 2 by OSC 3:
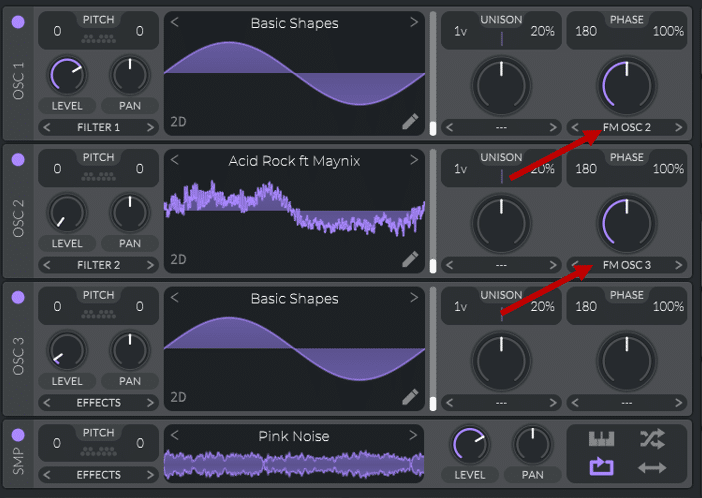
Now for some movement… We are going to assign some LFOs! In LFO 1, draw in the following shape:
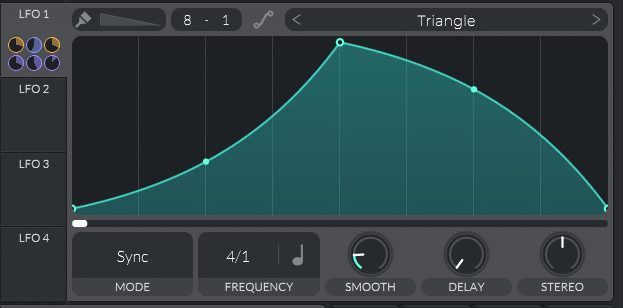
Make sure to set the frequency quite low compared to your project. We want to create some slow, evolving sounds here!
Next, assign this LFO to as many parameters as you want. Here are some examples:
- FM amount of OSC 1 and 2
- The cutoff frequency of Filter 1 and 2
- OSC 2 frame selection
- Amount of reverb mix
In this example, I’ve set Filter 1 to a low-pass, and Filter 2 to a high-pass. OSC 1 is routed only to Filter 1, and the SMP to Filter 2:

I’ve also added some reverb and delay.
Finally, draw in a “pad-like” envelope in ENV 1:
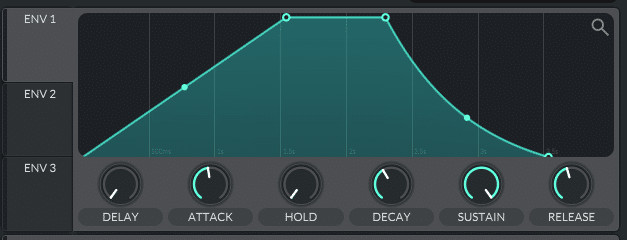
You might need to play a bit with the amount of FM modulation. FM synthesis can be quite aggressive, so just a small amount is often enough.

The Jump Up Lead 🤸
Finally, let’s have a look at how to design a Jump Up Lead!
While this sound is particularly popular within drum and bass, it can be imported into any genre.
First, set OSC 1 to a sine wave, and drop it down 3 octaves. Next, set OSC 2 to something resembling a sine wave. You can pick whatever you want and switch it out later.
Turn the level of OSC 2 all the way down, and set OSC 1 to be modulated by the frequency of OSC 2:
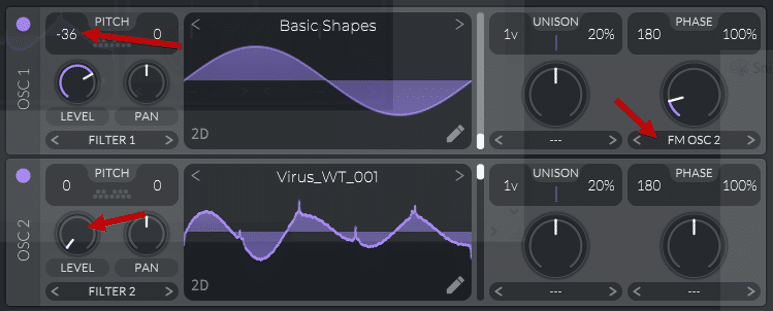
Next, draw the following shape in LFO 1:
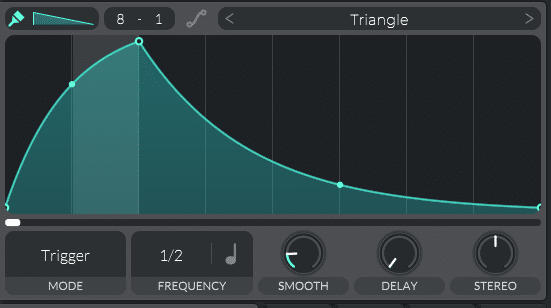
Drag it to both the level of OSC 1 and the Frequency Modulation amount. Enable Filter 1, set it to a high-pass, and assign LFO 1 to the cutoff. For now, you should have something like this:
The wavetable you pick for OSC 2 has a big impact on your final sound. So you might need to experiment a bit.
Play around with the amount of LFO on each knob as well.
Next, enable the SMP and set it to white noise. Send it to Filter 2 only, and assign LFO 1 to the level:
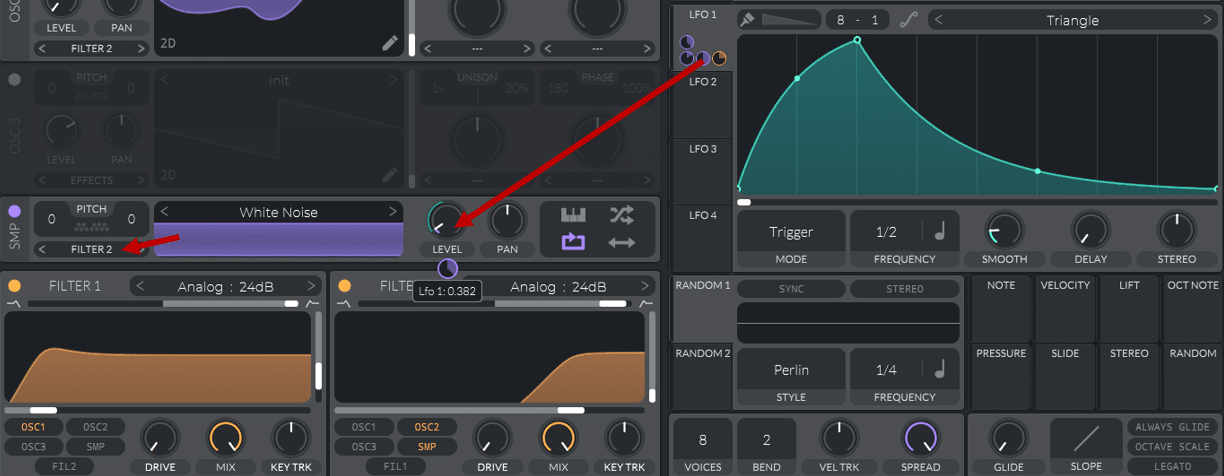
Now for some post-processing! First off, I’m going to set some multiband compression and distortion:
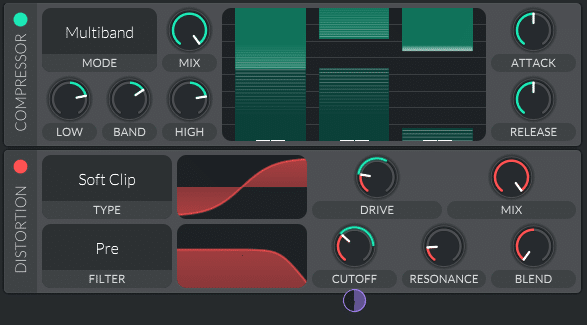
Note that I have assigned LFO 1 to both the drive and cutoff frequency of the distortion. This gives me a nice crunchy sound:
Finally, we are going to round this off with a bit of EQ’ing and filtering:
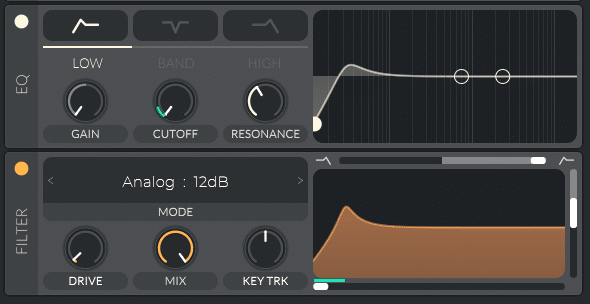
Again, LFO 1 is assigned to the cutoff of both the EQ and the filter. And that’s about it!
Playing with the amount of LFO will vastly change the sound you get. So once you have the basic setup in place, feel free to experiment to achieve new sounds.
That’s it for FM Synthesis! 🙏
Hopefully, you will now have a better grasp of FM synthesis and its potential.
If you want to improve your overall sound design techniques, make sure to check out our Breakthrough Sound Design course!
Did I miss out on anything? Feel free to reach out to me over at [email protected]


