Parallel compression can be intimidating for newcomers. I know it was for me when I started out! It sounded like an advanced and obscure technique reserved for elite mixing engineers.
In reality, parallel compression could be the key to bringing your mixes to the next level.
And as you’ll find out, it’s actually quite easy to put into action!
In this guide, we’ll go through:
- What parallel compression is
- How to set it up in your DAW
- Practical examples of when to use it (and when not to)
- The topic of parallel processing in general
- + more!
Let’s dive in! 👇
So What Is Parallel Compression? 🤔
Let’s not beat around the bush: parallel compression isn’t the sexiest topic in electronic music production.
Heck, I much prefer to design new patches in Vital or create weird sounds with bitcrushing.
But over the years, I’ve realized how essential parallel compression is. To the point where I use it in pretty much every one of my tracks…

In the words of the great Andrew Scheps, “once parallel compression is set up, it’s almost like the song starts to mix itself”.
So now that we’ve established that parallel compression is essential… What is it exactly?
Parallel compression is the process of blending a dry signal with a compressed version of the signal.
This is why the term parallel is used. You have essentially two copies of the same signal, and apply compression on only one.
Side note: parallel compression is just one type of compression! If you need a refresher on how compression works, check out our definitive guide over here. And learn more about multi-band compression and side-chain compression here!
Also known as “New-York compression”, parallel compression lets you compress a signal a lot more than you usually would. You can then dial in the exact amount to blend in with the dry signal.
But Wait… Why Do We Parallel Compress?
Great question! Parallel compression has become a widespread mixing technique for several reasons.
Firstly, it allows you to retain the original dynamics while adding punch and aggression.
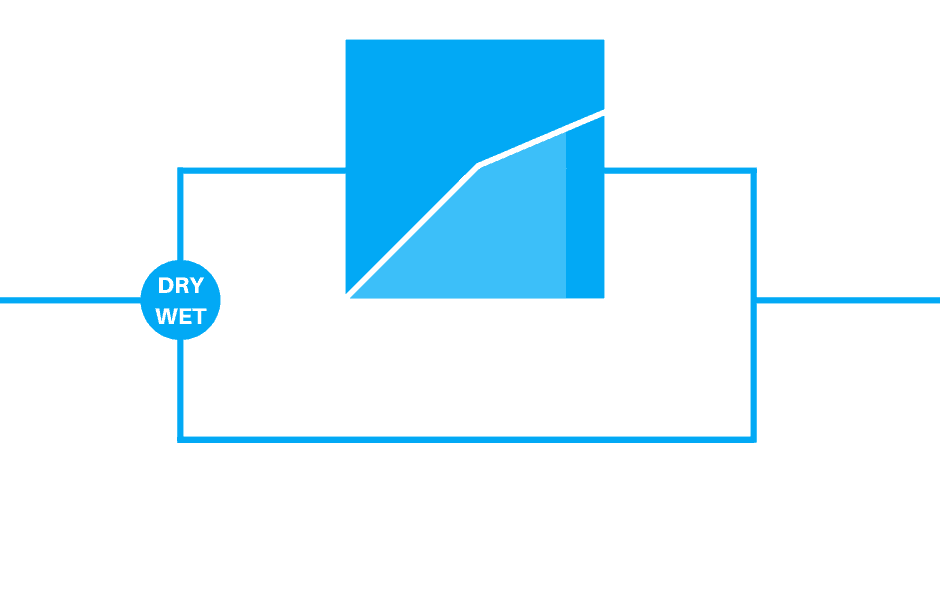
This is especially interesting with vocals, where you want to retain every nuance. Adding too much compression directly on your signal can absolutely ruin the performance.
Parallel compression is a great way to strike that balance between weight and dynamics.
Drums are also one of the most common applications of parallel compression. Getting your beat to punch through the mix while retaining its feel and dynamic can be tricky.
This is where parallel compression can help you achieve the sweet spot!
How to Set Up Parallel Compression
Now that we know what parallel compression is, let’s have a look at how to set it up in our DAWs.
Parallel Compression In FL Studio
Let’s first look at how to set up parallel compression in FL Studio. As usual, there are many ways to skin a cat. The first method I will show you uses the Fruity Send stock plugin.
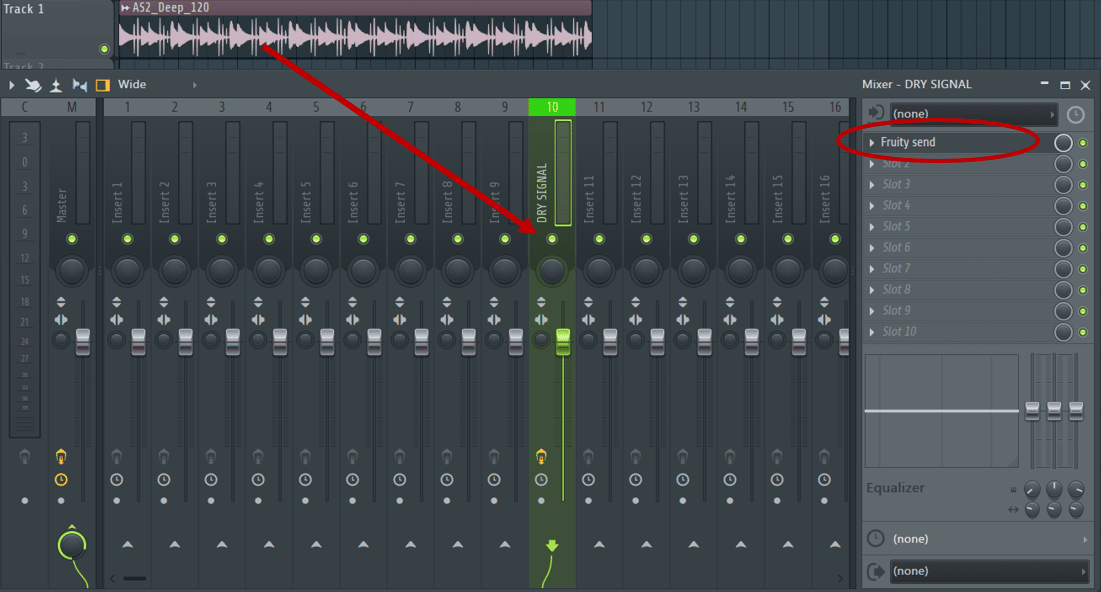
First, route your signal to an empty mixer track. Load up a “Fruity Send” in the first FX slot:
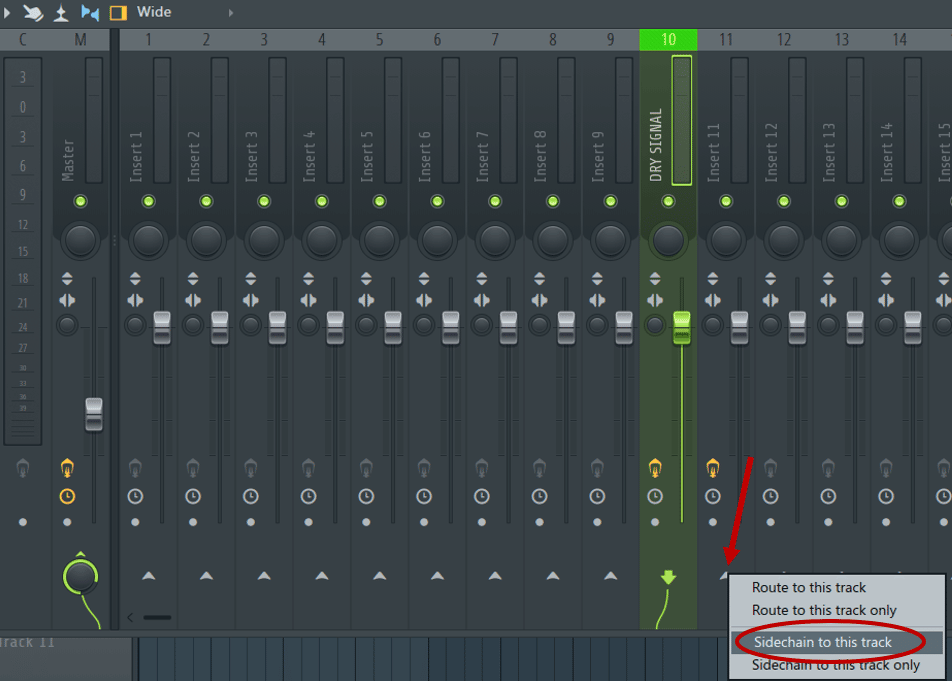
Next, select the dry signal mixer track and hover over the arrow at the bottom of another empty mixer track. Right-click and select “Sidechain to this track”:
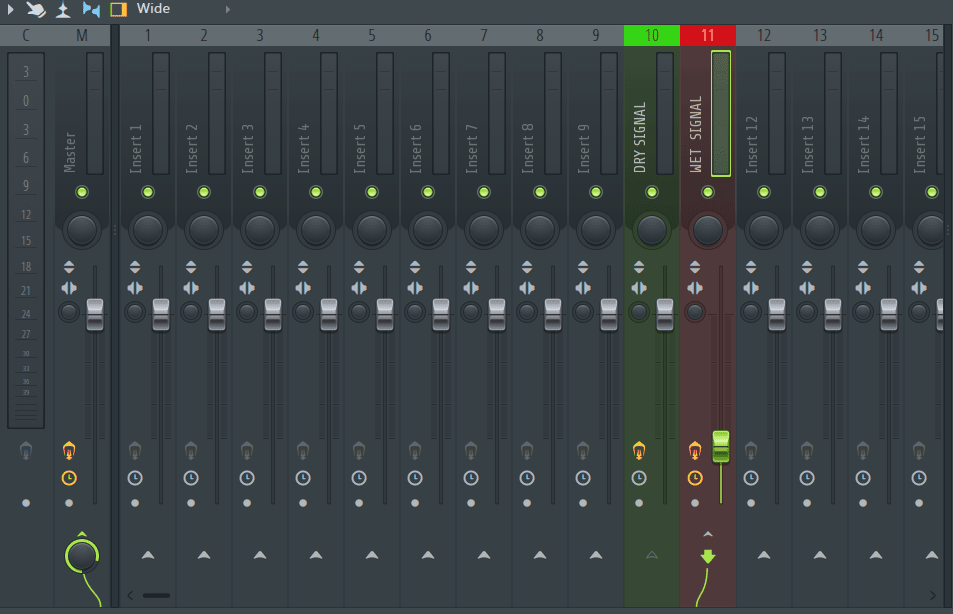
I will rename the “Insert 11” mixer track as “WET SIGNAL”. Now, return to the DRY SIGNAL mixer track. Open up the Fruity Send you loaded previously. Then, under “Send to”, select WET SIGNAL.
Congratulations – you’ve just created a copy of your original signal! Now it’s time to actually process the wet signal. Load up your favorite compressor into the Wet Signal effects chain.
At this stage, I usually like to mute the dry signal. This way I can properly hear the effect of the compressor on my wet signal.
However, some will argue that you should never mute when processing your sounds. This is because you need to hear your effects in the context of the full arrangement.
I’ll let you decide whatever works best for you 😊
In any case, don’t be scared to go overboard with your compression here! Remember, you are going to dial in the right amount of “Wet Signal” at the end.
For reference, this is what my wet signal looks like compared to the dry one:

Finally, unmute the Dry Signal, and use the fader on the Wet Signal to blend to taste. I went with about 30% of compressed signal blended in:
And this is the result:
And there you have it! Your first parallel compression! You’ll notice straight away the loop is now punchier, and the transients are hitting harder.
Another method for parallel compression is to simply copy your track. To do this, paste a copy of your signal into the playlist. Then, click on the waveform and select “Make unique”:
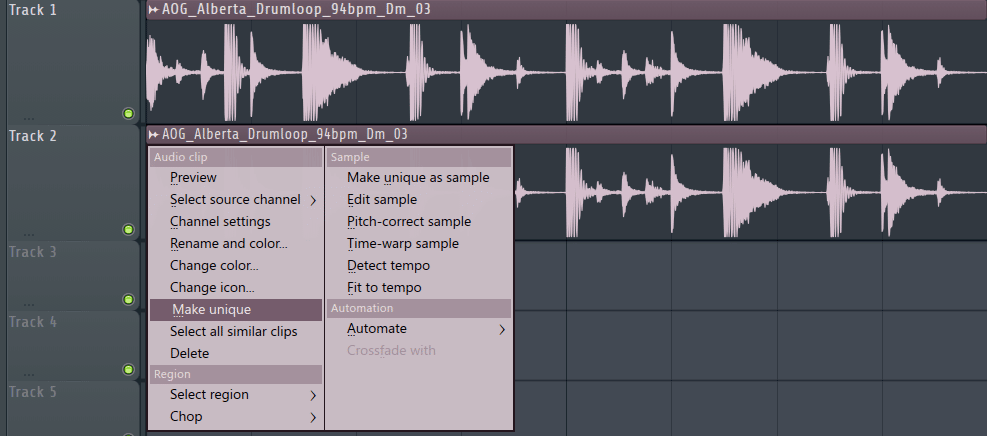
You can now route this copied signal to a new mixer track and proceed to compress. Although slightly quicker, I am not a fan of this method because it tends to clutter my playlist.
Parallel Compression in Ableton Live
Let’s now take a look at how to achieve the same thing in Ableton Live.
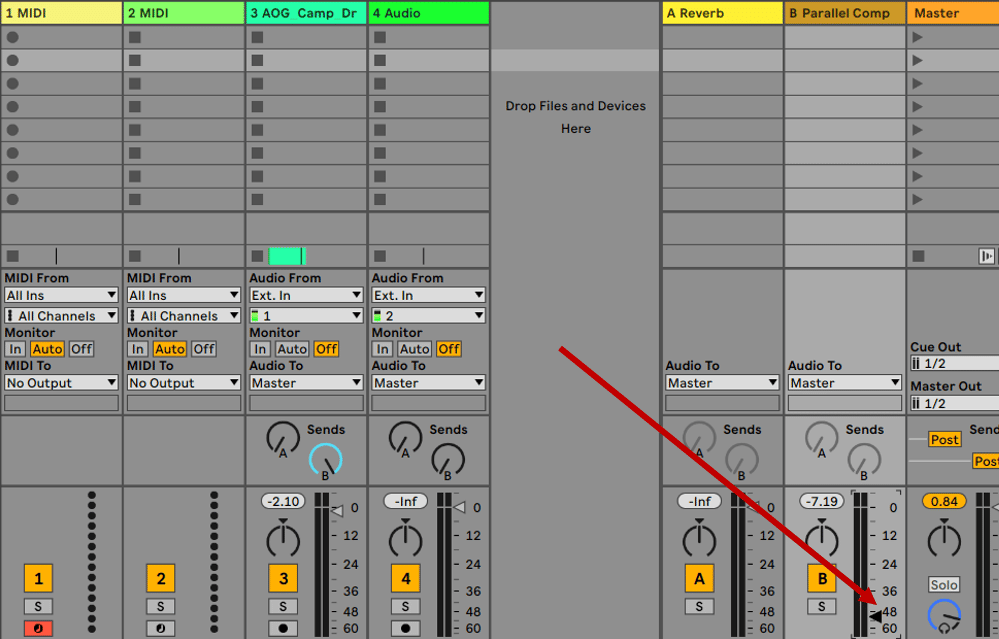
Here I have a drum loop playing in Track 3. First I am going to right-click in the empty space of the Session View Selector, and click on “Insert Return Track”:
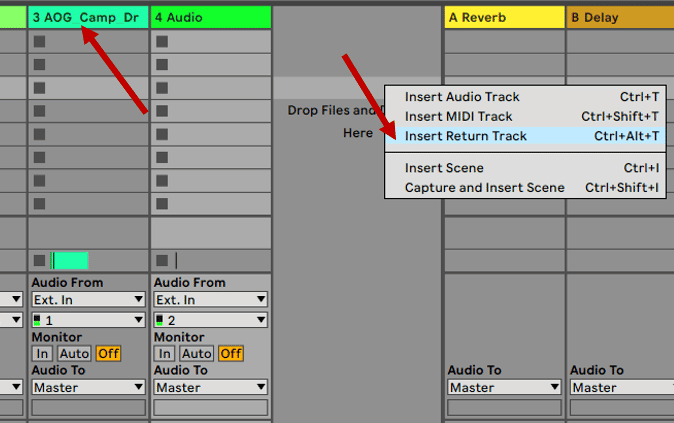
Alternatively, you can use one of the two return tracks already available (Track A Reverb or Track B Delay). If you do so, simply rename either one to “Parallel Compression” for clarity.
I’ve decided to use Track B as my return track. A delay plugin is set up there by default so make sure to remove it.
Under my audio, I am going to turn the Send knob “B” all the way up:
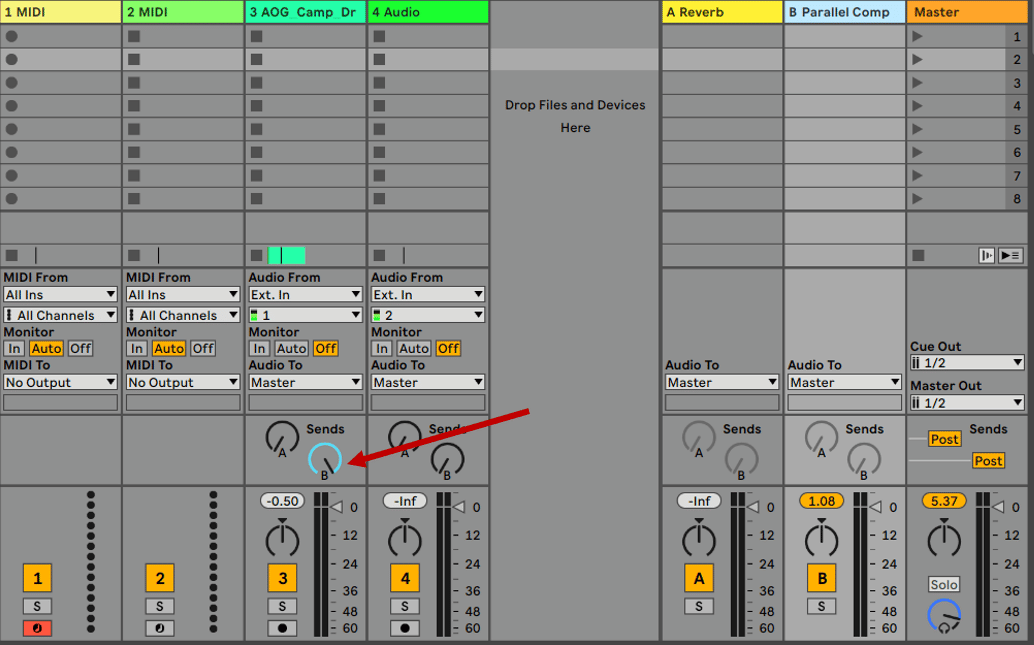
Great, we now have 2 versions of the same signal playing! All we have to do now is apply some compression to the return signal.
I’ve loaded up Ableton’s stock compressor plugin with the following settings:
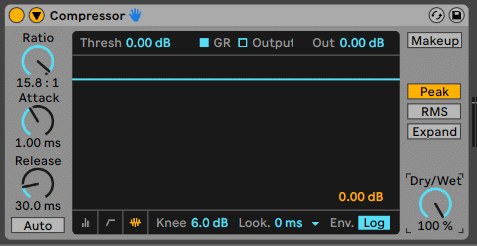
As mentioned before, you can go crazy with the ratio here. In the end, we are going to mix in just the right amount.
Once you’ve set your parameters, dial in the wet signal using the volume fader:
And there you have it, easy parallel compression in Ableton Live!
Now, you might have noticed that Ableton’s compressor has a dry/wet knob. This means you can also put the compressor directly on your audio track.
You can then dial in the amount of compression you want through the dry/wet knob.
An Alternate Method for Parallel Compression in Ableton Live
However, most people (myself included) prefer to use a return + fader to dial in the parallel compression. Personally, I just find it easier when I am mixing my track to play with the faders.
It also gives me a visual representation of my parallel compression, which you don’t have if you use the dry/wet knob option.
Finally, one last option in Ableton Live is to make use of the Audio Effect Rack. First, under the “Utilities” folder, select and drag Audio Effect Rack. Then click on “Show Chain List”:
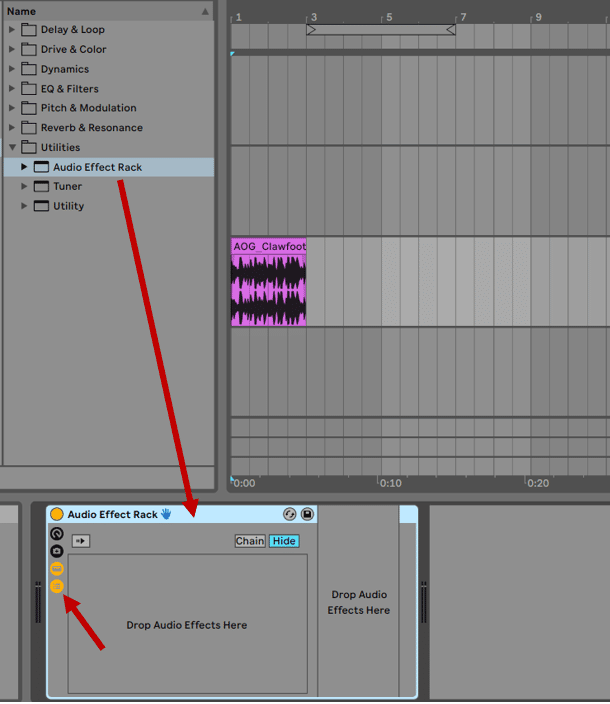
Next, drag a compressor plugin next to the Audio Effect Rack. Finally, right-click in the empty space of the Audio Effect Rack, and click “Create Chain”:
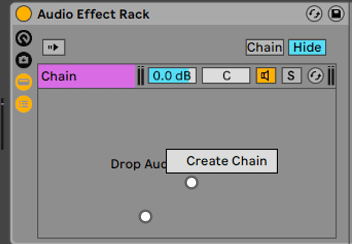
Great, so what have we just done? Essentially, we’ve created 2 chains through which our signal is flowing. The first one is our wet signal on which we added a compressor. The second is our dry signal:

You can also rename each chain for easier reference. To blend in the compressed signal, simply adjust the dB setting of the wet chain. And there you have it, yet another way to do parallel compression!
One Step Further: Parallel Processing!
As I’m sure you’ve already guessed, parallel compression isn’t the end of the story. Once you’ve set up your parallel signal, nothing is stopping you from swapping your compressor for any other effect of your choice!
From here, the possibilities are endless. Reverb, delay, saturation, chorus… Everything goes!
Now let’s look at some common ways of using parallel processing in EDM.
Parallel Saturation on Drums
You often might find that your drums are lacking in character. They are a bit too clean and lack some drive.
Setting up some saturation on a parallel channel is a great way to add so grittiness.
Listen to this example:
In this case, I’ve only added about 15% of wet signal. But you can hear how it brings the loop to life. I also applied some high-pass filtering on the parallel channel. This removes any potential clash of frequencies in the low end.
What I love about this technique is that I can really experiment with saturation. I can reach for settings I wouldn’t normally use and push the saturation to its limits.
Creating a Drums Room Mic
Another comment you might often get is that your drums sound “a bit dry”. Whenever somebody tells you that, what they mean is that your drums lack reverb.
However, adding reverb directly made them sound too washed out.
One solution is to work in parallel to add reverb and width to our drums.
Firstly, set up a parallel signal using your preferred method. Next, load up your favorite reverb unit. Make sure to have a 100% wet signal with a relatively low decay:
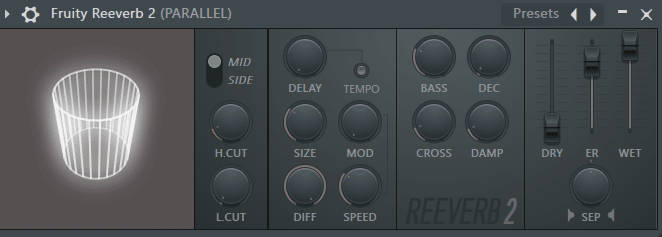
Next, remove all the mid information from the signal.
Need a refresher on all things mid, side, and stereo? Check out this video on our YouTube channel:
Finally, add the free plugin “Wider”, set it to 200%, then add one last EQ and remove the low-end. Your parallel signal should have transformed from this:
… to this:
You can now blend in this parallel signal with the original one!
Notice how the drums sound a lot more alive and spacey now!
Parallel Reverb/Delay on Vocals
As mentioned previously, vocals are a great use case for parallel compression. You want to retain the dynamics of the performance, but you also want them upfront.
However, vocals are also great for parallel processing in general.
This is especially true with reverb. I’m sure you’ve had this happen to you before.
You add too little reverb to your vocals and they sound dry. Then you add too much and they sound washy and distant.
The key lies in … parallel processing! But the true trick here is to use sidechain compression at the same time.
Firstly, set up your parallel channel and apply some reverb with a 100% wet setting.
Then, load up a compressor and use the dry vocal as the trigger. This means that when the vocal is playing, the reverb will duck. When the vocal stops playing, the reverb returns.
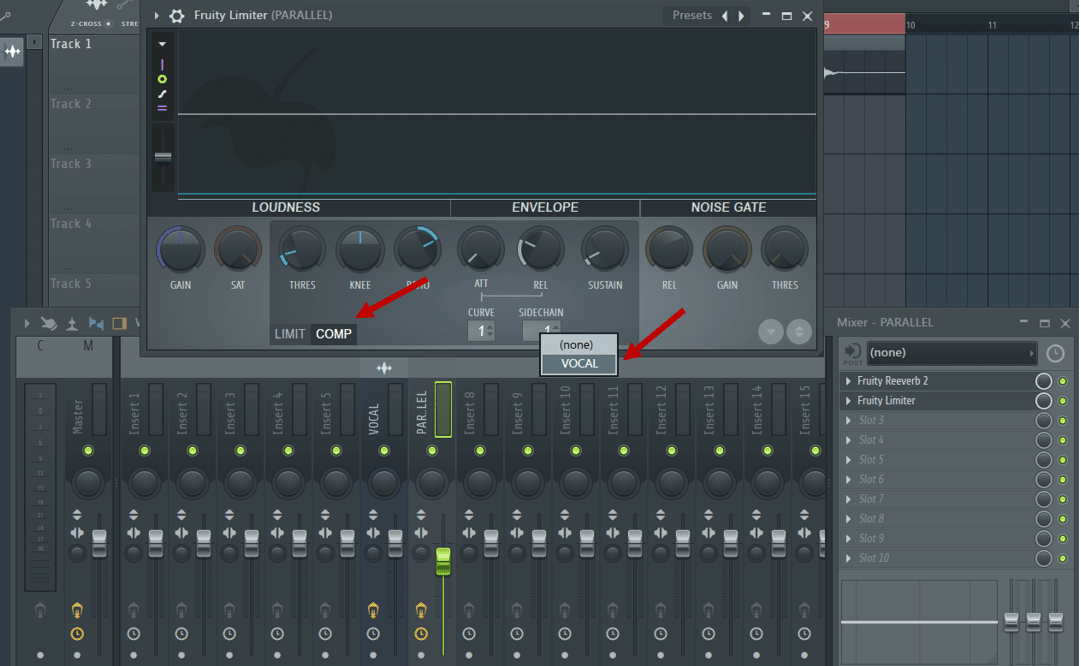
In FL Studio, you can easily do this with Fruity Limiter. Simply load it on the parallel channel, select COMP, and then select your dry signal under “SIDECHAIN”.
This way, you avoid having an ever-present reverb and washed-out vocals!
In Ableton Live, load up a Compressor on your wet signal and enable “Sidechain”:
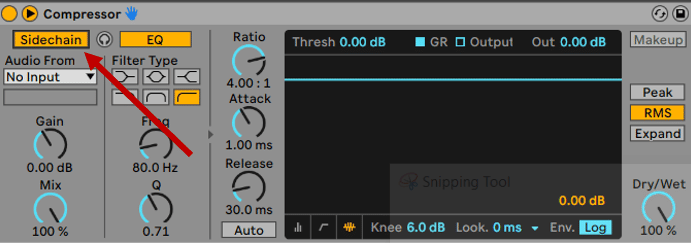
Under “Audio From”, select your dry channel. Make sure your dry/wet knob is set to 100% and that “Makeup” is deactivated.
Apply the desired compression settings, and you’re done!
I find that playing with the release knob is the most crucial part. This will dictate how fast your reverb comes back when the vocal stops.
That’s It For Now!
That’s a wrap for this one. Hope you enjoyed this guide and learned some new tricks to apply to your music!
Did I miss out on anything? Any topics you’d like us to cover? Drop me a line at [email protected]


